리눅스 / 하드디스크 파디션 만들기, 포맷하기, 마운트하기
리눅스에서 하드디스크 파티션 만들고, 포맷 하고, 마운트 하는 방법을 요약한다.
장착된 하드디스크 확인하기
- ls 명령어로 컴퓨터에 장착된 하드디스크 정보를 출력할 수 있다.
- /dev/sda, /dev/sdb 등이 하드디스크, /dev/sda1 등이 파티션이다.
# ls -l /dev/sd*
brw-rw----. 1 root disk 8,  0 Oct 16 13:12 /dev/sda
brw-rw----. 1 root disk 8,  1 Oct 16 13:12 /dev/sda1
brw-rw----. 1 root disk 8,  2 Oct 16 13:12 /dev/sda2
brw-rw----. 1 root disk 8, 16 Oct 16 13:12 /dev/sdb
brw-rw----. 1 root disk 8, 32 Oct 16 13:12 /dev/sdc
- 파일시스템은 df -T 또는 blkid /dev/sd*로 확인할 수 있다. 마운트하지 않는 파티션에 대한 정보까지 알고 싶다면 후자를 사용한다.
파티션 만들기
- 파티션을 관리하는 명령어는 fdisk이다.
- /dev/sdb의 파티션을 관리하고 싶다면 다음과 같이 명령한다.
# fdisk /dev/sdb
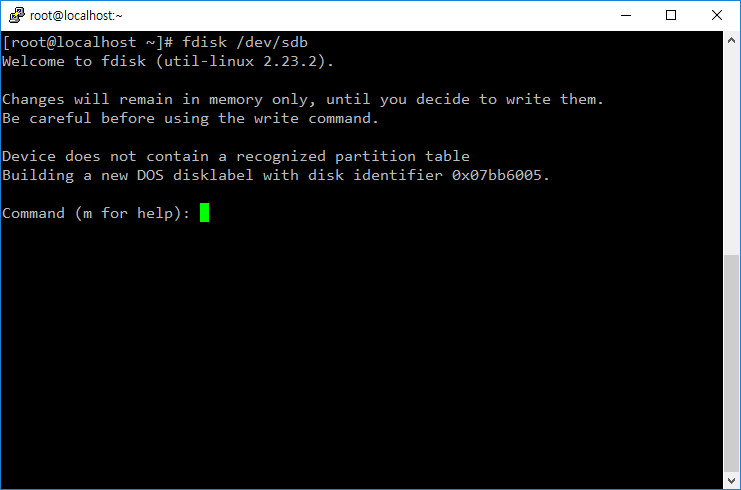
- 도움말이 필요하면 m을 입력한다.
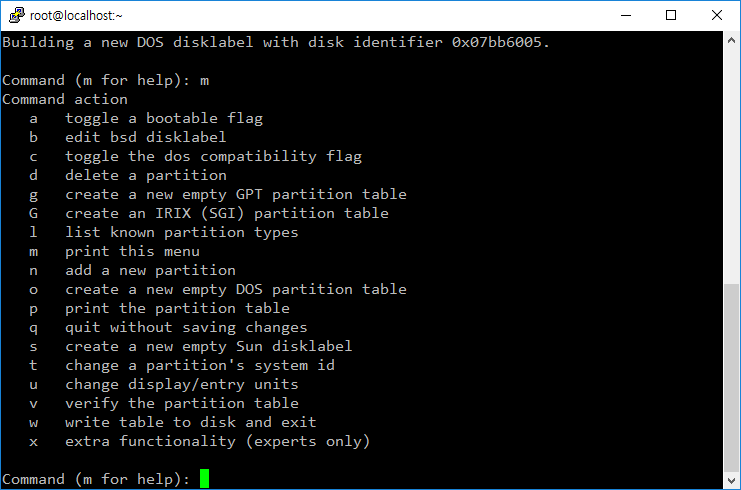
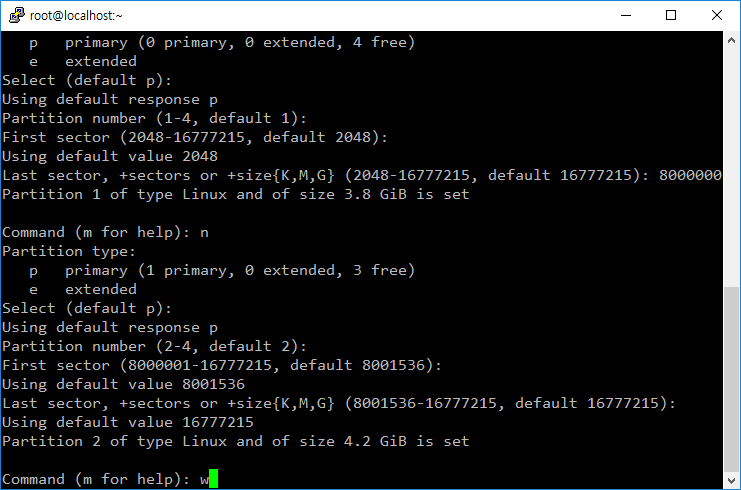
- 새 파티션은 n을 입력하고 안내에 따라 만든다.

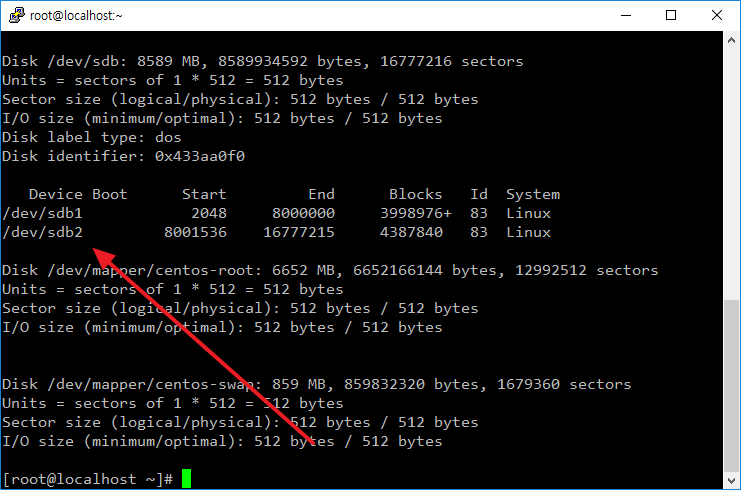
- w를 입력해야 변경사항이 반영된다.
2TB 초과 하드디스크 파티션 만들기
2TB를 초과하는, 예를 들어 4TB 하드디스크를 장착하고 파티션을 만들려고 하면 다음과 같은 메시지를 보게 되고, 전체 디스크를 사용할 수 없다.
The size of this disk is 4 TiB (4398046511104 bytes). DOS partition table format cannot be used on drives for volumes larger than 2199023255040 bytes for 512-byte sectors. Use GUID partition table format (GPT).
이런 경우 g를 입력하여 GPT partition table을 만든 후 파티션을 만든다.
Command (m for help): g
Created a new GPT disklabel (GUID: F13C6D0D-1E30-4448-B015-A61F3AE9EA48).
포맷하기
- 포맷하는 명령어는 mkfs이다.
- 예를 들어 /dev/sdb1 파티션을 ext4 파일 시스템으로 포맷하려면 다음과 같이 명령한다.
# mkfs.ext4 /dev/sdb1
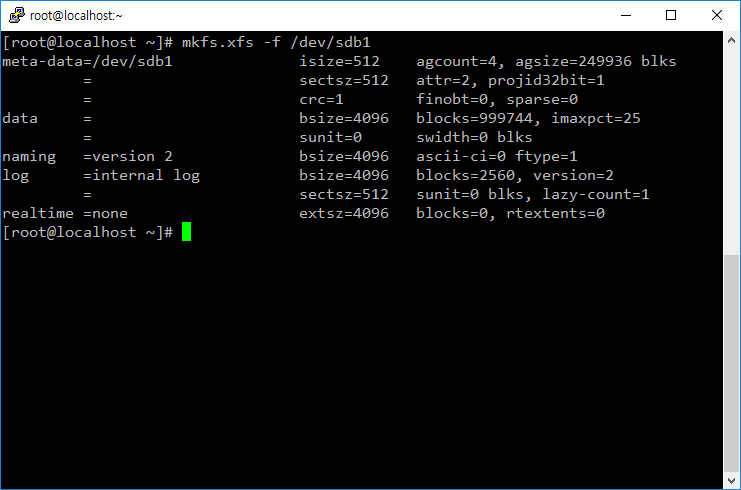
- 예를 들어 /dev/sdb1 파티션을 xfs 파일 시스템으로 포맷하려면 다음과 같이 명령한다.
# mkfs.xfs -f /dev/sdb1
- NTFS 파일 시스템으로 포맷하고 싶다면 mkntfs 명령어를 사용한다.
# mkntfs -f /dev/sdb1
- 파일 시스템은 df -T 또는 blkid /dev/sd*로 확인할 수 있다. 마운트하지 않는 파티션에 대한 정보까지 알고 싶다면 후자를 사용한다.
마운트하기
- 파티션을 특정 디렉토리에 연결해야 그 파티션을 사용할 수 있다.
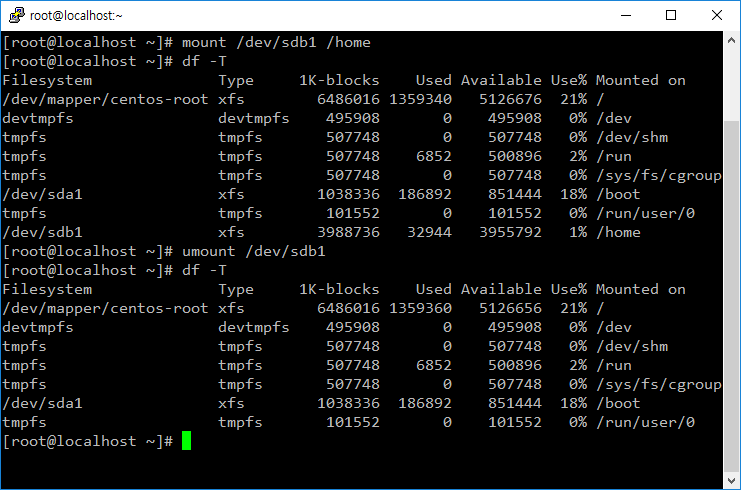
- 예를 들어 /dev/sdb1을 /home 디렉토리에 마운트하려면 다음과 같이 명령한다.
# mount /dev/sdb1 /home
- 마운트를 해제할 때는 umount 명령어를 사용한다.
# umount /dev/sdb1
- 부팅 시 자동으로 마운트되도록 하려면 /etc/fstab 파일에 다음과 같은 코드를 추가한다. /dev/sdb1 파티션을 /home 폴더에 마운트하라는 뜻이다. 파일 시스템 등 옵션은 적절히 변경한다.
/dev/sdb1 /home xfs defaults 0 0
- fstab 파일의 변경 내용을 바로 적용하고 싶다면 다음과 같이 명령한다.
# mount -a
UUID 사용하기
- 하드디스크에 /dev/sdb 같은 이름이 붙고, 파티션에는 /dev/sdb1 같은 이름이 붙는데, 이 이름이 고정된 것은 아니다. 하드디스크 장착 위치를 바꾸거나, 인식 순서가 바뀌면 그 이름도 바뀐다. 그런 경우 마운트가 제대로 되지 않을 수 있다. 그래서 마운트를 할 때는 하드디스크 고유값인 UUID를 사용하는 것이 좋다.
- UUID는 blkid 명령으로 확인할 수 있다.
# blkid
/dev/sda1: UUID="69d9add5-2153-4bc2-ad99-1560fb205c4b" TYPE="ext4" PARTUUID="aa61ba4b-01"
/dev/sda2: UUID="PuMuNg-5YHg-qikJ-tc10-iPIM-7W1q-4fUqyc" TYPE="LVM2_member" PARTUUID="aa61ba4b-02"
/dev/mapper/cl-root: UUID="79c8cfcb-c9e2-4243-8cf2-cf10eab57c40" TYPE="xfs"
/dev/mapper/cl-swap: UUID="b69a5fc3-98db-4a27-b3d4-a7ef76244ad1" TYPE="swap"
/dev/mapper/cl-home: UUID="fd372a6b-ee76-41d6-b7e6-6e6a7cf8193b" TYPE="xfs"
/dev/sdb1: UUID="fd95c93f-03fc-418a-a6db-c26b921ec93b" TYPE="xfs" PARTUUID="e5f55ef6-01"
- /etc/fstab에 마운트 정보를 넣을 때
/dev/sdb1 /home xfs defaults 0 0
- 대신 다음처럼 한다.
UUID=fd95c93f-03fc-418a-a6db-c26b921ec93b /home xfs defaults 0 0

리눅스가 OS인 서버의 시간과 실제 시간을 동기화하는 방법 중의 하나는 ntp를 이용하는 것입니다. CentOS 7에 ntp를 설치하고 설정하는 방법을 요약합니다. ntp 설치 yum install ntp 동기화할 서버 주소 가까운 곳에 있는 시간 서버를 사용하는 게 좋습니다. (하지만, 설정을 변경하지 않아도 큰 문제는 없습니다.) 서버 주소는 http://www.pool.ntp.org/에서 구할 수 있습니다. 지역을 아시아로 했을 때의 서버 주소는 다음과 같습니다. server 0.asia.pool.ntp.org server ...
리눅스 / 로그아웃 명령어, 재부팅 명령어, 종료 명령어
로그아웃 명령어 # logout # exit 재부팅 명령어 즉시 재부팅 # reboot # shutdown -r now # init 6 일정 시간 또는 일정 시간 후 재부팅 10분 후 재부팅 # shutdown -r 10 12시에 재부팅 # shutdown -r 12:00 취소 # shutdown -c 종료 명령어 즉시 종료 # poweroff # shutdown -h now # shutdown -P now # halt -p # init 0 일정 시간 또는 일정 시간 후에 종료 10분 후에 종료 # ...
리눅스 / 하드디스크 파디션 만들기, 포맷하기, 마운트하기
리눅스에서 하드디스크 파티션 만들고, 포맷 하고, 마운트 하는 방법을 요약한다. 장착된 하드디스크 확인하기 ls 명령어로 컴퓨터에 장착된 하드디스크 정보를 출력할 수 있다. /dev/sda, /dev/sdb 등이 하드디스크, /dev/sda1 등이 파티션이다. # ls -l /dev/sd* brw-rw----. 1 root disk 8, 0 Oct 16 13:12 /dev/sda brw-rw----. 1 root disk 8, 1 Oct 16 13:12 /dev/sda1 brw-rw----. 1 ...
Ubuntu 18.04 Server / Nginx, PHP, MariaDB 설치하고 설정하기
Nginx 설치 Nginx를 설치합니다. # apt install nginx 만약 방화벽을 사용하고 있다면 포트를 열어줍니다. # ufw allow 'Nginx Full' 서버 주소로 접속했을 때 다음과 같이 나오면 제대로 된 것입니다. 시작, 정지 등 Nginx를 시작합니다. # systemctl start nginx Nginx를 멈춥니다. # systemctl stop nginx Nginx를 재시작합니다. # systemctl restart nginx Nginx를 다시 로드합니다. # systemctl reload nginx Nginx를 설치하면 부팅 시 자동으로 시작하게 설정됩니다. 만약 자동 ...
Ubuntu 18.04 Server / apt / 패키지 설치, 삭제, 업그레이드하는 명령어
Ubuntu에서 패키지를 관리하는 명령어는 여러 가지가 있습니다. 그 중 널리 사용되는 것은 apt-get과 apt입니다. 아래는 apt를 이용하여 패키지를 설치하고 삭제하고 업그레이드하는 방법입니다. 대부분의 경우 apt-get을 사용해도 작동합니다. APT 사용법 패키지 목록을 갱신합니다 # apt update 모든 패키지를 최신 버전으로 업그레이드합니다. # apt upgrade abc 패키지를 설치합니다. 의존성있는 패키지도 함께 설치합니다. # apt install abc abc 패키지를 삭제합니다. 설정 ...
Ubuntu 16.04 / Apache / javascript 폴더 접근이 안되는 문제 해결하는 방법
javascript 폴더 접근 불가 우분투(Ubuntu)에서 아파치(Apache)로 웹서버를 운영할 때 이상한 문제가 하나 발생합니다. 사이트 경로에 javascript가 있으면 forbidden 에러가 나는 것입니다. Forbidden You don't have permission to access /javascript/ on this server. 이 문제가 발생하는 이유는 자바스크립트 설정 때문입니다. /etc/apache2/conf-available/javascript-common.conf에 다음과 같은 코드가 있습니다. Alias /javascript /usr/share/javascript/ javascript로 접속하면 /usr/share/javascript/로 연결시키라는 뜻입니다. 사이트 접속자는 /usr/share/javascript/에 접속 권한이 없으므로 forbidden 에러가 ...
리눅스 커널 버전을 확인하는 방법은 여러 가지가 있습니다. 그 중 자주 사용하는 방법 두 가지를 소개합니다. uname uname 명령어는 시스템 정보를 출력하는 데 사용됩니다. -r 옵션을 사용하여 커널 버전을 확인할 수 있습니다. # uname -r 6.8.0-35-generic hostnamectl hostnamectl 명령어는 시스템의 호스트 이름과 관련된 정보를 관리하고 표시합니다. 여기에는 커널 버전 정보도 포함됩니다. # hostnamectl Static hostname: ubuntu-24-01 ...
리눅스 / 배포판 / 데비안(Debian) - 역사, 특징, 장점
데비안의 역사 데비안(Debian)은 자유 소프트웨어 재단의 리눅스 배포판으로 1993년에 이안 머독(Ian Murdock)에 의해 시작되었습니다. 데비안 프로젝트는 커뮤니티 기반의 오픈 소스 프로젝트로서, 전 세계의 개발자와 기여자들이 협력하여 발전시켜 왔습니다. 데비안은 GNU 프로젝트의 일환으로 시작되었으며, 현재는 리눅스 커널뿐만 아니라 다양한 커널을 지원하는 운영체제를 제공합니다. 초기 역사 1993년 8월 16일, 이안 머독은 데비안 프로젝트를 발표했습니다. 데비안의 ...
다운로드 CentOS Stream 페이지로 접속한다. 을 선택한다. 시스템에 맞는 링크를 클릭한다. 가까운 미러 리스트가 나오는데, 적당한 것을 클릭한다. 보통 네이버나 카카오가 빠르다. CentOS-Stream-8-x86_64-20210927-boot.iso 또는 CentOS-Stream-8-x86_64-20210927-dvd1.iso를 다운로드 한다. 설치 물리적 기기라면 부팅 가능한 USB를 만들어서, 가상 머신이라면 ISO 파일을 이용해서 부팅한다. Install CentOS Stream 8-stream을 선택하고 엔터키를 누른다. 언어를 선택하고 를 클릭한다. 빨간색 경고를 다 해결해야 설치가 진행된다. Network & Host Name을 ...
CentOS 7 / mod_security 설치하는 방법
mod_security는 아파치 웹서버에 사용할 수 있는 방화벽 모듈입니다. ModSecurity is an open source, cross-platform web application firewall (WAF) module. Known as the "Swiss Army Knife" of WAFs, it enables web application defenders to gain visibility into HTTP(S) traffic and provides a power rules language and API to implement advanced protections. 설치 yum install ...