리눅스 / 명령어 / rm / 파일 또는 디렉토리 삭제하는 명령어
rm은 remove의 약자로, 파일 또는 디렉토리를 삭제하는 명령어이다.
파일 삭제하기
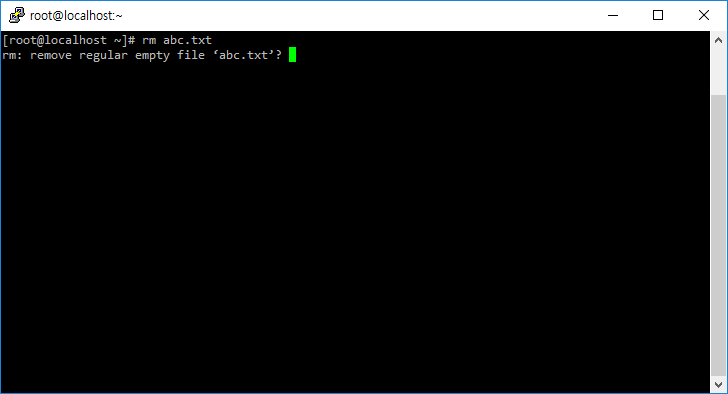
- abc.txt 파일을 삭제한다. 삭제할 건지 다시 묻는다. y 또는 yes를 입력하면 삭제한다.
# rm abc.txt
- 확장자가 txt인 모든 파일을 삭제한다. 각 파일에 대해서 삭제할 건지 묻는다.
# rm *.txt
- 현재 디렉토리에 있는 모든 파일을 삭제한다. 각 파일에 대해서 삭제할 건지 묻고, 디렉토리가 있다면 삭제할 수 없다는 메시지가 나온다.
# rm *
- -f 옵션을 붙이면 삭제할 건지 다시 묻지 않고 바로 삭제한다.
# rm -f abc.txt
- 현재 디렉토리에 있는 모든 파일을 바로 삭제한다. 디렉토리는 삭제하지 않는다.
# rm -f *
디렉토리 삭제하기
- dir1 디렉토리를 삭제한다. 디렉토리를 삭제할 때는 -r 옵션을 붙인다.
# rm -r dir1
- f 옵션을 추가하면 삭제할 건지 묻지 않고 바로 삭제한다.
# rm -rf dir1
- 현재 디렉토리에 속한 모든 파일과 디렉토리를 삭제한다. -rf 옵션은 주의해서 사용해야 한다.
# rm -rf *
리눅스에서 네트워크 정보는 주로 ifconfig, ip addr 명령어로 확인한다. 그런데, gateway 정보는 나오지 않는다. 만약 gateway 정보가 필요하다면 route 명령어를 사용한다. Ubuntu애서 명령어가 없다고 나오면 net-tools를 설치한다. apt install net-tools
다운로드 아래 링크에서 ISO 파일을 다운로드한다. https://rockylinux.org/download Boot, Minimal, DVD 세 가지가 있는데, 다음과 같이 설명되어 있다. Boot Used to install the operating system from another source (such as a HTTP repository of the binary files). Can also be used to enter Rescue Mode. Minimal Used to install the operating system from another source (such as a ...

현재 언어 확인하기 # localectl System Locale: LANG=en_US.UTF-8 VC Keymap: us X11 Layout: us 사용 가능한 언어 확인하기 # localectl list-locales C.utf8 en_AG en_AU en_AU.utf8 en_BW en_BW.utf8 en_CA en_CA.utf8 en_DK en_DK.utf8 en_GB en_GB.iso885915 en_GB.utf8 en_HK en_HK.utf8 en_IE en_IE.utf8 en_IE@euro en_IL en_IN en_NG en_NZ en_NZ.utf8 en_PH en_PH.utf8 en_SC.utf8 en_SG en_SG.utf8 en_US en_US.iso885915 en_US.utf8 en_ZA en_ZA.utf8 en_ZM en_ZW en_ZW.utf8 ko_KR.euckr ko_KR.utf8 언어를 한글로 변경하기 # localectl set-locale LANG=ko_KR.utf8 # localectl System Locale: LANG=ko_KR.utf8 ...
리눅스 / 로그아웃 명령어, 재부팅 명령어, 종료 명령어
로그아웃 명령어 # logout # exit 재부팅 명령어 즉시 재부팅 # reboot # shutdown -r now # init 6 일정 시간 또는 일정 시간 후 재부팅 10분 후 재부팅 # shutdown -r 10 12시에 재부팅 # shutdown -r 12:00 취소 # shutdown -c 종료 명령어 즉시 종료 # poweroff # shutdown -h now # shutdown -P now # halt -p # init 0 일정 시간 또는 일정 시간 후에 종료 10분 후에 종료 # ...
파일 이름 바꾸기 mv는 파일을 이동시키는 명령어이다. 이 명령어를 이용해서 파일 이름을 바꿀 수 있다. 예를 들어 다음은 abc.txt를 xyz.txt로 바꾼다. # mv abc.txt xyz.txt 디렉토리 이름 바꾸기 디렉토리 이름을 바꾸는 것도 파일 이름 변경과 같다. 다음은 abc 디렉토리의 이름을 xyz로 바꾼다. # mv abc xyz
우분투 14.04에 LESS를 설치하는 방법을 메모합니다. Node.js 설치 apt-get install nodejs NPM 설치 apt-get install npm LESS 설치 npm install -g less less-plugin-clean-css /usr/local/bin/lessc 파일 첫 줄에 다음과 같은 코드가 있습니다. #!/usr/bin/env node 다음처럼 바꿉니다. #!/usr/bin/env nodejs
리눅스 / chown, chmod / 파일 또는 디렉토리 소유자, 소유그룹, 권한 설정
chown과 chmod는 파일 및 디렉토리의 권한과 소유자를 관리하는 데 사용되는 Linux 명령어입니다. 정보 확인 ls 명령어에 -l 옵션을 붙여서 파일 또는 디렉토리의 권한과 소유자(그룹)을 확인할 수 있습니다. 제일 앞에 있는 문자는 디렉토리인지 파일인지는 나타냅니다. d는 디렉토리라는 뜻이고, -는 파일이라는 뜻입니다. 그 다음 3개의 문자열은 소유자의 권한을, 그 다음 3개의 문자열은 소유그룹의 권한을, 그 다음 ...
ODD가 없는 컴퓨터에 OS를 설치하는 방법은 두가지입니다. 첫번째는 휴대용 ODD를 이용하는 것이고, 두번째는 USB에 설치 파일을 넣어서 이용하는 것입니다. 두번째 방법이 간편하기는 하지만 설치용 USB를 만드는 게 좀 번거롭습니다. 하지만, 우분투(Ubuntu) 설치용 USB는 몇 번의 클릭으로 쉽게 만들 수 있습니다. 우분투 다운로드 원하는 우분투 버전을 다운로드 받습니다. Universal USB Installer 다운로드 다음의 링크에서 Universal USB Installer를 다운로드 ...
CentOS ISO 다운로드 CentOS ISO 파일은 DVD ISO, Everything ISO, Minimal ISO, NetInstall ISO 등 여러 가지가 있습니다. 이 중에서 가장 파일 크기가 작은 NetInstall ISO 파일로 설치하겠습니다. NetInstall ISO는 설치에 필요한 최소한의 파일만 포함하고 있고, 추가 소프트웨어는 다운로드 받아 설치합니다. CentOS 7의 NetInstall ISO 파일은 다음 링크에서 다운로드를 받을 수 있습니다. http://mirror.navercorp.com/centos/7/isos/x86_64/ 파일 이름은 CentOS-7-x86_64-NetInstall-xxxx.iso입니다. CD로 부팅 ISO 파일을 CD에 ...
Ubuntu / 특정 패키지만 업그레이드 하기, 보안 업데이트만 업그레이드 하기
우분투 서버에 접속하면 업데이트가 필요한 패키지가 있는지 알려줍니다. 두 가지 분류로 알려주는데, 하나는 패키지 업데이트, 또 하나는 보안 업데이트입니다. 소프트웨어는 보통 최신 버전을 유지하는 것이 좋지만, 업그레이드했을 때 문제가 없는지 충분히 확인을 해야 합니다. 따라서 특정 패키지만 업그레이드를 하거나, 보안 업데이트만 해야 하는 경우가 발생하는데, 어떻게 그런 작업을 하는지 알아보겠습니다. 특정 ...