다른 서버나 컴퓨터의 특정 포트로 통신 가능한지 확인하는 방법
서버를 운영하거나 네트워크 문제를 점검하다 보면 “상대 서버의 특정 포트로 접속이 되는지” 확인해야 할 때가 많습니다. 예를 들어 웹 서버의 80번, 443번 포트가 열려 있는지 확인하거나, DB 서버의 3306, 5432 포트로 접속 가능한지 확인해야 하는 경우가 있습니다. 또한 방화벽 정책을 변경한 뒤 실제로 통신이 가능한지 검증할 때도 포트 확인은 매우 중요합니다.
특정 포트로 통신이 가능한지 확인한다는 것은 단순히 상대 서버가 켜져 있는지 보는 것과 다릅니다. ping이 된다고 해서 특정 포트가 열려 있다는 뜻은 아니고, 반대로 ping이 안 된다고 해서 반드시 서비스 접속이 불가능하다는 뜻도 아닙니다. 실제 서비스 통신 가능 여부는 해당 서버의 IP 주소와 포트 번호를 기준으로 확인해야 합니다.
윈도우
telnet 명령어 이용하는 방법
- 텔넷 클라이언트 기능을 추가합니다.
- 명령 프롬프트(CMD) 또는 PowerShell에서 다음과 같이 명령합니다. google.com의 443 포트가 열렸는지 확인하는 것입니다.
C:\Users\JB>telnet google.com 443
- 포트가 열려 있다면 아무 내용 없는 창이 나옵니다.
- 만약 닫혀 있다면 아래와 같이 연결하지 못한다는 메시지가 나옵니다.
C:\Users\JB>telnet google.com 444
연결 대상 google.com...호스트에 연결할 수 없습니다. 포트 444: 연결하지 못했습니다.
tnc 명령어 이용하는 방법
- PowerShell에서 다음과 같이 명령합니다. google.com의 443 포트가 열렸는지 확인하는 것입니다.
- 열려 있다면 True...
PS C:\Users\JB> tnc google.com -port 443

ComputerName     : google.com
RemoteAddress    : 142.250.76.142
RemotePort       : 443
InterfaceAlias   : Ethernet
SourceAddress    : 192.168.0.201
TcpTestSucceeded : True
- 그렇지 않다면 False를 반환합니다.
PS C:\Users\JB> tnc google.com -port 444
경고: TCP connect to (142.250.76.142 : 444) failed

ComputerName           : google.com
RemoteAddress          : 142.250.76.142
RemotePort             : 444
InterfaceAlias         : Ethernet
SourceAddress          : 192.168.0.201
PingSucceeded          : True
PingReplyDetails (RTT) : 34 ms
TcpTestSucceeded       : False
Test-NetConnection 명령어 이용하는 방법
- PowerShell에서 다음과 같이 명령합니다. google.com의 443 포트가 열렸는지 확인하는 것입니다.
PS C:\Users\jb> Test-NetConnection -ComputerName google.com -Port 443                                                                                                                                                                                                                                                                                                   ComputerName     : google.com
RemoteAddress    : 142.250.207.110
RemotePort       : 443
InterfaceAlias   : Ethernet
SourceAddress    : 192.168.0.200
TcpTestSucceeded : True
리눅스
- nc 명령어로 확인할 수 있습니다.
# nc -zv google.com 443
Ncat: Version 7.70 ( https://nmap.org/ncat )
Ncat: Connected to 142.250.206.206:443.
Ncat: 0 bytes sent, 0 bytes received in 0.05 seconds.

MariaDB / 데이터베이스 이름에 하이픈(-) 또는 점(.) 포함하는 방법
MariaDB에 하이픈(-)이나 점(.)을 포함한 이름으로 데이터베이스를 만들면 에러가 납니다. 예를 들어 create database test-test; 라고 하면 다음과 같은 에러 메시지를 출력하면서 데이터베이스를 생성하지 못합니다. ERROR 1064 (42000): You have an error in your SQL syntax; check the manual that corresponds to your MariaDB server version for the right syntax to use near '-test' at ...
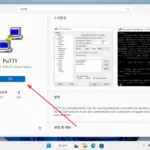
윈도우에 PuTTY를 다운로드하고 설치하는 방법은 두 가지가 있습니다. 하나는 Microsoft Store에서 다운로드 하는 것이고, 다른 하나는 PuTTY 홈페이지에서 다운로드 하는 것입니다. Microsoft Store에서는 putty로 검색한 후 설치를 하면 됩니다.(이 링크를 따라가도 됩니다.) PuTTY를 다운로드할 수 있는 사이트 주소는 아래와 같습니다. https://www.chiark.greenend.org.uk/~sgtatham/putty/latest.html MSI 파일을 다운로드하여 설치하면 됩니다. Microsoft Store에서 또는 PuTTY 홈페이지의 MSI로 설치하면 아래처럼 PuTTY, ...
안드로이드 / 앱 / 아웃룩 / 계정별로 다른 소리로 알림 받는 방법
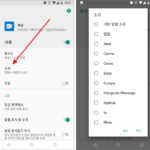
아웃룩 앱에 여러 메일 계정을 등록할 수 있다. 그런 경우 불편한 것은 모두 같은 소리로 알림이 온다는 것이다. 메일 계정마다 중요도가 다른데 알림의 차이가 없으므로 무조건 보게 된다. 다행히 아웃룩 앱에는 메일 계정마다 알림 소리를 다르게 하는 기능이 있다. 아웃룩 앱을 열고 왼쪽 위에 있는 선 세 개 아이콘을 누른다. 왼쪽 아래에 있는 ...
DPI는 마우스의 중요한 사양 중 하나로, 특히 게임, 그래픽 디자인, 세밀한 작업을 할 때 매우 중요합니다. DPI가 무엇인지, 마우스 성능에 어떤 영향을 미치는지, 다양한 DPI 설정의 장단점에 대해 알아보겠습니다. DPI란 무엇인가? DPI(Dots Per Inch)는 마우스의 감도를 측정하는 단위입니다. DPI는 마우스가 물리적으로 1인치(2.54cm) 움직일 때 화면에서 커서가 몇 픽셀 움직이는지를 나타냅니다. 예를 들어, ...
캐논 EOS 디지털 솔루션 소프트웨어 다운로드 받는 방법
캐논 DSLR 카메라를 구입하면 CD를 줍니다. CD에는 카메라 사용과 관련된 여러 소프트웨어가 들어있습니다. 만약 CD를 분실하였거나 최신 버전의 소프트웨어 필요하다면 캐논 홈페이지에서 다운로드 받을 수 있습니다.
가상 머신 만들기 가상 머신에 사용할 OS의 ISO 이미지를 준비합니다. 버추얼박스에서 를 클릭합니다. 이름을 적절히 정하고 OS의 종류와 버전을 선택합니다. 을 클릭합니다. 가상 머신에 할당할 메모리 크기를 정하고 을 클릭합니다. 를 클릭합니다. 을 클릭합니다. 동적 할당은 가상 하드 디스크를 사용하는 만큼 호스트 PC의 하드 디스크를 사용합니다. 고정 크기는 그 크기 만큼 미리 공간을 확보해 놓습니다. 적절히 설정하고 을 ...
구글 크롬에는 알림 기능이 있습니다. 알림 받는 게 싫어서 왠만하면 차단을 하는데, 실수로 차단을 안 한 경우도 있습니다. 그럴 땐 수동으로 알림을 차단할 수 있습니다. PC의 크롬과 안드로이드의 크롬으로 나누어서 어떻게 차단하는지 알아보겠습니다. PC용 크롬 점 세 개 아이콘을 클릭하고, 설정을 엽니다. 밑으로 내려가서 고급을 클릭합니다. 콘텐츠 설정을 클릭합니다. 알림을 클릭합니다. 알림을 차단한 목록과 허용한 목록을 ...
한화손해보험 / 실비보험 / 보험금 앱으로 청구하여 받는 방법
한화손해보험에 실비보험을 들어둔 게 있습니다. 병원에 잘 가지 않아서 실비보험의 드는 게 의미가 있나 고민을 했었는데, 나이가 들고 병원을 다니게 되니 잘 가입했다는 생각이 듭니다. 물론 계속 건강해서 보험금을 아까워하는 게 더 좋은 거지만요. 실비보험은 실제로 지출한 병원비를 보장 받는 건데, 보험금을 받으려면 보험회사에 청구를 해야 합니다. 병원에서 보험사로 자동으로 청구를 ...
다른 서버나 컴퓨터의 특정 포트로 통신 가능한지 확인하는 방법
서버를 운영하거나 네트워크 문제를 점검하다 보면 “상대 서버의 특정 포트로 접속이 되는지” 확인해야 할 때가 많습니다. 윈도우와 리눅스에서 통신 여부를 확인하는 방법을 정리합니다.
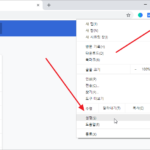
페이지를 삭제하는 메뉴만 찾으면 삭제는 쉽게 할 수 있다. 아래의 순서대로 찾아가거나 페이지 프로파일 설정 페이지로 바로 접속해도 된다. 삭제 과정 마지막에 나오듯이 30일 내에는 복원이 가능하다. 회원님의 페이지를 영구적으로 삭제합니다. 삭제할 준비가 완료되면 페이지 삭제를 클릭하세요. 페이지 삭제를 요청한 후에는 페이지를 다시 활성화하고 삭제를 취소할 수 있는 30일의 기간이 주어집니다. 30일의 ...