리눅스 / 명령어 / alias / 명령어 별칭 만들기
긴 명령어 또는 복잡한 명령어를 자주 사용한다면 alias를 사용하자. 시간을 많이 절약할 수 있다.
alias 목록 보기
- alias를 실행하면 현재 등록된 alias를 출력한다.
alias
- 예를 들어 ll을 실행한다는 것은 ls -alF를 실행하는 것과 같다.
alias egrep='egrep --color=auto'
alias fgrep='fgrep --color=auto'
alias grep='grep --color=auto'
alias l='ls -CF'
alias la='ls -A'
alias ll='ls -alF'
alias ls='ls --color=auto'
alias 만들기
- alias는 다음과 같이 만든다. abc를 실행하는 것은 cd /home을 실행하는 것과 같다.
alias abc='cd /home'
alias 없애기
- alias를 없애고 싶다면 다음과 같이 한다.
unalias abc
alias 영구 등록하기
- 터미널을 종료하거나 재부팅하면 alias가 사라진다. 계속하여 사용하고 싶다면 .bashrc 파일에 추가한다.
- .bashrc 파일에 추가한 후 재접속을 하면 사용할 수 있는데, 바로 사용하고 싶다면 다음과 같이 명령한다.
source .bashrc

CentOS 7 / hostname 확인하고 변경하는 방법
명령어 이용하기 hostname 확인 다음과 같이 명령하면 hostname을 출력한다. hostname hostname 변경 다음과 같이 명령하면 hostname을 abc로 변경한다. hostnamectl set-hostname abc 설정 파일 이용하기 hostname 확인 hostname 설정 파일은 /etc/hostname이다. 그 파일을 열거나 다음과 같이 명령하여 설정 파일의 내용을 볼 수 있다. cat /etc/hostname hostname 변경 텍스트 편집기로 열면 한 줄의 코드가 있는데, 그것이 hostname이다. 그 코드를 바꾸고 저장하면 hostname이 변경된다. 변경 사항 ...
Ubuntu 20.04 Server / GUI 설치하는 방법
Ubuntu Server는 CLI(Command Line Interface) 환경으로 설치된다. 그런데 어떤 작업은 GUI(Graphical Uer Interface) 환경에서 하는 것이 편하다. 만약 GUI 환경이 필요하다면 설치하여 사용할 수 있다. GUI 패키지에는 kubuntu-desktop lubuntu-desktop ubuntu-desktop ubuntu-desktop-minimal xubuntu-desktop 등이 있다. 주로 ubuntu-desktop 또는 ubuntu-desktop-minimal을 사용하는 듯 하다. 예를 들어 ubuntu-desktop-minimal을 설치한다면, 다음과 같이 명령하면 된다. # apt install ubuntu-desktop-minimal Minimal임에도 불구하고 꽤 많은 저장소 공간이 필요하다. After ...
Ubuntu 22.04 Server / 원격 데스크톱으로 연결하는 방법
GUI 설치 우분투에 GUI를 설치한다. # apt install ubuntu-desktop-minimal xrdp 설치 xrdp를 설치한다. # apt install xrdp 방화벽 설정 원격 데스크톱은 3389 포트를 사용하므로, 방화벽을 사용하고 있다면 포트를 열어 준다. ufw allow 3389/tcp 원격 데스크톱 연결 원격 데스크톱으로 접속한다. 아래와 같은 창이 뜨는데, 를 클릭한다. 계정 정보를 입력하고 를 클릭하면... 원격지에서 GUI로 우분투를 즐길 수 있다.
리눅스 / 명령어 / mkdir / 디렉토리 만드는 명령어
mkdir은 make directory의 약자로, 디렉토리를 만드는 명령어이다. abc 디렉토리를 만든다. # mkdir abc abc 디렉토리 아래에 def 디렉토리를 만든다. 만약 abc 디렉토리가 없다면 def 디렉토리를 만들 수 없다는 메시지가 나온다. # mkdir abc/def p 옵션을 붙이면 abc 디렉토리가 없어도 abc 디렉토리를 만든 후에 def 디렉토리를 만든다. # mkdir -p abc/def 리눅스 / 명령어 / rm / 파일 ...
Ubuntu 16.04 Server / PHP / 메모리 늘리는 방법
PHP 설정은 php.ini에서 한다. Ubuntu 16.04에서 php.ini의 위치는 /etc/php/7.0/apache2/php.ini 이다. PHP 버전에 따라 7.0은 다른 숫자일 수 있다. 메모리를 늘리기 위해 수정해야 할 것은 memory_limit이다. 기본값은 128M이다. 128을 적절히 변경한다. memory_limit = 128M 변경한 설정이 적용되도록 하려면 웹서버를 다시 시작하거나 다시 로드한다. Apache 웹서버라면 다음과 같이 명령하여 다시 시작할 수 있고, # service apache2 restart 다음과 같이 ...
YUM 명령어 도움말 보기 yum -h 패키지를 최신 버전으로 업데이트 하기 yum update 모든 패키지 목록을 보기 yum list 모든 패키지 그룹 목록을 보기 yum grouplist http과 관련된 패키지를 검색하기 yum search http 패키지 이름에 http를 포함하고 있는 것을 검색하기 yum list *http* httpd 패키지의 정보 보기 yum info httpd X Window System 패키지 그룹의 정보 보기 yum groupinfo "X Window System" httpd 패키지 설치하기 yum install ...
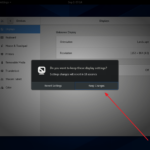
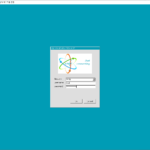
바탕화면에서 마우스 우클릭하고 Display Settings를 클릭합니다. Resolution에서 원하는 해상도를 선택합니다. 오른쪽 위의 Apply를 클릭합니다. Keep Changes를 클릭합니다. 해상도 변경이 완료되었습니다.
리눅스 / 그룹 / 그룹 조회, 그룹 추가, 그룹 삭제, 그룹 수정
그룹 조회 그룹 목록은 /et/group 파일에 있습니다. cat 명령어로 전체를 조회하거나... cat /etc/group tail 명령어로 마지막 부분을 조회할 수 있습니다. # tail -n 5 /etc/group avahi:x:70: slocate:x:21: rngd:x:974: tcpdump:x:72: vboxsf:x:973: X:Y:Z 형식으로 나오는데, X는 그룹 이름, Y는 그룹 비밀번호, Z는 그룹 ID입니다. 그룹 추가 groupadd 명령으로 그룹을 추가합니다. # groupadd group-1 # tail -n 5 /etc/group slocate:x:21: rngd:x:974: tcpdump:x:72: vboxsf:x:973: group-1:x:1000: 그룹 삭제 groupdel 명령으로 그룹을 삭제합니다. # ...
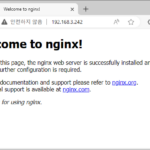
Ubuntu 22.04 Server / NGINX / 설치와 설정
Nginx는 높은 성능과 안정성을 제공하는 웹 서버 소프트웨어로, 웹 서버 외에도 리버스 프록시, 로드 밸런서, 메일 프록시 등의 기능을 수행할 수 있다. Igor Sysoev가 2004년에 처음 개발했으며, 현재는 오픈 소스 소프트웨어로 널리 사용되고 있다. 가정 Ubuntu 22.04 Server의 IP는 192.168.3.242이고, 내 컴퓨터에서 IP로 접근 가능하다. 내 컴퓨터의 OS는 Windows이다. 설치 nginx 패키지 설치 다음과 같이 명령하여 ...
cron & crontab cron은 특정 시간에 특정 작업을 수행하게 하는 시스템 대몬이다. 백업, 캐시 메모리 비우기 등 주기적으로 어떤 작업을 해야할 때 유용하다. crontab은 시간과 작업을 적은 텍스트 파일이다. 사용자별로 파일이 존재한다. cron은 모든 사용자의 crontab 파일을 찾아서, 적혀진 일정대로 작업을 수행한다. 작업 목록 보기 예약 작업 목록을 보고 싶다면 다음과 같이 명령한다. 사용자의 crontab ...