리눅스 / 명령어 / rmdir / 빈 디렉토리 삭제하는 명령어
rmdir
rmdir은 빈 디렉토리를 삭제하는 명령어이다.
Remove the DIRECTORY(ies), if they are empty.
사용법
rmdir directory
- a 디렉토리를 삭제한다.
# rmdir a
- 비어있다면 삭제를 하고, 그렇지 않다면 다음을 출력한다.
rmdir: failed to remove ‘a’: Directory not empty
rmdir --ignore-fail-on-non-empty directory
- 디렉토리가 비어있지 않아도 메시지를 출력하지 않는다.
rmdir -v directory
- 현재 디렉토리 안에 있는 모든 비어있는 디렉토리를 삭제한다. v 옵션을 넣으면 작업 결과를 출력한다.
# rmdir -v *
- 예를 들어 헌재 디렉토리에 a, b, c 디렉토리가 있고, a와 c는 빈 디렉토리, b는 비어있지 않은 디렉토리라면, 다음을 출력한다.
rmdir: removing directory, ‘a’
rmdir: removing directory, ‘b’
rmdir: failed to remove ‘b’: Directory not empty
rmdir: removing directory, ‘c’
rmdir -p directory
- a/b/c를 삭제하고, a/b를 삭제하고, a를 삭제한다.
# rmdir -p a/b/c
- 아래와 같다.
# rmdir a/b/c a/b a
rmdir --help
- 도움말을 출력한다.
# rmdir --help
Usage: rmdir [OPTION]... DIRECTORY...
Remove the DIRECTORY(ies), if they are empty.

      --ignore-fail-on-non-empty
                  ignore each failure that is solely because a directory
                    is non-empty
  -p, --parents   remove DIRECTORY and its ancestors; e.g., 'rmdir -p a/b/c' is
                    similar to 'rmdir a/b/c a/b a'
  -v, --verbose   output a diagnostic for every directory processed
      --help     display this help and exit
      --version  output version information and exit

GNU coreutils online help: <https://www.gnu.org/software/coreutils/>
Full documentation <https://www.gnu.org/software/coreutils/rmdir>
or available locally via: info '(coreutils) rmdir invocation'
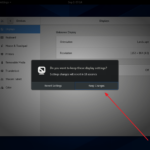
바탕화면에서 마우스 우클릭하고 Display Settings를 클릭합니다. Resolution에서 원하는 해상도를 선택합니다. 오른쪽 위의 Apply를 클릭합니다. Keep Changes를 클릭합니다. 해상도 변경이 완료되었습니다.
Ubuntu Server / Let’s Encrypt 무료 SSL 인증서 발급 받기
Ubuntu Server에서 Apache Web Server를 사용하는 경우 Let’s Encrypt 인증서 발급 받는 방법입니다. Apache용 Certbot 설치 Ubuntu Server 20.04, Ubuntu Server 22.04 # snap install core # snap refresh core # snap install --classic certbot # ln -s /snap/bin/certbot /usr/bin/certbot Ubuntu Server 18.04 # apt install software-properties-common # add-apt-repository universe # add-apt-repository ppa:certbot/certbot # apt update # apt upgrade # apt install certbot ...
Ubuntu 20.04 Server / 고정 IP 설정하는 방법
네트워크 설정 파일은 /etc/netplan 디렉토리 안에 있는 yaml 파일이다. DHCP로 설치했다면, 설정 파일 내용은 다음과 비슷하게 되어 있다. # This is the network config written by 'subiquity' network: ethernets: enp0s3: dhcp4: true version: 2 다음과 같이 수정하고 저장한다. IP 등은 네트워크 환경에 맞게 적절히 ...
리눅스 / RAID / Linear RAID, RAID0, RAID1, RAID5, RAID6
RAID 뜻과 종류 RAID Redundant Array of Inexpensive Disk or Redundant Array of Independent Disk 여러 개의 하드디스크를 하나처럼 사용하게 하는 기술. 예를 들어 1TB 하드디스크 두 개를 묶어서 2TB 하드디스크처럼 사용할 수 있다. 크게 하드웨어 RAID와 소프트웨어 RAID로 구분할 수 있다. 하드웨어 RAID는 성능이 좋으나 비싸다. 소프트웨어 RAID는 운영체제에서 지원하는 것으로 OS RAID라고도 한다. Linear RAID 두 ...

방법 1 다음과 같이 명령하면 SELinux가 꺼진다. 재부팅하면 다시 SELinux가 켜진다. setenforce 0 만약 다시 SELinux를 사용하고 싶다면 다음과 같이 명령한다. setenforce 1 방법 2 /etc/selinux/config에 다음과 같은 코드가 있다. SELINUX=enforcing 다음과 같이 바꾼다. SELINUX=disabled 시스템을 재부팅하면 적용된다. 방법 1과는 달리 재부팅해도 설정이 유지된다.
cat /etc/redhat-release # cat /etc/redhat-release CentOS Linux release 7.4.1708 (Core) cat /etc/*release* # cat /etc/*release* CentOS Linux release 7.4.1708 (Core) Derived from Red Hat Enterprise Linux 7.4 (Source) NAME="CentOS Linux" VERSION="7 (Core)" ID="centos" ID_LIKE="rhel fedora" VERSION_ID="7" PRETTY_NAME="CentOS Linux 7 (Core)" ANSI_COLOR="0;31" CPE_NAME="cpe:/o:centos:centos:7" HOME_URL="https://www.centos.org/" BUG_REPORT_URL="https://bugs.centos.org/" CENTOS_MANTISBT_PROJECT="CentOS-7" CENTOS_MANTISBT_PROJECT_VERSION="7" REDHAT_SUPPORT_PRODUCT="centos" REDHAT_SUPPORT_PRODUCT_VERSION="7" CentOS Linux release 7.4.1708 (Core) CentOS Linux release 7.4.1708 (Core) cpe:/o:centos:centos:7
CentOS 8 / NAS의 공유 폴더 마운트하는 방법
저장소로 또는 공유 목적으로 NAS를 사용합니다. 윈도우라면 네트워크 드라이브 연결로 NAS의 파일에 접근합니다. 리눅스라면 좀 번거로운 과정을 거칩니다. 아래는 CentOS 8에서 NAS의 공유 폴더에 접근하는 방법입니다. TUI cifs-utils 패키지를 설치합니다. dnf install cifs-utils 다음과 같이 마운트합니다. 192.168.0.101은 NAS의 IP, file은 공유 폴더 이름, /mnt/file는 마운트가 될 폴더, jb는 사용자 이름, 1234는 비밀번호입니다. 환경에 맞게 수정합니다. mount ...
리눅스 서버에 SSH 접속을 하는 공격이 있습니다. SSH Brute Force라고 하는데, 여러 아이디와 비밀번호로 로그인을 시도하는 공격입니다. 이 공격을 방어하는 방법은 여러가지가 있습니다. root 계정으로 로그인 못하게 하기 암호를 복잡하게 만들기 접속 가능 IP를 정하기 SSH 포트 번호 바꾸기 이 중에서 SSH 포트 번호 바꾸는 방법을 정리해보겠습니다. CentOS 7 기준이며, 포트 번호를 1980으로 바꾼다고 가정하겠습니다. SSH 설정 파일 ...
Ubuntu 18.04 Server / Nginx, PHP, MariaDB 설치하고 설정하기
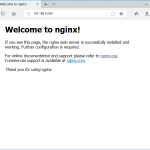
Nginx 설치 Nginx를 설치합니다. # apt install nginx 만약 방화벽을 사용하고 있다면 포트를 열어줍니다. # ufw allow 'Nginx Full' 서버 주소로 접속했을 때 다음과 같이 나오면 제대로 된 것입니다. 시작, 정지 등 Nginx를 시작합니다. # systemctl start nginx Nginx를 멈춥니다. # systemctl stop nginx Nginx를 재시작합니다. # systemctl restart nginx Nginx를 다시 로드합니다. # systemctl reload nginx Nginx를 설치하면 부팅 시 자동으로 시작하게 설정됩니다. 만약 자동 ...
리눅스 / 명령어 / cp - 복사하는 명령어, mv - 이동하는 명령어
cp는 copy의 약자로 복사하는 명령어, mv는 move의 약자로 이동하는 명령어이다. 복사하기 abc.txt 파일을 def.txt로 이름을 바꾸어 복사한다. cp abc.txt def.txt xyz라는 디렉토리가 없다면 abc.txt 파일을 xyz 파일로 복사한다. xyz라는 디렉토리가 있다면 xyz 디렉토리 안에 abc.txt 파일을 복사한다. cp abc.txt xyz abc.txt 파일을 xyz 디렉토리 안에 def.txt라는 이름으로 복사한다. cp abc.txt xyz/def.txt abc가 디렉토리이고 xyz라는 디렉토리가 없다면, abc 디렉토리를 xyz로 ...