리눅스 / 명령어 / mkdir / 디렉토리 만드는 명령어

mkdir은 make directory의 약자로, 디렉토리를 만드는 명령어이다.

  • abc 디렉토리를 만든다.
# mkdir abc
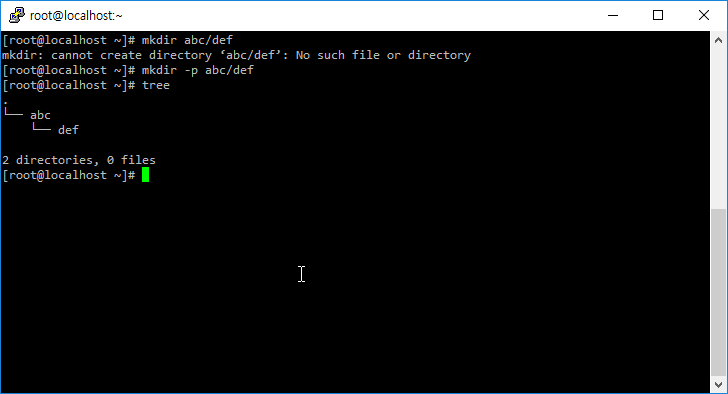
  • abc 디렉토리 아래에 def 디렉토리를 만든다. 만약 abc 디렉토리가 없다면 def 디렉토리를 만들 수 없다는 메시지가 나온다.
# mkdir abc/def
  • p 옵션을 붙이면 abc 디렉토리가 없어도 abc 디렉토리를 만든 후에 def 디렉토리를 만든다.
# mkdir -p abc/def

같은 카테고리의 다른 글
CentOS Stream 8 / 설치하기

CentOS Stream 8 / 설치하기

다운로드 CentOS Stream 페이지로 접속한다. 을 선택한다. 시스템에 맞는 링크를 클릭한다. 가까운 미러 리스트가 나오는데, 적당한 것을 클릭한다. 보통 네이버나 카카오가 빠르다. CentOS-Stream-8-x86_64-20210927-boot.iso 또는 CentOS-Stream-8-x86_64-20210927-dvd1.iso를 다운로드 한다. 설치 물리적 기기라면 부팅 가능한 USB를 만들어서, 가상 머신이라면 ISO 파일을 이용해서 부팅한다. Install CentOS Stream 8-stream을 선택하고 엔터키를 누른다. 언어를 선택하고 를 클릭한다. 빨간색 경고를 다 해결해야 설치가 진행된다. Network & Host Name을 ...

리눅스 / 명령어 / which, whereis, locate / 명령어 위치 찾기

명령어의 위치를 찾을 때 사용할 수 있는 명령어에는 which, whereis, locate가 있다. 명령어의 위치만 찾을 때는 which를 사용하고, 관련된 파일들의 위치까지 찾을 때는 whereis나 locate를 사용한다. which 명령어로 find 명령어를 찾는다. # which find /usr/bin/find whereis 명령어로 find 명령어를 찾는다. # whereis find find: /usr/bin/find /usr/share/man/man1/find.1.gz locate 명령어로 find 명령어를 찾는다. # locate find /usr/bin/find /usr/bin/find2perl /usr/bin/findmnt /usr/bin/nl-link-ifindex2name /usr/bin/nl-link-name2ifindex /usr/bin/oldfind /usr/lib64/python2.7/modulefinder.py /usr/lib64/python2.7/modulefinder.pyc /usr/lib64/python2.7/modulefinder.pyo /usr/sbin/btrfs-find-root /usr/sbin/findfs /usr/share/bash-completion/completions/findmnt /usr/share/doc/findutils-4.5.11 /usr/share/doc/findutils-4.5.11/AUTHORS /usr/share/doc/findutils-4.5.11/COPYING /usr/share/doc/findutils-4.5.11/ChangeLog /usr/share/doc/findutils-4.5.11/NEWS /usr/share/doc/findutils-4.5.11/README /usr/share/doc/findutils-4.5.11/THANKS /usr/share/doc/findutils-4.5.11/TODO /usr/share/doc/wpa_supplicant-2.6/examples/p2p/p2p_find.py /usr/share/doc/wpa_supplicant-2.6/examples/p2p/p2p_stop_find.py /usr/share/info/find-maint.info.gz /usr/share/info/find.info.gz /usr/share/locale/be/LC_MESSAGES/findutils.mo /usr/share/locale/bg/LC_MESSAGES/findutils.mo /usr/share/locale/ca/LC_MESSAGES/findutils.mo /usr/share/locale/cs/LC_MESSAGES/findutils.mo /usr/share/locale/da/LC_MESSAGES/findutils.mo /usr/share/locale/de/LC_MESSAGES/findutils.mo /usr/share/locale/el/LC_MESSAGES/findutils.mo /usr/share/locale/eo/LC_MESSAGES/findutils.mo /usr/share/locale/es/LC_MESSAGES/findutils.mo /usr/share/locale/et/LC_MESSAGES/findutils.mo /usr/share/locale/fi/LC_MESSAGES/findutils.mo /usr/share/locale/fr/LC_MESSAGES/findutils.mo /usr/share/locale/ga/LC_MESSAGES/findutils.mo /usr/share/locale/gl/LC_MESSAGES/findutils.mo /usr/share/locale/hr/LC_MESSAGES/findutils.mo /usr/share/locale/hu/LC_MESSAGES/findutils.mo /usr/share/locale/id/LC_MESSAGES/findutils.mo /usr/share/locale/it/LC_MESSAGES/findutils.mo /usr/share/locale/ja/LC_MESSAGES/findutils.mo /usr/share/locale/ko/LC_MESSAGES/findutils.mo /usr/share/locale/lg/LC_MESSAGES/findutils.mo /usr/share/locale/lt/LC_MESSAGES/findutils.mo /usr/share/locale/ms/LC_MESSAGES/findutils.mo /usr/share/locale/nl/LC_MESSAGES/findutils.mo /usr/share/locale/pl/LC_MESSAGES/findutils.mo /usr/share/locale/pt/LC_MESSAGES/findutils.mo /usr/share/locale/pt_BR/LC_MESSAGES/findutils.mo /usr/share/locale/ro/LC_MESSAGES/findutils.mo /usr/share/locale/ru/LC_MESSAGES/findutils.mo /usr/share/locale/rw/LC_MESSAGES/findutils.mo /usr/share/locale/sk/LC_MESSAGES/findutils.mo /usr/share/locale/sl/LC_MESSAGES/findutils.mo /usr/share/locale/sr/LC_MESSAGES/findutils.mo /usr/share/locale/sv/LC_MESSAGES/findutils.mo /usr/share/locale/tr/LC_MESSAGES/findutils.mo /usr/share/locale/uk/LC_MESSAGES/findutils.mo /usr/share/locale/vi/LC_MESSAGES/findutils.mo /usr/share/locale/zh_CN/LC_MESSAGES/findutils.mo /usr/share/locale/zh_TW/LC_MESSAGES/findutils.mo /usr/share/man/man1/find.1.gz /usr/share/man/man1/find2perl.1.gz /usr/share/man/man1/oldfind.1.gz /usr/share/man/man8/btrfs-find-root.8.gz /usr/share/man/man8/findfs.8.gz /usr/share/man/man8/findmnt.8.gz locate 명령어는 -n 옵션으로 출력 ...

Ubuntu 16.04 Server / PHP / 메모리 늘리는 방법

PHP 설정은 php.ini에서 한다. Ubuntu 16.04에서 php.ini의 위치는 /etc/php/7.0/apache2/php.ini 이다. PHP 버전에 따라 7.0은 다른 숫자일 수 있다. 메모리를 늘리기 위해 수정해야 할 것은 memory_limit이다. 기본값은 128M이다. 128을 적절히 변경한다. memory_limit = 128M 변경한 설정이 적용되도록 하려면 웹서버를 다시 시작하거나 다시 로드한다. Apache 웹서버라면 다음과 같이 명령하여 다시 시작할 수 있고, # service apache2 restart 다음과 같이 ...

Ubuntu 18.04 / 빠르게 다운로드하는 방법

우분투 다운로드 우분투 다운로드는 보통 우분투 홈페이지에서 합니다. 상단의 Downloads 메뉴를 클릭하고 안내를 따라가면 됩니다. 그런데, 우분투 홈페이지를 통해 다운로드를 받으면 전송 속도가 느릴 수 있습니다. 만약 너무 느리다면 가까운 미러 사이트에 직접 접속하여 다운로드해보세요. 빠르게 다운로드를 할 수 있습니다. 카카오 서버 한국이라면 카카오 서버가 빠릅니다. 우분투 페이지로 간 다음 원하는 버전을 선택합니다. 데스크톱 이미지와 ...

리눅스 / CPU 이름, 코어 수, 스레드 수 확인하는 방법

리눅스에서 lscpu 명령으로 CPU의 정보를 확인할 수 있습니다. 출력하는 내용 중에 CPU 이름, 코어 수, 스레드 수가 있습니다. 아래는 lscpu 명령을 내린 결과 예시입니다. # lscpu Architecture: x86_64 CPU op-mode(s): 32-bit, 64-bit Byte Order: ...

Ubuntu 18.04 Server / apt / 패키지 설치, 삭제, 업그레이드하는 명령어

Ubuntu에서 패키지를 관리하는 명령어는 여러 가지가 있습니다. 그 중 널리 사용되는 것은 apt-get과 apt입니다. 아래는 apt를 이용하여 패키지를 설치하고 삭제하고 업그레이드하는 방법입니다. 대부분의 경우 apt-get을 사용해도 작동합니다. APT 사용법 패키지 목록을 갱신합니다 # apt update 모든 패키지를 최신 버전으로 업그레이드합니다. # apt upgrade abc 패키지를 설치합니다. 의존성있는 패키지도 함께 설치합니다. # apt install abc abc 패키지를 삭제합니다. 설정 ...

CentOS 8 / 원격 데스크톱으로 연결하는 방법

CentOS 8 / 원격 데스크톱으로 연결하는 방법

서버용으로 CentOS를 사용하는 경우 보통 Minimal로 설치하고, 원격 접속은 SSH로 한다. 하지만 하드웨어 사양이 좋아지고 사용의 편리함으로 GUI(Graphical User Interface)를 설치하는 경우도 많아지고 있다. GUI가 설치되어 있다면 SSH보다는 원격 데스크톱으로 관리하는 게 편하다. CentOS에 원격 데스크톱으로 접속하는 방법을 알아본다. 패키지 설치 다음과 같이 명령하여 EPEL(Extra Packages of Enterprise Linux) 저장소를 추가한다. yum install ...

Ubuntu 18.04 Server / Nginx, PHP, MariaDB 설치하고 설정하기

Ubuntu 18.04 Server / Nginx, PHP, MariaDB 설치하고 설정하기

Nginx 설치 Nginx를 설치합니다. # apt install nginx 만약 방화벽을 사용하고 있다면 포트를 열어줍니다. # ufw allow 'Nginx Full' 서버 주소로 접속했을 때 다음과 같이 나오면 제대로 된 것입니다. 시작, 정지 등 Nginx를 시작합니다. # systemctl start nginx Nginx를 멈춥니다. # systemctl stop nginx Nginx를 재시작합니다. # systemctl restart nginx Nginx를 다시 로드합니다. # systemctl reload nginx Nginx를 설치하면 부팅 시 자동으로 시작하게 설정됩니다. 만약 자동 ...

리눅스 / LVM / 만드는 방법, 수정하는 방법, 삭제하는 방법

1TB 디스크와 2TB 디스크를 추가했다고 하자. 디스크 크기에 맞게 그대로 사용할 수도 있지만, 3TB 하나인 것처럼 사용하거나 1.5TB 두 개인 것처럼 사용하고 싶을 수도 있다. 즉, 물리적인 디스크 크기와 무관하게 자유롭게 볼륨을 만들고 싶은 것이다. 이럴 때 사용하는 것이 LVM(Logical Volume Manager)이다. 여러 개의 볼륨을 하나로 묶은 후 다시 배분하여 사용한다.(이렇게 ...

CentOS / 버전 확인하는 방법

CentOS / 버전 확인하는 방법

cat /etc/redhat-release # cat /etc/redhat-release CentOS Linux release 7.4.1708 (Core) cat /etc/*release* # cat /etc/*release* CentOS Linux release 7.4.1708 (Core) Derived from Red Hat Enterprise Linux 7.4 (Source) NAME="CentOS Linux" VERSION="7 (Core)" ID="centos" ID_LIKE="rhel fedora" VERSION_ID="7" PRETTY_NAME="CentOS Linux 7 (Core)" ANSI_COLOR="0;31" CPE_NAME="cpe:/o:centos:centos:7" HOME_URL="https://www.centos.org/" BUG_REPORT_URL="https://bugs.centos.org/" CENTOS_MANTISBT_PROJECT="CentOS-7" CENTOS_MANTISBT_PROJECT_VERSION="7" REDHAT_SUPPORT_PRODUCT="centos" REDHAT_SUPPORT_PRODUCT_VERSION="7" CentOS Linux release 7.4.1708 (Core) CentOS Linux release 7.4.1708 (Core) cpe:/o:centos:centos:7