리눅스 / 명령어 / cp - 복사하는 명령어, mv - 이동하는 명령어
cp는 copy의 약자로 복사하는 명령어, mv는 move의 약자로 이동하는 명령어이다.
복사하기
- abc.txt 파일을 def.txt로 이름을 바꾸어 복사한다.
cp abc.txt def.txt
- xyz라는 디렉토리가 없다면 abc.txt 파일을 xyz 파일로 복사한다.
- xyz라는 디렉토리가 있다면 xyz 디렉토리 안에 abc.txt 파일을 복사한다.
cp abc.txt xyz
- abc.txt 파일을 xyz 디렉토리 안에 def.txt라는 이름으로 복사한다.
cp abc.txt xyz/def.txt
- abc가 디렉토리이고 xyz라는 디렉토리가 없다면, abc 디렉토리를 xyz로 이름을 바꾸어 복사한다.
- abc가 디렉토리이고 xyz라는 디렉토리가 있다면, abc 디렉토리를 xyz 디렉토리 안에 복사한다. 즉 xyz/abc가 된다.
cp -r abc xyz
- abc가 디렉토리이고 xyz/zzz라는 디렉토리가 없다면, abc 디렉토리를 xyz 디렉토리 안에 zzz로 이름을 바꾸어서 복사한다.
- abc가 디렉토리이고 xyz/zzz라는 디렉토리가 있다면, abc 디렉토리를 xyz/zzz 디렉토리 안에 복사한다. 즉 xyz/zzz/abc가 된다.
cp -r abc xyz/zzz
이동하기
- abc.txt 파일을 def.txt로 이름을 바꾸어 이동한다. 파일 이름을 바꾸는 것과 결과가 같다.
mv abc.txt def.txt
- xyz라는 디렉토리가 없다면 abc.txt 파일을 xyz로 이름을 바꾸어 이동한다.
- xyz라는 디렉토리가 있다면 xyz 디렉토리 안으로 abc.txt 파일을 이동한다.
mv abc.txt xyz
- abc.txt 파일을 xyz 디렉토리 안으로 def.txt로 이름을 바꾸어 이동한다.
mv abc.txt xyz/def.txt
- abc가 디렉토리이고 xyz라는 디렉토리가 없다면, abc 디렉토리를 xyz로 이름을 바꾸어 이동한다.
- abc가 디렉토리이고 xyz라는 디렉토리가 있다면, abc 디렉토리를 xyz 디렉토리 안으로 이동한다. 즉 xyz/abc가 된다.
mv abc xyz
- abc가 디렉토리이고 xyz/zzz라는 디렉토리가 없다면, abc 디렉토리를 xyz 디렉토리 안으로 zzz로 이름을 바꾸어 이동한다.
- abc가 디렉토리이고 xyz/zzz라는 디렉토리가 있다면, abc 디렉토리를 xyz/zzz 디렉토리 안으로 이동한다. 즉 xyz/zzz/abc가 된다.
mv abc xyz/zzz
Midnight Commander
- 파일 복사, 이동 작업은 Midnight Commander를 이용하면 쉽게 할 수 있다.
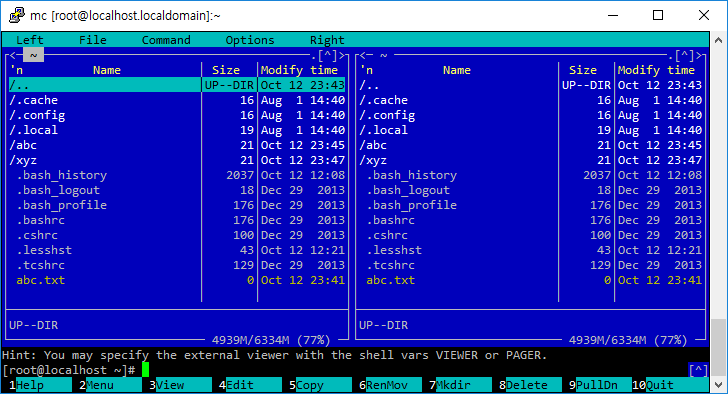
- CentOS라면 다음 명령으로,
yum install mc
- Ubuntu라면 다음 명령으로 설치할 수 있다.
apt install mc
리눅스 / 명령어 / cd / 다른 디렉토리로 이동하는 명령어
cd는 change directory의 약자로, 다른 디렉토리로 이동하는 명령어이다. cd 현재 로그인한 사용자의 홈 디렉토리로 이동한다. 일반적으로 root 계정이라면 /root로, 사용자 jb 계정이라면 /home/jb로 이동한다. cd ~user user의 홈 디렉토리로 이동한다. 다음과 같이 명령하면 jb 사용자의 홈 디렉토리로 이동한다. # cd ~jb cd 디렉토리명 지정한 디렉토리로 이동한다. 절대경로, 상대경로 다 사용할 수 있다. 다음과 같이 명령하면 /etc 디렉토리로 이동한다. # cd /etc 현재 ...

CentOS 7 / Let’s Encrypt에서 무료 SSL 인증서 발급 받는 방법
CentOS 7에서 Let’s Encrypt 인증서를 발급 받는 방법을 요약합니다. 환경 CentOS 7 Apache Web Server 설치 저장소 추가 yum install epel-release 설치 yum install python-certbot-apache 인증서 발급 abc.com 인증서 발급 certbot --apache -d abc.com abc.com과 www.abc.com 인증서 동시 발급 certbot --apache -d abc.com -d www.abc.com 인증서 갱신 Let’s Encrypt 인증서는 90일마다 갱신해야 합니다. certbot renew
CentOS를 설치하려면 다운로드 받은 ISO 파일을 부팅 가능한 CD 또는 USB로 만들어야 한다. ISO를 부팅 가능한 미디어로 만들어주는 프로그램은 여러 가지가 있는데, 그 중 많이 사용되는 것은 Rufus다. Rufus 다운로드 https://rufus.ie/에서 밑으로 내려가면 다운로드할 수 있는 링크가 있다. Rufus Portable은 설치가 필요 없는 실행 파일이다. 개인적으로 Portable 버전을 선호한다. CentOS 부팅 USB 만들기 Rufus를 실행한다. 다음과 ...
Ubuntu 18.04 Server / PHP 최신 버전으로 업그레이드하는 방법
Ubuntu 패키지로 설치한 PHP 버전보다 PHP 최신 버전이 더 높을 수 있습니다. 예를 들어 패키지로 설치한 PHP의 버전은 7.0, 최신 버전은 7.2일 수 있다는 것이죠. 만약 최신 버전의 PHP를 사용해야 한다면 다음의 방법으로 설치할 수 있습니다. PHP를 처음 설치하는 경우 저장소를 추가합니다. # add-apt-repository ppa:ondrej/php 패키지 정보를 업데이트합니다. # apt-get update PHP를 설치합니다. # apt-get install php PHP가 ...
파일 이름 바꾸기 mv는 파일을 이동시키는 명령어이다. 이 명령어를 이용해서 파일 이름을 바꿀 수 있다. 예를 들어 다음은 abc.txt를 xyz.txt로 바꾼다. # mv abc.txt xyz.txt 디렉토리 이름 바꾸기 디렉토리 이름을 바꾸는 것도 파일 이름 변경과 같다. 다음은 abc 디렉토리의 이름을 xyz로 바꾼다. # mv abc xyz
Ubuntu 22.04 Server / 고정 IP 설정하는 방법
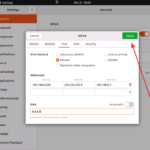
설정 파일 수정하기 네트워크 설정 파일은 /etc/netplan 디렉토리 안에 있는 yaml 파일이다. DHCP로 설치했다면, 설정 파일 내용은 다음과 비슷하게 되어 있다. # This is the network config written by 'subiquity' network: ethernets: eth0: dhcp4: true version: 2 다음과 같이 수정하고 저장한다. IP 등은 네트워크 환경에 ...
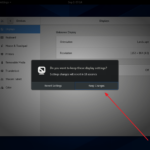
바탕화면에서 마우스 우클릭하고 Display Settings를 클릭합니다. Resolution에서 원하는 해상도를 선택합니다. 오른쪽 위의 Apply를 클릭합니다. Keep Changes를 클릭합니다. 해상도 변경이 완료되었습니다.
Ubuntu 16.04 Server / logrotate 설치하고 설정하기
우분투(Ubuntu)는 여러 작업의 내용을 로그(Log) 파일로 남깁니다. 예를 들어 웹서버 운영과 관련된 로그는 /var/log/apache2에 있습니다. 로그는 기본적으로 하나의 파일에 계속 추가하는 것이어서, 시간이 지날수록 파일의 크기가 커집니다. 로그 파일의 크기가 너무 커지면, 시스템이 느려지거나 다운되기도 합니다. 이러한 문제를 해결해주는 패키지가 logrotate입니다. 로그 파일이 일정 기준을 충족하면 기존 로그 파일을 다른 이름으로 변경하여 저장하고 ...
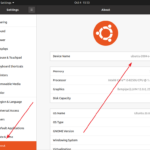
Ubuntu 20.04 Server / hostname 확인하는 방법, 변경하는 방법
hostname 확인하는 방법 방법 1 - 명령어로 확인하기 다음과 같이 명령하면 hostname을 출력한다. hostname 방법 2 - 설정 파일 열어서 확인하기 /etc/hostname 파일에 hostname이 있다. cat /etc/hostname hostname 변경하는 방법 방법 1 - 명령어로 변경하기 다음과 같이 명령하면 hostname이 abc로 바뀐다. hostnamectl set-hostname abc 방법 2 - 설정 파일 열어서 변경하기 텍스트 에디터로 /etc/hostname 파일을 열어서 내용을 abc로 바꾸면 hostname이 abc로 바뀐다. 재부팅 재부팅을 하면 변경사항이 ...
Ubuntu 22.04 Server / SSH / 포트 변경하는 방법
보안 상의 이유로 SSH 포트는 변경하는 것이 좋다. Ubuntu 22.04 Server에서 SSH 포트 변경하는 방법은 다음과 같다. 1980으로 변경한다고 가정한다. /etc/ssh/sshd_config에서 다음의 코드를... #Port 22 다음으로 변경한다. Port 1980 방화벽이 활성화되어 있다면 1980 포트를 열어준다. ufw allow 1980/tcp SSH 서비스를 다시 시작한다. systemctl restart ssh SSH 서비스를 다시 시작해도 적용되지 않으면, 컴퓨터를 다시 시작한다.