리눅스 / 그룹 / 그룹 조회, 그룹 추가, 그룹 삭제, 그룹 수정
그룹 조회
- 그룹 목록은 /et/group 파일에 있습니다. cat 명령어로 전체를 조회하거나...
cat /etc/group
- tail 명령어로 마지막 부분을 조회할 수 있습니다.
[root@localhost ~]# tail -n 5 /etc/group
avahi:x:70:
slocate:x:21:
rngd:x:974:
tcpdump:x:72:
vboxsf:x:973:
- X:Y:Z 형식으로 나오는데, X는 그룹 이름, Y는 그룹 비밀번호, Z는 그룹 ID입니다.
그룹 추가
- groupadd 명령으로 그룹을 추가합니다.
[root@localhost ~]# groupadd group-1
[root@localhost ~]# tail -n 5 /etc/group
slocate:x:21:
rngd:x:974:
tcpdump:x:72:
vboxsf:x:973:
group-1:x:1000:
그룹 삭제
- groupdel 명령으로 그룹을 삭제합니다.
[root@localhost ~]# groupdel group-1
[root@localhost ~]# tail -n 5 /etc/group
avahi:x:70:
slocate:x:21:
rngd:x:974:
tcpdump:x:72:
vboxsf:x:973:
그룹 수정
그룹에 사용자 추가
- user-1을 group-1에 추가합니다.
[root@localhost ~]# gpasswd -a user-1 group-1
Adding user user-1 to group group-1
- user-1이 속한 그룹은 groups 명령으로 확인할 수 있습니다.
[root@localhost ~]# groups user-1
user-1 : user-1 group-1
그룹에서 사용자 제거
- user-1을 group-1에서 제거합니다.
[root@localhost ~]# gpasswd -d user-1 group-1
Removing user user-1 from group group-1
[root@localhost ~]# groups user-1
user-1 : user-1
그룹 이름 변경
- group-1을 group-2로 변경합니다.
groupmod -n group-2 group-1
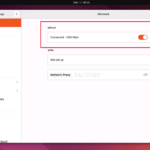
Ubuntu Server / 22.04 / 네트워크 세팅에 이더넷(Wired) 보이지 않을 때 해결 방법
우분투 설정의 네트워크에 Wired가 보이지 않는다. 그것이 보여야 GUI로 IP 설정이 가능한데 말이다. 이를 보이게 하는 방법이 여러 가지가 있는 거 같은데, 내가 성공한 방법은... /etc/netplan/00-installer-config.yaml의 내용은 다음처럼 생겼을 것이다. # This is the network config written by 'subiquity' network: ethernets: eth0: dhcp4: true ...

현재 언어 확인하기 # localectl System Locale: LANG=en_US.UTF-8 VC Keymap: us X11 Layout: us 사용 가능한 언어 확인하기 # localectl list-locales C.utf8 en_AG en_AU en_AU.utf8 en_BW en_BW.utf8 en_CA en_CA.utf8 en_DK en_DK.utf8 en_GB en_GB.iso885915 en_GB.utf8 en_HK en_HK.utf8 en_IE en_IE.utf8 en_IE@euro en_IL en_IN en_NG en_NZ en_NZ.utf8 en_PH en_PH.utf8 en_SC.utf8 en_SG en_SG.utf8 en_US en_US.iso885915 en_US.utf8 en_ZA en_ZA.utf8 en_ZM en_ZW en_ZW.utf8 ko_KR.euckr ko_KR.utf8 언어를 한글로 변경하기 # localectl set-locale LANG=ko_KR.utf8 # localectl System Locale: LANG=ko_KR.utf8 ...
Ubuntu 24.04 Server / 고정 IP 설정하는 방법
네트워크 설정 파일은 /etc/netplan 디렉토리 안에 있는 yaml 파일입니다. 파일 이름은 시스템마다 다를 수 있습니다. # ll /etc/netplan total 12 drwxr-xr-x 2 root root 4096 Apr 27 23:00 ./ drwxr-xr-x 108 root root 4096 Apr 27 23:06 ../ -rw------- 1 root root 389 Apr 27 23:00 50-cloud-init.yaml DHCP라면 설정 파일이 다음과 ...
Ubuntu 16.04 Server / 고정 IP 설정하는 방법
네트워크 설정 파일은 /etc/network/interfaces이다. 우분투를 DHCP로 설치했다면 설정 파일의 내용은 다음과 비슷하게 되어 있다. # The primary network interface auto enp0s3 iface enp0s3 inet dhcp 이를 다음처럼 변경하고 저장한다. xxx.xxx.xxx.xxx는 네트워크 환경에 맞게 수정한다. # The primary network interface auto enp0s3 iface enp0s3 inet static address xxx.xxx.xxx.xxx netmask xxx.xxx.xxx.xxx gateway xxx.xxx.xxx.xxx dns-nameservers xxx.xxx.xxx.xxx 다음과 같이 명령하여 네트워크를 재시작한다. systemctl restart networking.service 만약 위와 같이 해도 ...
Ubuntu 16.04 / Apache / javascript 폴더 접근이 안되는 문제 해결하는 방법
javascript 폴더 접근 불가 우분투(Ubuntu)에서 아파치(Apache)로 웹서버를 운영할 때 이상한 문제가 하나 발생합니다. 사이트 경로에 javascript가 있으면 forbidden 에러가 나는 것입니다. Forbidden You don't have permission to access /javascript/ on this server. 이 문제가 발생하는 이유는 자바스크립트 설정 때문입니다. /etc/apache2/conf-available/javascript-common.conf에 다음과 같은 코드가 있습니다. Alias /javascript /usr/share/javascript/ javascript로 접속하면 /usr/share/javascript/로 연결시키라는 뜻입니다. 사이트 접속자는 /usr/share/javascript/에 접속 권한이 없으므로 forbidden 에러가 ...
우분투 16.04에 SASS를 설치하는 방법은 두 가지가 있습니다. 방법 1 apt install ruby-sass 방법 2 apt install ruby gem install sass 설치되었는지 확인하는 방법 sass -v SASS 버전이 출력되면 제대로 설치된 것입니다. Sass 3.4.23 (Selective Steve) 참고 최신 버전의 SASS를 사용하고 싶다면 방법 2로 설치합니다.
CentOS 7 / firewall-cmd 명령어로 방화벽 관리하기
CentOS의 방화벽 관리 데몬은 firewalld입니다. 설정은 firewall-cmd 명령어로 합니다. 방화벽 실행 여부 확인 firewall-cmd --state 실행 중이면 running, 실행 중이 아니면 not running을 출력합니다. 방화벽 다시 로드 firewall-cmd --reload 방화벽 설정 후 다시 로드해야 적용됩니다. 존(Zone) 출력하기 firewall-cmd --get-zones 존(zone) 목록을 출력합니다. firewall-cmd --get-default-zone 기본 존을 출력합니다. firewall-cmd --get-active-zones 활성화된 존을 출력합니다. 사용 가능한 서비스/포트 출력하기 firewall-cmd --list-all 사용 가능한 모든 서비스/포트 목록을 출력합니다. firewall-cmd --zone=public --list-all public 존에 ...
Ubuntu 22.04 Server / 백신 프로그램 ClamAV 설치 및 사용법
ClamAV ClamAV는 리눅스에서 사용할 수 있는 백신 프로그램이다. 우분투 패키지에 포함되어 있으므로 apt 명령으로 쉽게 설치하고 사용할 수 있다. 설치 # apt install clamav 사용법 데이터베이스 업데이트 clamav-freshclam 서비스를 중지한다. # systemctl stop clamav-freshclam freshclam 명령으로 업데이트한다. # freshclam clamav-freshclam 서비스를 시작한다. # systemctl start clamav-freshclam 검사 home 디렉토리와 그 하위 디렉토리를 검사한다. # clamscan -r /home 검사 결과는 다음처럼 나온다. ----------- SCAN SUMMARY ----------- Known viruses: ...
CentOS는 세계 곳곳의 서버에서 다운로드할 수 있습니다. 다운로드하려는 곳에서 가까운 곳에 있고 회선이 좋은 서버에서 다운로드 받아야 빠르게 다운로드 할 수 있습니다. 다행이 CentOS는 가까운 서버를 알려줘서 다운로드에 소요되는 시간을 줄일 수 있습니다. CentOS 공식 다운로드 페이지로 갑니다. 다운로드 하고 싶은 ISO를 클릭합니다. 카이스트, 카카오, 네이버 등 국내 다운로드 주소를 먼저 보여줍니다. 마음에 드는 ...
cron & crontab cron은 특정 시간에 특정 작업을 수행하게 하는 시스템 대몬이다. 백업, 캐시 메모리 비우기 등 주기적으로 어떤 작업을 해야할 때 유용하다. crontab은 시간과 작업을 적은 텍스트 파일이다. 사용자별로 파일이 존재한다. cron은 모든 사용자의 crontab 파일을 찾아서, 적혀진 일정대로 작업을 수행한다. 작업 목록 보기 예약 작업 목록을 보고 싶다면 다음과 같이 명령한다. 사용자의 crontab ...