리눅스 / 명령어 / rdate / 타임서버의 시간과 동기화해주는 명령어
rdate는 서버의 시간과 타임서버의 시간을 동기화해주는 명령어이다. rdate는 설치되어있지 않는 경우가 많으므로, 필요하다면 설치를 해야 한다. CentOS라면
# yum install rdate
Ubuntu라면
# apt install rdate
와 같이 명령하여 설치할 수 있습니다.
타임서버의 시간을 확인할 때는 -p 옵션을 사용합니다. 현재 서버의 시간을 변경하지 않는다.
# rdate -p time.bora.net
현재 서버의 시간을 타임서버의 시간으로 맞출 때에는 -s 옵션을 붙입니다.
# rdate -s time.bora.net

cat /etc/redhat-release # cat /etc/redhat-release CentOS Linux release 7.4.1708 (Core) cat /etc/*release* # cat /etc/*release* CentOS Linux release 7.4.1708 (Core) Derived from Red Hat Enterprise Linux 7.4 (Source) NAME="CentOS Linux" VERSION="7 (Core)" ID="centos" ID_LIKE="rhel fedora" VERSION_ID="7" PRETTY_NAME="CentOS Linux 7 (Core)" ANSI_COLOR="0;31" CPE_NAME="cpe:/o:centos:centos:7" HOME_URL="https://www.centos.org/" BUG_REPORT_URL="https://bugs.centos.org/" CENTOS_MANTISBT_PROJECT="CentOS-7" CENTOS_MANTISBT_PROJECT_VERSION="7" REDHAT_SUPPORT_PRODUCT="centos" REDHAT_SUPPORT_PRODUCT_VERSION="7" CentOS Linux release 7.4.1708 (Core) CentOS Linux release 7.4.1708 (Core) cpe:/o:centos:centos:7

상태 확인 켜진 상태라면 Enforcing, 꺼진 상태라면 Permissive를 출력한다. getenforce 방법 1 다음과 같이 명령하면 SELinux가 꺼진다. 재부팅하면 다시 SELinux가 켜진다. setenforce 0 만약 다시 SELinux를 사용하고 싶다면 다음과 같이 명령한다. setenforce 1 방법 2 /etc/selinux/config에 다음과 같은 코드가 있다. SELINUX=enforcing 다음과 같이 바꾼다. SELINUX=disabled 시스템을 재부팅하면 적용된다. 방법 1과는 달리 재부팅해도 설정이 유지된다.
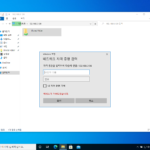
Ubuntu 18.04 Server / 언어 변경하는 방법
현재 언어 확인하기 locale 명령어로 현재 언어가 무엇인지 확인할 수 있습니다. # locale LANG=en_US.UTF-8 LANGUAGE= LC_CTYPE="en_US.UTF-8" LC_NUMERIC="en_US.UTF-8" LC_TIME="en_US.UTF-8" LC_COLLATE="en_US.UTF-8" LC_MONETARY="en_US.UTF-8" LC_MESSAGES="en_US.UTF-8" LC_PAPER="en_US.UTF-8" LC_NAME="en_US.UTF-8" LC_ADDRESS="en_US.UTF-8" LC_TELEPHONE="en_US.UTF-8" LC_MEASUREMENT="en_US.UTF-8" LC_IDENTIFICATION="en_US.UTF-8" LC_ALL= 언어 변경하기 사용할 언어를 먼저 설치합니다. 한국어를 사용하고 싶다면 다음과 같이 명령합니다. # apt-get install language-pack-ko /etc/default/locale을 열고 다음과 같이 만듭니다. LANG=ko_KR.UTF-8 테스트하기 새로 로그인하거나 재부팅하면 변경한 언어가 적용됩니다. 의미 없는 문자열을 입력해보거나... # 123 123: 명령을 찾을 수 없습니다 locale 명령어로 확인할 수 있습니다. # locale LANG=ko_KR.UTF-8 LANGUAGE= LC_CTYPE="ko_KR.UTF-8" LC_NUMERIC="ko_KR.UTF-8" LC_TIME="ko_KR.UTF-8" LC_COLLATE="ko_KR.UTF-8" LC_MONETARY="ko_KR.UTF-8" LC_MESSAGES="ko_KR.UTF-8" LC_PAPER="ko_KR.UTF-8" LC_NAME="ko_KR.UTF-8" LC_ADDRESS="ko_KR.UTF-8" LC_TELEPHONE="ko_KR.UTF-8" LC_MEASUREMENT="ko_KR.UTF-8" LC_IDENTIFICATION="ko_KR.UTF-8" LC_ALL=
리눅스 / 사용자 / 사용자 조회, 사용자 추가, 사용자 삭제, 사용자 수정
사용자 조회 모든 사용자를 출력합니다. # cat /etc/passwd root:x:0:0:root:/root:/bin/bash bin:x:1:1:bin:/bin:/sbin/nologin daemon:x:2:2:daemon:/sbin:/sbin/nologin adm:x:3:4:adm:/var/adm:/sbin/nologin lp:x:4:7:lp:/var/spool/lpd:/sbin/nologin sync:x:5:0:sync:/sbin:/bin/sync shutdown:x:6:0:shutdown:/sbin:/sbin/shutdown halt:x:7:0:halt:/sbin:/sbin/halt mail:x:8:12:mail:/var/spool/mail:/sbin/nologin operator:x:11:0:operator:/root:/sbin/nologin games:x:12:100:games:/usr/games:/sbin/nologin ftp:x:14:50:FTP User:/var/ftp:/sbin/nologin ... root과 useradd 또는 adduser를 통해 생성한 사용자 계정을 출력합니다. # grep /bin/bash /etc/passwd root:x:0:0:root:/root:/bin/bash jb:x:1000:1000:JB:/home/jb:/bin/bash 사용자 추가 useradd jb 사용자를 만듭니다. useradd jb 사용자 홈 디렉토리도 같이 만들고 싶다면 -d 옵션을 사용합니다. useradd jb -d /home/jbdir jb 사용자의 비밀번호를 만듭니다. passwd jb adduser adduser 명령어로 사용자를 추가할 수 있습니다. useradd와는 달리 사용자 홈 디렉토리를 자동으로 만들고, 비밀번호 ...
Ubuntu 20.04 Server / Samba / 설치하고 공유 폴더 만드는 방법
Samba를 이용하여 Ubuntu Server에 공유 폴더를 만들고, Windows 클라이언트에서 접속하는 방법을 알아본다. Samba 설치 Samba를 설치한다. 설치하면 바로 시작하고, 재부팅을 해도 자동으로 시작한다. apt install samba 공유할 폴더를 만들고 권한을 777로 설정한다. mkdir /sharedfolder chmod 777 /sharedfolder 설정 파일은 /etc/samba/smb.conf이다. 텍스트 에디터로 열고 제일 밑에 다음 코드를 추가한다. 폴더 이름은 sharedfolder이지만, 네트워크에서는 Shared Folder로 보인다. comment = ...
리눅스 서버에 SSH 접속을 하는 공격이 있습니다. SSH Brute Force라고 하는데, 여러 아이디와 비밀번호로 로그인을 시도하는 공격입니다. 이 공격을 방어하는 방법은 여러가지가 있습니다. root 계정으로 로그인 못하게 하기 암호를 복잡하게 만들기 접속 가능 IP를 정하기 SSH 포트 번호 바꾸기 이 중에서 SSH 포트 번호 바꾸는 방법을 정리해보겠습니다. CentOS 7 기준이며, 포트 번호를 1980으로 바꾼다고 가정하겠습니다. SSH 설정 파일 ...
리눅스 / 명령어 / alias / 명령어 별칭 만들기
긴 명령어 또는 복잡한 명령어를 자주 사용한다면 alias를 사용하자. 시간을 많이 절약할 수 있다. alias 목록 보기 alias를 실행하면 현재 등록된 alias를 출력한다. alias 예를 들어 ll을 실행한다는 것은 ls -alF를 실행하는 것과 같다. alias egrep='egrep --color=auto' alias fgrep='fgrep --color=auto' alias grep='grep --color=auto' alias l='ls -CF' alias la='ls -A' alias ll='ls -alF' alias ls='ls --color=auto' alias 만들기 alias는 다음과 같이 만든다. abc를 실행하는 ...
CentOS 7 / rsyslog / 로그 서버 구축하는 방법
CentOS을 설치하면 로그 기록을 위한 rsyslog 패키지가 설치되고 실행됩니다. 로그는 로컬 컴퓨터에 저장되는데, 관리하는 컴퓨터가 여러 대인 경우 각각의 로그를 따로 모니터링하는 것이 불편할 수 있습니다. 그런 경우 하나의 컴퓨터를 로그를 수집하는 서버로 만들어서 그 서버에 로그가 쌓이게 하면, 좀 더 수월하게 로그를 관리할 수 있습니다. rsyslog는 간단한 설정 변경으로 로그 ...
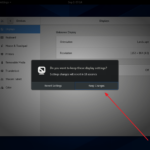
바탕화면에서 마우스 우클릭하고 Display Settings를 클릭합니다. Resolution에서 원하는 해상도를 선택합니다. 오른쪽 위의 Apply를 클릭합니다. Keep Changes를 클릭합니다. 해상도 변경이 완료되었습니다.
CentOS를 설치하려면 다운로드 받은 ISO 파일을 부팅 가능한 CD 또는 USB로 만들어야 한다. ISO를 부팅 가능한 미디어로 만들어주는 프로그램은 여러 가지가 있는데, 그 중 많이 사용되는 것은 Rufus다. Rufus 다운로드 https://rufus.ie/에서 밑으로 내려가면 다운로드할 수 있는 링크가 있다. Rufus Portable은 설치가 필요 없는 실행 파일이다. 개인적으로 Portable 버전을 선호한다. CentOS 부팅 USB 만들기 Rufus를 실행한다. 다음과 ...