Ubuntu 18.04 / 메모
SSH 설정
설정 파일
/etc/ssh/sshd_config
포트 변경하기
다음 코드를
#Port 22
다음처럼 바꾼다.
Port 1234
포트 번호는 자신이 원하는 것으로...
root 계정 로그인 가능하게 만들기
다음 코드를
#PermitRootLogin prohibit-password
다음처럼 만든다.
PermitRootLogin yes
설정 변경 적용하기
service ssh restart
Ubuntu 18.04 Server / apt / 패키지 설치, 삭제, 업그레이드하는 명령어
Ubuntu에서 패키지를 관리하는 명령어는 여러 가지가 있습니다. 그 중 널리 사용되는 것은 apt-get과 apt입니다. 아래는 apt를 이용하여 패키지를 설치하고 삭제하고 업그레이드하는 방법입니다. 대부분의 경우 apt-get을 사용해도 작동합니다. APT 사용법 패키지 목록을 갱신합니다 # apt update 모든 패키지를 최신 버전으로 업그레이드합니다. # apt upgrade abc 패키지를 설치합니다. 의존성있는 패키지도 함께 설치합니다. # apt install abc abc 패키지를 삭제합니다. 설정 ...
Ubuntu Server / do-release-upgrade / 버전 업그레이드 명령어
Ubuntu 새 버전이 나오면 어떻게 업그레이드를 할까? 새로 설치하고 다시 설정하는 게 제일 좋지만, 설정할 게 많다면 바로 업그레이드를 할 수도 있다. 업그레이드는 do-release-upgrade 명령어로 한다. do-release-upgrade -h Usage: do-release-upgrade Options: -h, --help show this help message and exit -V, ...
Ubuntu 18.04 Server / 언어 변경하는 방법
현재 언어 확인하기 locale 명령어로 현재 언어가 무엇인지 확인할 수 있습니다. # locale LANG=en_US.UTF-8 LANGUAGE= LC_CTYPE="en_US.UTF-8" LC_NUMERIC="en_US.UTF-8" LC_TIME="en_US.UTF-8" LC_COLLATE="en_US.UTF-8" LC_MONETARY="en_US.UTF-8" LC_MESSAGES="en_US.UTF-8" LC_PAPER="en_US.UTF-8" LC_NAME="en_US.UTF-8" LC_ADDRESS="en_US.UTF-8" LC_TELEPHONE="en_US.UTF-8" LC_MEASUREMENT="en_US.UTF-8" LC_IDENTIFICATION="en_US.UTF-8" LC_ALL= 언어 변경하기 사용할 언어를 먼저 설치합니다. 한국어를 사용하고 싶다면 다음과 같이 명령합니다. # apt-get install language-pack-ko /etc/default/locale을 열고 다음과 같이 만듭니다. LANG=ko_KR.UTF-8 테스트하기 새로 로그인하거나 재부팅하면 변경한 언어가 적용됩니다. 의미 없는 문자열을 입력해보거나... # 123 123: 명령을 찾을 수 없습니다 locale 명령어로 확인할 수 있습니다. # locale LANG=ko_KR.UTF-8 LANGUAGE= LC_CTYPE="ko_KR.UTF-8" LC_NUMERIC="ko_KR.UTF-8" LC_TIME="ko_KR.UTF-8" LC_COLLATE="ko_KR.UTF-8" LC_MONETARY="ko_KR.UTF-8" LC_MESSAGES="ko_KR.UTF-8" LC_PAPER="ko_KR.UTF-8" LC_NAME="ko_KR.UTF-8" LC_ADDRESS="ko_KR.UTF-8" LC_TELEPHONE="ko_KR.UTF-8" LC_MEASUREMENT="ko_KR.UTF-8" LC_IDENTIFICATION="ko_KR.UTF-8" LC_ALL=
Ubuntu 18.04 Server / 시간대(time zone) 설정하는 방법
현재 서버의 시간대 확인 현재 서버에 설정된 시간대는 date 명령어로 확인할 수 있다. # date 시간대 설정 방법 1 - dpkg-reconfigure tzdata 시간대를 설정하고 싶다면 다음과 같이 명령한다. # dpkg-reconfigure tzdata 한국이라면 Asia를 선택하고 Seoul을 선택합니다. 시간대 설정 방법 2 - tzselect tzselect 명령으로 설정할 수 있다. 번호를 입력하여 시간대를 정한다. # tzselect Please identify a location so that time ...
Ubuntu / 특정 패키지만 업그레이드 하기, 보안 업데이트만 업그레이드 하기
우분투 서버에 접속하면 업데이트가 필요한 패키지가 있는지 알려줍니다. 두 가지 분류로 알려주는데, 하나는 패키지 업데이트, 또 하나는 보안 업데이트입니다. 소프트웨어는 보통 최신 버전을 유지하는 것이 좋지만, 업그레이드했을 때 문제가 없는지 충분히 확인을 해야 합니다. 따라서 특정 패키지만 업그레이드를 하거나, 보안 업데이트만 해야 하는 경우가 발생하는데, 어떻게 그런 작업을 하는지 알아보겠습니다. 특정 ...
다음은 Ubuntu 20.04 Desktop을 설치하는 과정입니다. Windows를 설치하는 것만큼 쉽고, 시간도 오래 걸리지 않습니다. Ubuntu Desktop을 다운로드하고 설치용 CD 또는 USB를 만듭니다. Rufus를 사용하면 편합니다. 컴퓨터에 설치용 미디어를 장착하고 부팅합니다. 잠시 기다리면... GUI로 설치를 시작합니다. 언어를 한국어로 정하고 를 클릭합니다. 키보드 레이아웃을 정하고 를 클릭합니다. 일반 설치와 최소 설치 중 하나를 선택합니다. 최소 설치를 하고 나중에 ...
Ubuntu 18.04 Server / Apache / 사용자 인증 만드는 방법
웹사이트의 콘텐츠를 특정 사용자만 볼 수 있게 하는 방법은 여러 가지가 있습니다. 만약 웹서버에 대한 충분한 권한이 있다면, Apache를 이용하여 구현할 수 있습니다. 비밀번호 파일 만들기 비밀번호 파일은 htpasswd 명령어로 만듭니다. /home/auth/ 디렉토리에 passwords라는 이름의 파일을 만들고, 사용자 user1의 비밀번호를 정하고 싶다면 다음과 같이 명령합니다. # htpasswd -c /home/auth/passwords user1 .htaccess 파일 만들기 웹사이트의 루트 ...
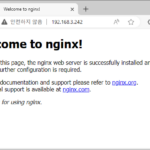
Ubuntu 22.04 Server / NGINX / 설치와 설정
Nginx는 높은 성능과 안정성을 제공하는 웹 서버 소프트웨어로, 웹 서버 외에도 리버스 프록시, 로드 밸런서, 메일 프록시 등의 기능을 수행할 수 있다. Igor Sysoev가 2004년에 처음 개발했으며, 현재는 오픈 소스 소프트웨어로 널리 사용되고 있다. 가정 Ubuntu 22.04 Server의 IP는 192.168.3.242이고, 내 컴퓨터에서 IP로 접근 가능하다. 내 컴퓨터의 OS는 Windows이다. 설치 nginx 패키지 설치 다음과 같이 명령하여 ...
Ubuntu 22.04 Server / root 계정으로 로그인하는 방법, root 계정으로 ssh 접속하는 방법
Ubuntu는 설치할 때 일반 사용자 계정만 만듭니다. 관리자 권한이 필요할 때는 sudo를 이용하죠. 그런데 공부를 위해 혼자만 사용하거나, 여러 가지 이유로 보안에 문제가 없는 경우 root 계정으로 로그인해서 작업하는 게 편합니다. root 계정으로 로그인 하는 방법 일반 사용자 계정으로 로그인합니다. 다음과 같이 명령하여 root 계정의 비밀번호를 만들면 root 계정으로 로그인할 수 있습니다. # sudo ...
Ubuntu Server / Let’s Encrypt 무료 SSL 인증서 발급 받기
Ubuntu Server에서 Apache Web Server를 사용하는 경우 Let’s Encrypt 인증서 발급 받는 방법입니다. Apache용 Certbot 설치 Ubuntu Server 20.04, Ubuntu Server 22.04 # snap install core # snap refresh core # snap install --classic certbot # ln -s /snap/bin/certbot /usr/bin/certbot Ubuntu Server 18.04 # apt install software-properties-common # add-apt-repository universe # add-apt-repository ppa:certbot/certbot # apt update # apt upgrade # apt install certbot ...