Ubuntu / 특정 패키지만 업그레이드 하기, 보안 업데이트만 업그레이드 하기
우분투 서버에 접속하면 업데이트가 필요한 패키지가 있는지 알려줍니다. 두 가지 분류로 알려주는데, 하나는 패키지 업데이트, 또 하나는 보안 업데이트입니다. 소프트웨어는 보통 최신 버전을 유지하는 것이 좋지만, 업그레이드했을 때 문제가 없는지 충분히 확인을 해야 합니다. 따라서 특정 패키지만 업그레이드를 하거나, 보안 업데이트만 해야 하는 경우가 발생하는데, 어떻게 그런 작업을 하는지 알아보겠습니다.
특정 패키지만 업그레이드 하기
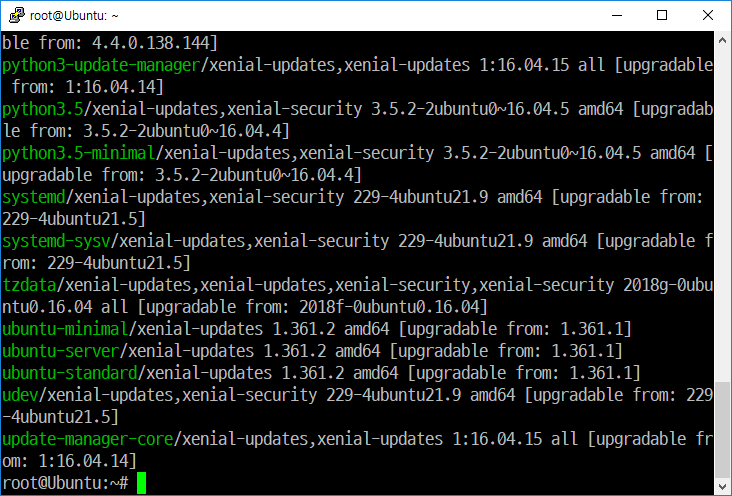
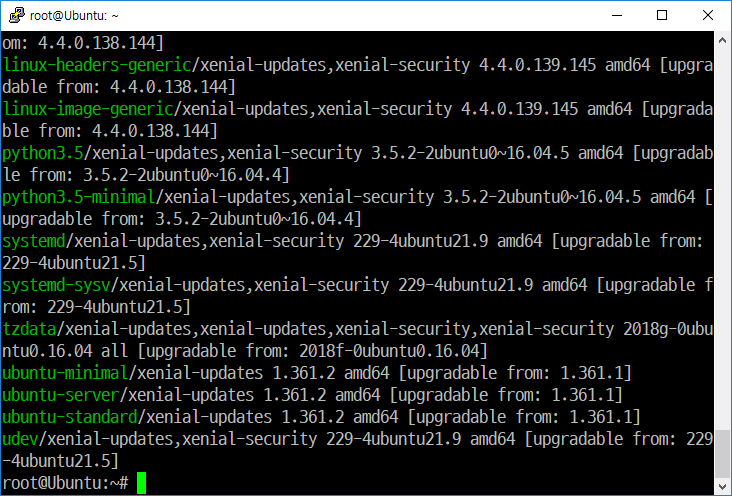
다음 명령으로 업그레이드 가능한 패키지 목록을 볼 수 있습니다.
apt list --upgradable
가장 아래에 보이는 update-manager-core를 업그레이드해보겠습니다.
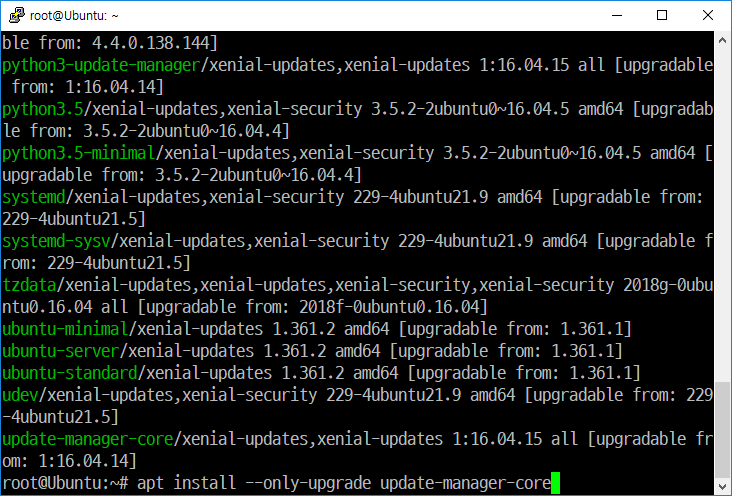
다음과 같이 명령합니다.
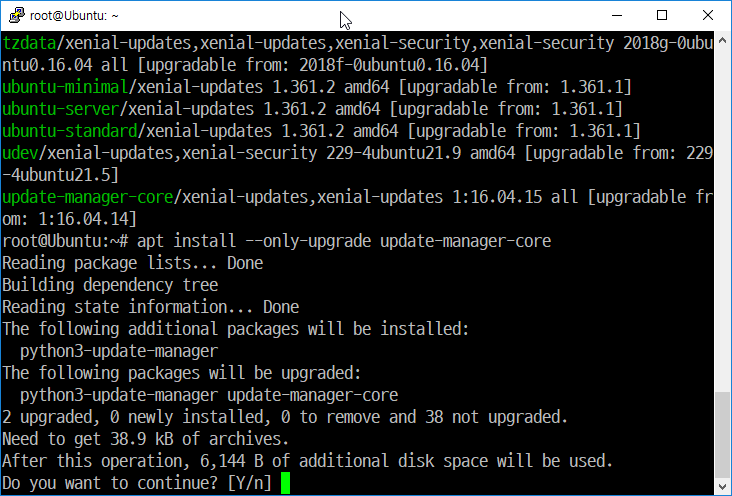
apt install --only-upgrade update-manager-core
하나의 패키지만 선택했지만, 의존성있는 패키지는 같이 업그레이드됩니다.
업그레이드를 마친 후 다시 업그레이드 가능한 패키지 목록을 보면 update-manager-core가 사라진 것을 확인할 수 있습니다.
보안 업데이트만 업그레이드 하기
보안 업데이트만 업그레이드 하는 것은 unattended-upgrades 명령으로 합니다. 보통은 설치되어 있지만, 없다면 설치합니다.
apt install unattended-upgrades
매뉴얼에서는 다음과 같이 설명하고 있습니다.
This program can download and install security upgrades automatically and unattended, taking care to only install packages from the config‐ured APT source, and checking for dpkg prompts about configuration file changes. All output is logged to /var/log/unattended-upgrades.log.
어떤 패키지가 업그레이드 되는지 알고 싶다면 다음과 같이 명령합니다.
unattended-upgrade --dry-run
결과를 보는데 꽤 시간이 오래 걸립니다. 실제로 업그레이드를 하고 싶다면 다음과 같이 명령합니다.
unattended-upgrade
이것도 시간이 꽤 걸립니다. apt로 모든 업데이트를 업그레이드하는 것보다 훨씬 많이 시간이 걸립니다.
보안 업데이트만 업그레이드 하는 다른 방법
/etc/apt/sources.list에서 다음의 보안 업데이트 서버만 그대로 두고 나머지는 다 주석처리(#)합니다.
deb http://security.ubuntu.com/ubuntu xenial-security main restricted
deb http://security.ubuntu.com/ubuntu xenial-security universe
deb http://security.ubuntu.com/ubuntu xenial-security multiverse
업데이트합니다.
apt update
그리고 업그레이드합니다.
apt upgrade
/etc/apt/sources.list를 원래대로 돌려놓습니다.
Ubuntu Server / Let’s Encrypt 무료 SSL 인증서 발급 받기
Ubuntu Server에서 Apache Web Server를 사용하는 경우 Let’s Encrypt 인증서 발급 받는 방법입니다. Apache용 Certbot 설치 Ubuntu Server 20.04, Ubuntu Server 22.04 # snap install core # snap refresh core # snap install --classic certbot # ln -s /snap/bin/certbot /usr/bin/certbot Ubuntu Server 18.04 # apt install software-properties-common # add-apt-repository universe # add-apt-repository ppa:certbot/certbot # apt update # apt upgrade # apt install certbot ...
Ubuntu 24.04 Server / SSH / 포트 변경하는 방법
보안 등의 이유로 SSH 포트를 변경해야 한다면, 다음과 같이 한다. /etc/ssh/sshd_config에서 다음의 코드를... #Port 22 다음으로 변경한다. Port 1980 방화벽이 활성화되어 있다면 1980 포트를 열어준다. ufw allow 1980/tcp SSH 서비스를 다시 시작한다. systemctl restart ssh SSH 서비스를 다시 시작해도 적용되지 않으면, 컴퓨터를 다시 시작한다.
MariaDB / 포트 변경 MariaDB의 기본 접속 포트는 3306입니다. 이를 다른 포트로 변경하고 싶다면 /etc/mysql/mariadb.conf.d/50-server.cnf를 수정합니다. port = 3306 을 찾아서 원하는 포트로 변경한 후 저장합니다. 그리고 MariaDB를 재시작합니다. service mysql restart MariaDB / Can't connect to MySQL server on ... (10061) 다음과 같은 에러를 만났다면... Can't connect to MySQL server on ... (10061) /etc/mysql/mariadb.conf.d/50-server.cnf에 있는 bind-address = 127.0.0.1 를 ...
Ubuntu 24.04 Server / 고정 IP 설정하는 방법
네트워크 설정 파일은 /etc/netplan 디렉토리 안에 있는 yaml 파일입니다. 파일 이름은 시스템마다 다를 수 있습니다. # ll /etc/netplan total 12 drwxr-xr-x 2 root root 4096 Apr 27 23:00 ./ drwxr-xr-x 108 root root 4096 Apr 27 23:06 ../ -rw------- 1 root root 389 Apr 27 23:00 50-cloud-init.yaml DHCP라면 설정 파일이 다음과 ...
Ubuntu 18.04 Desktop에서 해상도 변경하는 방법입니다. 바탕화면에서 마우스 우클릭을 합니다. 를 클릭합니다. 왼쪽 메뉴에서 를 클릭합니다. 왼쪽 메뉴에서 를 클릭하고, 오른쪽에서 해상도를 선택합니다. 오른쪽 위의 버튼을 클릭합니다. 를 클릭합니다.
우분투 14.04에 LESS를 설치하는 방법을 메모합니다. Node.js 설치 apt-get install nodejs NPM 설치 apt-get install npm LESS 설치 npm install -g less less-plugin-clean-css /usr/local/bin/lessc 파일 첫 줄에 다음과 같은 코드가 있습니다. #!/usr/bin/env node 다음처럼 바꿉니다. #!/usr/bin/env nodejs
Ubuntu 18.04 Server / 시간대(time zone) 설정하는 방법
현재 서버의 시간대 확인 현재 서버에 설정된 시간대는 date 명령어로 확인할 수 있다. # date 시간대 설정 방법 1 - dpkg-reconfigure tzdata 시간대를 설정하고 싶다면 다음과 같이 명령한다. # dpkg-reconfigure tzdata 한국이라면 Asia를 선택하고 Seoul을 선택합니다. 시간대 설정 방법 2 - tzselect tzselect 명령으로 설정할 수 있다. 번호를 입력하여 시간대를 정한다. # tzselect Please identify a location so that time ...
우분투 다운로드 우분투 다운로드는 보통 우분투 홈페이지에서 합니다. 상단의 Downloads 메뉴를 클릭하고 안내를 따라가면 됩니다. 그런데, 우분투 홈페이지를 통해 다운로드를 받으면 전송 속도가 느릴 수 있습니다. 만약 너무 느리다면 가까운 미러 사이트에 직접 접속하여 다운로드해보세요. 빠르게 다운로드를 할 수 있습니다. 카카오 서버 한국이라면 카카오 서버가 빠릅니다. 우분투 페이지로 간 다음 원하는 버전을 선택합니다. 데스크톱 이미지와 ...
Ubuntu 22.04 Server / ufw로 방화벽 설정하는 방법
우분투에서 방화벽을 설정하는 명령어는 ufw이다. ufw로 방화벽을 활성화시키고 관리하는 방법은 다음과 같다. 방화벽 활성화 ufw enable 방화벽 비활성화 ufw disable 방화벽 상태 확인 ufw status 53 포트 허용 ufw allow 53 53 포트 tcp 패킷 허용 ufw allow 53/tcp 53 포트 udp 패킷 허용 ufw allow 53/udp 53 포트 거부 ufw deny 53 53 포트 tcp 패킷 거부 ufw deny 53/tcp 53 포트 udp 패킷 거부 ufw deny ...
우분투 16.04에 SASS를 설치하는 방법은 두 가지가 있습니다. 방법 1 apt install ruby-sass 방법 2 apt install ruby gem install sass 설치되었는지 확인하는 방법 sass -v SASS 버전이 출력되면 제대로 설치된 것입니다. Sass 3.4.23 (Selective Steve) 참고 최신 버전의 SASS를 사용하고 싶다면 방법 2로 설치합니다.