How to Enable AMD Virtualization on a GIGABYTE Motherboard
To enable hardware virtualization with an AMD CPU on a GIGABYTE motherboard, set SVM Mode or SVM Enable to Enabled in the BIOS or UEFI, then save and restart. In Windows, open Task Manager → Performance → CPU and check that Virtualization shows Enabled.
Find the SVM setting for your motherboard
SVM (Secure Virtual Machine) is AMD’s hardware virtualization feature. The BIOS or UEFI (Unified Extensible Firmware Interface) is motherboard firmware that runs before Windows. If Task Manager already shows virtualization as enabled, the setting is on.
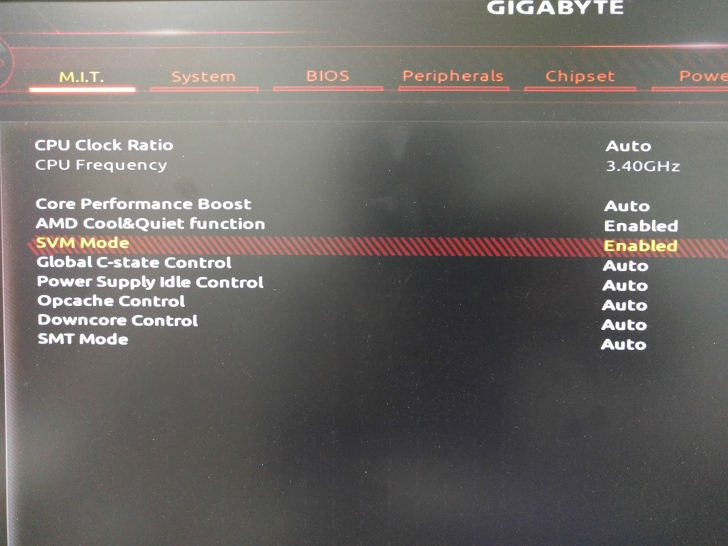
The menu depends on the GIGABYTE board and firmware version. On the A320M-S2H shown here, the path is M.I.T. → Advanced Frequency Settings → Advanced CPU Core Settings → SVM Mode. GIGABYTE’s AMD 800 Series BIOS guide lists Tweaker → Advanced CPU Settings → SVM Enable. Check the model and hardware revision and use your board’s manual first. GIGABYTE A320M-S2H manual (PDF) · GIGABYTE AMD 800 Series BIOS guide (PDF)
Enable SVM in the BIOS
- Save your work and restart the PC. Press Delete when prompted at startup to enter the BIOS setup. Follow the on-screen prompt if your system shows a different key.
- Go to the menu you identified. Write down the current value, such as Disabled or Auto, so you can restore it later.
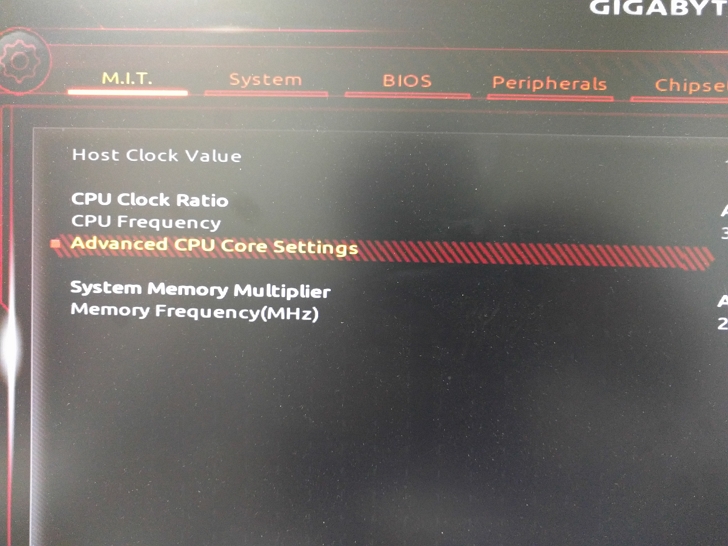
- Set SVM Mode or SVM Enable to Enabled. Leave the CPU voltage, boot order, Trusted Platform Module (TPM), and Secure Boot settings as they are.
- Use Save & Exit to save and restart. You can use F10 if the screen lists it as the save shortcut. In the confirmation dialog, check that SVM is the setting you changed.
If you cannot use the startup key, you can also reach UEFI settings through Windows Advanced startup. For the path in your Windows version, see Microsoft’s guide to Windows virtualization and UEFI access.
Verify the change in Windows Task Manager
- After Windows starts, press Ctrl+Shift+Esc to open Task Manager.
- Open Performance → CPU and look for Virtualization: Enabled in the details. The menu may be on the left or across the top, depending on the Windows version.
This status means Windows can use the CPU’s hardware virtualization. If a virtual machine or Android emulator still fails to launch, check the app’s documentation for its Windows feature and virtualization software requirements.
If SVM is missing or the change does not take effect
- SVM is missing from the menu. If the BIOS is in its simplified mode, follow its prompt to switch to Advanced Mode. If the option is still missing, compare your board’s model and revision, CPU virtualization support, and installed BIOS version with the product documentation.
- Windows still shows Disabled. Reenter the BIOS and verify that SVM was saved as Enabled. If Windows itself is running in a virtual machine, also check whether the host exposes nested virtualization.
- You need to undo the change. Restore the value you wrote down in the same SVM menu, save, and restart. Verify the result in Task Manager.