리눅스 / 로그아웃 명령어, 재부팅 명령어, 종료 명령어

로그아웃 명령어

# logout
# exit

재부팅 명령어

즉시 재부팅

# reboot
# shutdown -r now
# init 6

일정 시간 또는 일정 시간 후 재부팅

  • 10분 후 재부팅
# shutdown -r 10
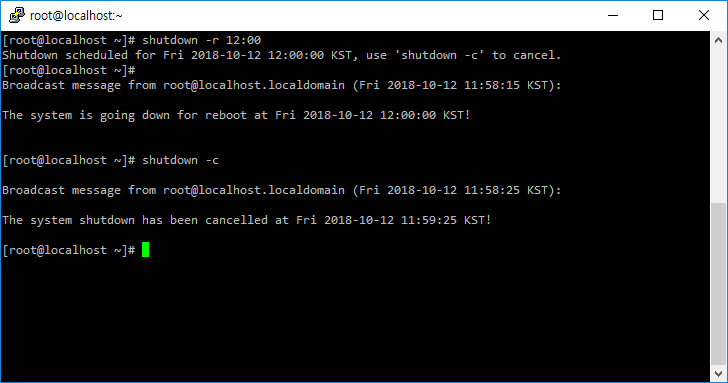
  • 12시에 재부팅
# shutdown -r 12:00
  • 취소
# shutdown -c

종료 명령어

즉시 종료

# poweroff
# shutdown -h now
# shutdown -P now
# halt -p
# init 0

일정 시간 또는 일정 시간 후에 종료

  • 10분 후에 종료
# shutdown -P 10
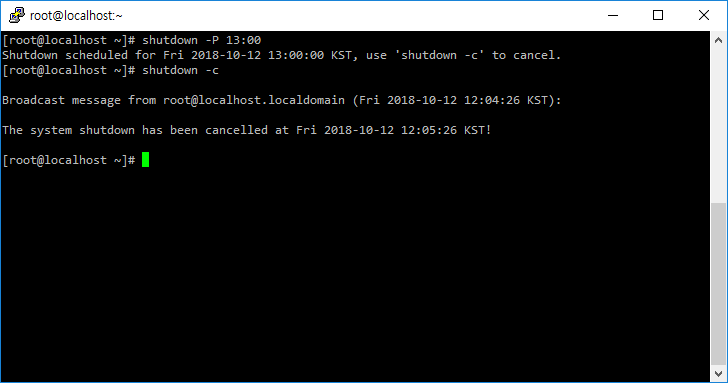
  • 13시에 종료
# shutdown -P 13:00
  • 취소
# shutdown -c

기타

  • 10분 후에 종료할 거라는 메시지를 사용자에게 보내지만, 종료하지는 않음.
# shutdown -k 10


같은 카테고리의 다른 글

Ubuntu Server / Let’s Encrypt 무료 SSL 인증서 발급 받기

Ubuntu Server에서 Apache Web Server를 사용하는 경우 Let’s Encrypt 인증서 발급 받는 방법입니다. Apache용 Certbot 설치 Ubuntu Server 20.04, Ubuntu Server 22.04 # snap install core # snap refresh core # snap install --classic certbot # ln -s /snap/bin/certbot /usr/bin/certbot Ubuntu Server 18.04 # apt install software-properties-common # add-apt-repository universe # add-apt-repository ppa:certbot/certbot # apt update # apt upgrade # apt install certbot ...

Ubuntu 16.04 / phpMyAdmin / 특정 IP에서만 접속 가능하게 만드는 방법

우분투 16.04에서 phpMyAdmin을 패키지로 설치했을 때, 기본 설정은 모든 IP에서 접속 가능입니다. 만약 특정 IP에서만 접속 가능하게 하려면 /etc/apache2/conf-available/phpmyadmin.conf에 다음 코드를 추가합니다. <Directory /usr/share/phpmyadmin> Order deny,allow Deny from all Allow from xxx.xxx.xxx.xxx </Directory> xxx.xxx.xxx.xxx는 접속하려는 IP로 바꿉니다. 여러 IP를 설정하고 싶을 때는 띄어쓰기로 구분합니다. <Directory /usr/share/phpmyadmin> Order deny,allow Deny from all ...

Ubuntu 22.04 Server / NGINX / 설치와 설정

Ubuntu 22.04 Server / NGINX / 설치와 설정

Nginx는 높은 성능과 안정성을 제공하는 웹 서버 소프트웨어로, 웹 서버 외에도 리버스 프록시, 로드 밸런서, 메일 프록시 등의 기능을 수행할 수 있다. Igor Sysoev가 2004년에 처음 개발했으며, 현재는 오픈 소스 소프트웨어로 널리 사용되고 있다. 가정 Ubuntu 22.04 Server의 IP는 192.168.3.242이고, 내 컴퓨터에서 IP로 접근 가능하다. 내 컴퓨터의 OS는 Windows이다. 설치 nginx 패키지 설치 다음과 같이 명령하여 ...

Ubuntu 20.04 Server / GUI 설치하는 방법

Ubuntu 20.04 Server / GUI 설치하는 방법

Ubuntu Server는 CLI(Command Line Interface) 환경으로 설치된다. 그런데 어떤 작업은 GUI(Graphical Uer Interface) 환경에서 하는 것이 편하다. 만약 GUI 환경이 필요하다면 설치하여 사용할 수 있다. GUI 패키지에는 kubuntu-desktop lubuntu-desktop ubuntu-desktop ubuntu-desktop-minimal xubuntu-desktop 등이 있다. 주로 ubuntu-desktop 또는 ubuntu-desktop-minimal을 사용하는 듯 하다. 예를 들어 ubuntu-desktop-minimal을 설치한다면, 다음과 같이 명령하면 된다. # apt install ubuntu-desktop-minimal Minimal임에도 불구하고 꽤 많은 저장소 공간이 필요하다. After ...

리눅스 / 명령어 / rm / 파일 또는 디렉토리 삭제하는 명령어

rm은 remove의 약자로, 파일 또는 디렉토리를 삭제하는 명령어이다. 파일 삭제하기 abc.txt 파일을 삭제한다. 삭제할 건지 다시 묻는다. y 또는 yes를 입력하면 삭제한다. # rm abc.txt 확장자가 txt인 모든 파일을 삭제한다. 각 파일에 대해서 삭제할 건지 묻는다. # rm *.txt 현재 디렉토리에 있는 모든 파일을 삭제한다. 각 파일에 대해서 삭제할 건지 묻고, 디렉토리가 있다면 삭제할 수 없다는 ...

Ubuntu 18.04 Server / Apache / 사용자 인증 만드는 방법

Ubuntu 18.04 Server / Apache / 사용자 인증 만드는 방법

웹사이트의 콘텐츠를 특정 사용자만 볼 수 있게 하는 방법은 여러 가지가 있습니다. 만약 웹서버에 대한 충분한 권한이 있다면, Apache를 이용하여 구현할 수 있습니다. 비밀번호 파일 만들기 비밀번호 파일은 htpasswd 명령어로 만듭니다. /home/auth/ 디렉토리에 passwords라는 이름의 파일을 만들고, 사용자 user1의 비밀번호를 정하고 싶다면 다음과 같이 명령합니다. # htpasswd -c /home/auth/passwords user1 .htaccess 파일 만들기 웹사이트의 루트 ...

Ubuntu Server / 메모

MariaDB / 포트 변경 MariaDB의 기본 접속 포트는 3306입니다. 이를 다른 포트로 변경하고 싶다면 /etc/mysql/mariadb.conf.d/50-server.cnf를 수정합니다. port = 3306 을 찾아서 원하는 포트로 변경한 후 저장합니다. 그리고 MariaDB를 재시작합니다. service mysql restart MariaDB / Can't connect to MySQL server on ... (10061) 다음과 같은 에러를 만났다면... Can't connect to MySQL server on ... (10061) /etc/mysql/mariadb.conf.d/50-server.cnf에 있는 bind-address = 127.0.0.1 를 ...

리눅스 / 사용자 / 사용자 조회, 사용자 추가, 사용자 삭제, 사용자 수정

사용자 조회 모든 사용자를 출력합니다. # cat /etc/passwd root:x:0:0:root:/root:/bin/bash bin:x:1:1:bin:/bin:/sbin/nologin daemon:x:2:2:daemon:/sbin:/sbin/nologin adm:x:3:4:adm:/var/adm:/sbin/nologin lp:x:4:7:lp:/var/spool/lpd:/sbin/nologin sync:x:5:0:sync:/sbin:/bin/sync shutdown:x:6:0:shutdown:/sbin:/sbin/shutdown halt:x:7:0:halt:/sbin:/sbin/halt mail:x:8:12:mail:/var/spool/mail:/sbin/nologin operator:x:11:0:operator:/root:/sbin/nologin games:x:12:100:games:/usr/games:/sbin/nologin ftp:x:14:50:FTP User:/var/ftp:/sbin/nologin ... root과 useradd 또는 adduser를 통해 생성한 사용자 계정을 출력합니다. # grep /bin/bash /etc/passwd root:x:0:0:root:/root:/bin/bash jb:x:1000:1000:JB:/home/jb:/bin/bash 사용자 추가 useradd jb 사용자를 만듭니다. useradd jb 사용자 홈 디렉토리도 같이 만들고 싶다면 -d 옵션을 사용합니다. useradd jb -d /home/jbdir jb 사용자의 비밀번호를 만듭니다. passwd jb adduser adduser 명령어로 사용자를 추가할 수 있습니다. useradd와는 달리 사용자 홈 디렉토리를 자동으로 만들고, 비밀번호 ...

리눅스 / 명령어 / which, whereis, locate / 명령어 위치 찾기

명령어의 위치를 찾을 때 사용할 수 있는 명령어에는 which, whereis, locate가 있다. 명령어의 위치만 찾을 때는 which를 사용하고, 관련된 파일들의 위치까지 찾을 때는 whereis나 locate를 사용한다. which 명령어로 find 명령어를 찾는다. # which find /usr/bin/find whereis 명령어로 find 명령어를 찾는다. # whereis find find: /usr/bin/find /usr/share/man/man1/find.1.gz locate 명령어로 find 명령어를 찾는다. # locate find /usr/bin/find /usr/bin/find2perl /usr/bin/findmnt /usr/bin/nl-link-ifindex2name /usr/bin/nl-link-name2ifindex /usr/bin/oldfind /usr/lib64/python2.7/modulefinder.py /usr/lib64/python2.7/modulefinder.pyc /usr/lib64/python2.7/modulefinder.pyo /usr/sbin/btrfs-find-root /usr/sbin/findfs /usr/share/bash-completion/completions/findmnt /usr/share/doc/findutils-4.5.11 /usr/share/doc/findutils-4.5.11/AUTHORS /usr/share/doc/findutils-4.5.11/COPYING /usr/share/doc/findutils-4.5.11/ChangeLog /usr/share/doc/findutils-4.5.11/NEWS /usr/share/doc/findutils-4.5.11/README /usr/share/doc/findutils-4.5.11/THANKS /usr/share/doc/findutils-4.5.11/TODO /usr/share/doc/wpa_supplicant-2.6/examples/p2p/p2p_find.py /usr/share/doc/wpa_supplicant-2.6/examples/p2p/p2p_stop_find.py /usr/share/info/find-maint.info.gz /usr/share/info/find.info.gz /usr/share/locale/be/LC_MESSAGES/findutils.mo /usr/share/locale/bg/LC_MESSAGES/findutils.mo /usr/share/locale/ca/LC_MESSAGES/findutils.mo /usr/share/locale/cs/LC_MESSAGES/findutils.mo /usr/share/locale/da/LC_MESSAGES/findutils.mo /usr/share/locale/de/LC_MESSAGES/findutils.mo /usr/share/locale/el/LC_MESSAGES/findutils.mo /usr/share/locale/eo/LC_MESSAGES/findutils.mo /usr/share/locale/es/LC_MESSAGES/findutils.mo /usr/share/locale/et/LC_MESSAGES/findutils.mo /usr/share/locale/fi/LC_MESSAGES/findutils.mo /usr/share/locale/fr/LC_MESSAGES/findutils.mo /usr/share/locale/ga/LC_MESSAGES/findutils.mo /usr/share/locale/gl/LC_MESSAGES/findutils.mo /usr/share/locale/hr/LC_MESSAGES/findutils.mo /usr/share/locale/hu/LC_MESSAGES/findutils.mo /usr/share/locale/id/LC_MESSAGES/findutils.mo /usr/share/locale/it/LC_MESSAGES/findutils.mo /usr/share/locale/ja/LC_MESSAGES/findutils.mo /usr/share/locale/ko/LC_MESSAGES/findutils.mo /usr/share/locale/lg/LC_MESSAGES/findutils.mo /usr/share/locale/lt/LC_MESSAGES/findutils.mo /usr/share/locale/ms/LC_MESSAGES/findutils.mo /usr/share/locale/nl/LC_MESSAGES/findutils.mo /usr/share/locale/pl/LC_MESSAGES/findutils.mo /usr/share/locale/pt/LC_MESSAGES/findutils.mo /usr/share/locale/pt_BR/LC_MESSAGES/findutils.mo /usr/share/locale/ro/LC_MESSAGES/findutils.mo /usr/share/locale/ru/LC_MESSAGES/findutils.mo /usr/share/locale/rw/LC_MESSAGES/findutils.mo /usr/share/locale/sk/LC_MESSAGES/findutils.mo /usr/share/locale/sl/LC_MESSAGES/findutils.mo /usr/share/locale/sr/LC_MESSAGES/findutils.mo /usr/share/locale/sv/LC_MESSAGES/findutils.mo /usr/share/locale/tr/LC_MESSAGES/findutils.mo /usr/share/locale/uk/LC_MESSAGES/findutils.mo /usr/share/locale/vi/LC_MESSAGES/findutils.mo /usr/share/locale/zh_CN/LC_MESSAGES/findutils.mo /usr/share/locale/zh_TW/LC_MESSAGES/findutils.mo /usr/share/man/man1/find.1.gz /usr/share/man/man1/find2perl.1.gz /usr/share/man/man1/oldfind.1.gz /usr/share/man/man8/btrfs-find-root.8.gz /usr/share/man/man8/findfs.8.gz /usr/share/man/man8/findmnt.8.gz locate 명령어는 -n 옵션으로 출력 ...

Ubuntu 16.04 Server / 고정 IP 설정하는 방법

네트워크 설정 파일은 /etc/network/interfaces이다. 우분투를 DHCP로 설치했다면 설정 파일의 내용은 다음과 비슷하게 되어 있다. # The primary network interface auto enp0s3 iface enp0s3 inet dhcp 이를 다음처럼 변경하고 저장한다. xxx.xxx.xxx.xxx는 네트워크 환경에 맞게 수정한다. # The primary network interface auto enp0s3 iface enp0s3 inet static address xxx.xxx.xxx.xxx netmask xxx.xxx.xxx.xxx gateway xxx.xxx.xxx.xxx dns-nameservers xxx.xxx.xxx.xxx 다음과 같이 명령하여 네트워크를 재시작한다. systemctl restart networking.service 만약 위와 같이 해도 ...