리눅스 / LVM / 만드는 방법, 수정하는 방법, 삭제하는 방법
1TB 디스크와 2TB 디스크를 추가했다고 하자. 디스크 크기에 맞게 그대로 사용할 수도 있지만, 3TB 하나인 것처럼 사용하거나 1.5TB 두 개인 것처럼 사용하고 싶을 수도 있다. 즉, 물리적인 디스크 크기와 무관하게 자유롭게 볼륨을 만들고 싶은 것이다.
이럴 때 사용하는 것이 LVM(Logical Volume Manager)이다. 여러 개의 볼륨을 하나로 묶은 후 다시 배분하여 사용한다.(이렇게 만든 볼륨을 논리적 볼륨이라고 한다.)
LVM을 이용하여 논리적 볼륨을 만들고, 수정하고, 삭제하는 방법을 알아본다.
차례
LVM 만들기
LVM으로 볼륨을 만드는 순서는 다음과 같다.
- 물리적 볼륨을 만든다.
- 물리적 볼륨을 묶어서 볼륨 그룹을 만든다.
- 볼륨 그룹에 논리적 볼륨을 만든다.
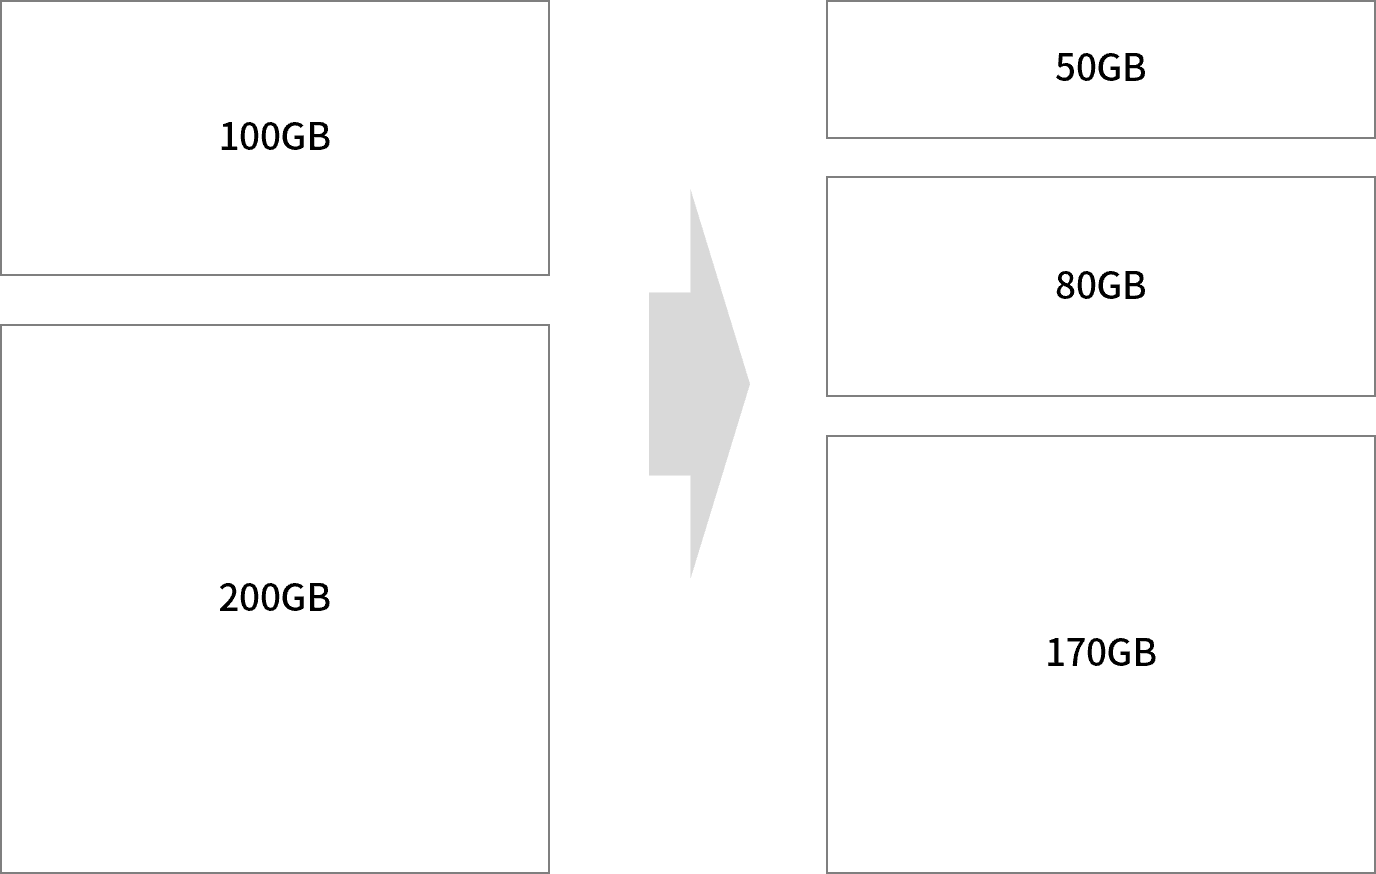
간단한 예로 어떻게 구성하는지 알아보자. 목표는 100GB 디스크과 200GB 디스크로 50GB, 80GB, 170GB 볼륨을 만드는 것이다.
파티션 만들기
- 현재 상태는 다음과 같다. 디스크 두 개를 추가해서 /dev/sdb와 /dev/sdc가 생겼고, /dev/sdb의 크기는 100GB, /dev/sdc의 크기는 200GB이다.
# ls /dev/sd*
/dev/sda  /dev/sda1  /dev/sda2  /dev/sda3  /dev/sdb  /dev/sdc
- fdisk로 파티션을 만든다. 주의할 점은 타입을 8e로 해야 한다는 것이다.
# fdisk /dev/sdb

Welcome to fdisk (util-linux 2.34).
Changes will remain in memory only, until you decide to write them.
Be careful before using the write command.

Device does not contain a recognized partition table.
Created a new DOS disklabel with disk identifier 0xa066b799.

Command (m for help): n
Partition type
   p   primary (0 primary, 0 extended, 4 free)
   e   extended (container for logical partitions)
Select (default p): p
Partition number (1-4, default 1): 1
First sector (2048-209715199, default 2048):
Last sector, +/-sectors or +/-size{K,M,G,T,P} (2048-209715199, default 209715199):

Created a new partition 1 of type 'Linux' and of size 100 GiB.

Command (m for help): t
Selected partition 1
Hex code (type L to list all codes): 8e
Changed type of partition 'Linux' to 'Linux LVM'.

Command (m for help): w
The partition table has been altered.
Calling ioctl() to re-read partition table.
Syncing disks.
- 파티션을 만든 후의 상태는 다음과 같다.
# ls /dev/sd*
/dev/sda  /dev/sda1  /dev/sda2  /dev/sda3  /dev/sdb  /dev/sdb1  /dev/sdc  /dev/sdc1
물리적 볼륨 만들기
- /dev/sdb1과 /dev/sdc1로 물리적 볼륨(Physical Volume)을 만든다.
# pvcreate /dev/sdb1
  Physical volume "/dev/sdb1" successfully created.
root@ubuntu-2004-s-02:~# pvcreate /dev/sdc1
  Physical volume "/dev/sdc1" successfully created.
볼륨 그룹 만들기
- /dev/sdb1과 /dev/sdc1를 볼륨 그룹으로 만든다.
- VG-01은 볼륨 그룹의 이름으로, 다른 것으로 만들어도 된다.
# vgcreate VG-01 /dev/sdb1 /dev/sdc1
  Volume group "VG-01" successfully created
논리적 볼륨 만들기
- VG-01 볼륨 그룹에 50GB 크기의 논리적 볼륨(Logical Volume)을 만든다.
- LG-01은 논리적 볼륨의 이름으로, 다른 것으로 만들어도 된다.
# lvcreate --size 50G --name LG-01 VG-01
  Logical volume "LG-01" created.
- LG-02라는 이름의 80GB 크기의 논리적 볼륨을 만든다.
# lvcreate --size 80G --name LG-02 VG-01
  Logical volume "LG-02" created.
- 나머지 공간을 다 사용하는 LG-03이라는 이름의 논리적 볼륨을 만든다.
# lvcreate --extents 100%FREE --name LG-03 VG-01
  Logical volume "LG-03" created.
포맷하고 마운트하기
- 논리적 볼륨을 포맷한다. 아래는 LG-01을 EXT4 형식으로 포맷한 것이다.
# mkfs.ext4 /dev/VG-01/LG-01
mke2fs 1.45.5 (07-Jan-2020)
Creating filesystem with 13107200 4k blocks and 3276800 inodes
Filesystem UUID: ee2a0e20-db9f-4e38-b3d1-d46f00ccc215
Superblock backups stored on blocks:
        32768, 98304, 163840, 229376, 294912, 819200, 884736, 1605632, 2654208,
        4096000, 7962624, 11239424

Allocating group tables: done
Writing inode tables: done
Creating journal (65536 blocks): done
Writing superblocks and filesystem accounting information: done
- 적당한 이름의 폴더를 만들고 마운트한다.
# mkdir /LG-01
# mount /dev/VG-01/LG-01 /LG-01
- 다음은 세 개의 논리적 볼륨을 포맷하고 마운트한 결과이다. 제일 아래 세 줄에 논리적 볼륨이 추가된 것을 확인할 수 있다.
# df -h
Filesystem                         Size  Used Avail Use% Mounted on
udev                               1.9G     0  1.9G   0% /dev
tmpfs                              394M  1.4M  393M   1% /run
/dev/mapper/ubuntu--vg-ubuntu--lv  196G  8.8G  178G   5% /
tmpfs                              2.0G     0  2.0G   0% /dev/shm
tmpfs                              5.0M  4.0K  5.0M   1% /run/lock
tmpfs                              2.0G     0  2.0G   0% /sys/fs/cgroup
/dev/loop1                          62M   62M     0 100% /snap/core20/1169
/dev/loop2                          71M   71M     0 100% /snap/lxd/21029
/dev/loop3                          68M   68M     0 100% /snap/lxd/21545
/dev/sda2                          976M  112M  798M  13% /boot
/dev/loop4                          56M   56M     0 100% /snap/core18/2128
/dev/loop5                          33M   33M     0 100% /snap/snapd/13170
/dev/loop0                          62M   62M     0 100% /snap/core20/1081
/dev/loop6                          33M   33M     0 100% /snap/snapd/12704
tmpfs                              394M   36K  394M   1% /run/user/128
tmpfs                              394M     0  394M   0% /run/user/0
/dev/mapper/VG--01-LG--01           49G   53M   47G   1% /LG-01
/dev/mapper/VG--01-LG--02           79G   57M   75G   1% /LG-02
/dev/mapper/VG--01-LG--03          167G   61M  158G   1% /LG-03
LVM 수정하기
볼륨 추가
볼륨 그룹에 볼륨을 추가하여 전체 공간을 확장할 수 있다. 위 예제에 이어 200GB 하드 디스크를 추가로 장착했다고 하면...
- 디스크를 추가하면 아래와 같은 상태가 된다. /dev/sdd가 추가한 디스크이다.
# ls /dev/sd*
/dev/sda  /dev/sda1  /dev/sda2  /dev/sda3  /dev/sdb  /dev/sdb1  /dev/sdc  /dev/sdc1  /dev/sdd
- Linux LVM 파티션을 만든다.
# fdisk /dev/sdd

Welcome to fdisk (util-linux 2.34).
Changes will remain in memory only, until you decide to write them.
Be careful before using the write command.

Device does not contain a recognized partition table.
Created a new DOS disklabel with disk identifier 0x8aa237e3.

Command (m for help): n
Partition type
   p   primary (0 primary, 0 extended, 4 free)
   e   extended (container for logical partitions)
Select (default p): p
Partition number (1-4, default 1):
First sector (2048-419430399, default 2048):
Last sector, +/-sectors or +/-size{K,M,G,T,P} (2048-419430399, default 419430399):

Created a new partition 1 of type 'Linux' and of size 200 GiB.

Command (m for help): t
Selected partition 1
Hex code (type L to list all codes): 8e
Changed type of partition 'Linux' to 'Linux LVM'.

Command (m for help): w
The partition table has been altered.
Calling ioctl() to re-read partition table.
Syncing disks.
- 물리적 볼륨을 만든다.
# pvcreate /dev/sdd1
  Physical volume "/dev/sdd1" successfully created.
- VG-01 볼륨 그룹에 추가한다.
# vgextend VG-01 /dev/sdd1
  Volume group "VG-01" successfully extended
- 200GB의 여유 공간이 생긴다.
# vgdisplay VG-01
  --- Volume group ---
  VG Name               VG-01
  System ID
  Format                lvm2
  Metadata Areas        3
  Metadata Sequence No  9
  VG Access             read/write
  VG Status             resizable
  MAX LV                0
  Cur LV                3
  Open LV               3
  Max PV                0
  Cur PV                3
  Act PV                3
  VG Size               <499.99 GiB
  PE Size               4.00 MiB
  Total PE              127997
  Alloc PE / Size       76798 / 299.99 GiB
  Free  PE / Size       51199 / <200.00 GiB
  VG UUID               YLV2F1-x00c-4CZt-LsCh-3q9O-iE3L-Ynx2vG
확장된 공간에 새로운 논리적 볼륨을 만들거나, 기존 논리적 볼륨의 크기를 늘릴 수 있다.
논리적 볼륨 확장하기
- lvextend 명령어로 논리적 볼륨의 크기를 확장한다. 아래는 /dev/VG-01/LG-01의 크기를 1GB 늘리는 것.
# lvextend -L+1G /dev/VG-01/LG-01
  Size of logical volume VG-01/LG-01 changed from 50.00 GiB (12800 extents) to 51.00 GiB (13056 extents).
  Logical volume VG-01/LG-01 successfully resized.
- resize2fs 명령어로 파일 시스템의 크기를 확장해야 반영된다.
# resize2fs /dev/VG-01/LG-01
resize2fs 1.45.5 (07-Jan-2020)
Filesystem at /dev/VG-01/LG-01 is mounted on /LG-01; on-line resizing required
old_desc_blocks = 7, new_desc_blocks = 7
The filesystem on /dev/VG-01/LG-01 is now 13369344 (4k) blocks long.
- 아래는 /dev/VG-01/LG-01의 크기를 60GB로 늘리는 것. 마찬가지로 resize2fs 명령으로 파일 시스템 크기를 확장한다.
# lvextend -L60G /dev/VG-01/LG-01
  Size of logical volume VG-01/LG-01 changed from 51.00 GiB (13056 extents) to 60.00 GiB (15360 extents).
  Logical volume VG-01/LG-01 successfully resized.
# resize2fs /dev/VG-01/LG-01
resize2fs 1.45.5 (07-Jan-2020)
Filesystem at /dev/VG-01/LG-01 is mounted on /LG-01; on-line resizing required
old_desc_blocks = 7, new_desc_blocks = 8
The filesystem on /dev/VG-01/LG-01 is now 15728640 (4k) blocks long.
LVM 삭제하기
LVM 삭제는 LVM 생성의 역순으로 진행한다.
논리적 볼륨 삭제하기
lvremove 명령어로 논리적 볼륨을 삭제한다. 아래는 /dev/VG-01/LG-03를 삭제하는 것.
# lvremove /dev/VG-01/LG-03
Do you really want to remove and DISCARD active logical volume VG-01/LG-03? [y/n]: y
  Logical volume "LG-03" successfully removed
볼륨 그룹 삭제하기
vgremove 명령어로 볼륨 그룹을 삭제한다. 아래는 VG-01을 삭제하는 것으로, 볼륨 그룹 안에 논리적 볼륨이 남아 있으면 삭제할 것인지 묻는다.
# vgremove VG-01
Do you really want to remove volume group "VG-01" containing 2 logical volumes? [y/n]: y
Do you really want to remove and DISCARD active logical volume VG-01/LG-01? [y/n]: y
  Logical volume "LG-01" successfully removed
Do you really want to remove and DISCARD active logical volume VG-01/LG-02? [y/n]: y
  Logical volume "LG-02" successfully removed
  Volume group "VG-01" successfully removed
물리적 볼륨 삭제하기
pvremove 명령어로 물리적 볼륨을 삭제한다. 아래는 /dev/sdd1을 삭제하는 것.
# pvremove /dev/sdd1
  Labels on physical volume "/dev/sdd1" successfully wiped.
리눅스 / LVM / 만드는 방법, 수정하는 방법, 삭제하는 방법
1TB 디스크와 2TB 디스크를 추가했다고 하자. 디스크 크기에 맞게 그대로 사용할 수도 있지만, 3TB 하나인 것처럼 사용하거나 1.5TB 두 개인 것처럼 사용하고 싶을 수도 있다. 즉, 물리적인 디스크 크기와 무관하게 자유롭게 볼륨을 만들고 싶은 것이다. 이럴 때 사용하는 것이 LVM(Logical Volume Manager)이다. 여러 개의 볼륨을 하나로 묶은 후 다시 배분하여 사용한다.(이렇게 ...
CentOS 8 / Squid로 Proxy Server 만드는 방법
리눅스로 프록시 서버(Proxy Server)를 만들 때 스퀴드(Squid)를 주로 사용합니다. 오픈 소스이고, 대부분의 리눅스 배포판에 패키지로 포함되어 있습니다. 스퀴드(squid)는 대중적인 오픈 소스(GPL)소프트웨어 프록시 서버이자 웹 캐시이다. 반복된 요청을 캐싱함으로 웹서버의 속도를 향상시키는 것부터, 네트워크 자원을 공유하려는 사람들에게 웹, DNS와 다른 네트워크 검색의 캐싱을 제공하고, 트래픽을 걸러줌으로써 안정성에 도움을 주는 등에 이르기까지 광범위 ...
리눅스 / CPU 이름, 코어 수, 스레드 수 확인하는 방법
리눅스에서 lscpu 명령으로 CPU의 정보를 확인할 수 있습니다. 출력하는 내용 중에 CPU 이름, 코어 수, 스레드 수가 있습니다. 아래는 lscpu 명령을 내린 결과 예시입니다. # lscpu Architecture: x86_64 CPU op-mode(s): 32-bit, 64-bit Byte Order: ...
Ubuntu / 특정 패키지만 업그레이드 하기, 보안 업데이트만 업그레이드 하기
우분투 서버에 접속하면 업데이트가 필요한 패키지가 있는지 알려줍니다. 두 가지 분류로 알려주는데, 하나는 패키지 업데이트, 또 하나는 보안 업데이트입니다. 소프트웨어는 보통 최신 버전을 유지하는 것이 좋지만, 업그레이드했을 때 문제가 없는지 충분히 확인을 해야 합니다. 따라서 특정 패키지만 업그레이드를 하거나, 보안 업데이트만 해야 하는 경우가 발생하는데, 어떻게 그런 작업을 하는지 알아보겠습니다. 특정 ...
Ubuntu 24.04 Server / 고정 IP 설정하는 방법
네트워크 설정 파일은 /etc/netplan 디렉토리 안에 있는 yaml 파일입니다. 파일 이름은 시스템마다 다를 수 있습니다. # ll /etc/netplan total 12 drwxr-xr-x 2 root root 4096 Apr 27 23:00 ./ drwxr-xr-x 108 root root 4096 Apr 27 23:06 ../ -rw------- 1 root root 389 Apr 27 23:00 50-cloud-init.yaml DHCP라면 설정 파일이 다음과 ...
리눅스 / 로그아웃 명령어, 재부팅 명령어, 종료 명령어
로그아웃 명령어 # logout # exit 재부팅 명령어 즉시 재부팅 # reboot # shutdown -r now # init 6 일정 시간 또는 일정 시간 후 재부팅 10분 후 재부팅 # shutdown -r 10 12시에 재부팅 # shutdown -r 12:00 취소 # shutdown -c 종료 명령어 즉시 종료 # poweroff # shutdown -h now # shutdown -P now # halt -p # init 0 일정 시간 또는 일정 시간 후에 종료 10분 후에 종료 # ...

CentOS 7 / ntsysv로 부팅할 때 서비스 자동으로 시작하게 하기
서비스 관리는 보통 systemctl 명령어로 합니다. systemctl 명령어의 enable을 이용하면 시스템이 부팅할 때 서비스가 자동으로 시작하게 할 수 있습니다. 예를 들어 systemctl enable httpd.service 는 서버가 부팅할 때 httpd 서비스를 자동으로 시작합니다. 만약 이러한 서비스 관리를 명령어로 하는 불편하다면 ntsysv를 사용해보세요. TUI로 자동으로 시작하는 서비스를 관리할 수 있습니다. 다음과 같이 명령하여 ntsysv 패키지를 설치합니다. yum install ntsysv 다음과 같이 ...
리눅스 / 명령어 / history / 이전에 실행했던 명령어 목록 출력하는 명령어
history는 이전에 실행했던 명령어 목록 출력하는 명령어이다. history 이전에 실행했던 명령어 목록을 일련번호와 함께 출력한다. # history history n 최근 n개의 명령어 목록을 출력한다. 다음과 같이 명령하면 최근 실행한 10개의 명령어를 출력한다. # history 10 !! !!를 입력하고 엔터를 누르면 직전에 실행했던 명령어를 다시 실행한다. !n 일련번호가 n인 명령어를 실행한다. 다음과 같이 명령하면 번호가 202인 명령어를 실행한다. # !202
CentOS 7 / rsyslog / 로그 서버 구축하는 방법
CentOS을 설치하면 로그 기록을 위한 rsyslog 패키지가 설치되고 실행됩니다. 로그는 로컬 컴퓨터에 저장되는데, 관리하는 컴퓨터가 여러 대인 경우 각각의 로그를 따로 모니터링하는 것이 불편할 수 있습니다. 그런 경우 하나의 컴퓨터를 로그를 수집하는 서버로 만들어서 그 서버에 로그가 쌓이게 하면, 좀 더 수월하게 로그를 관리할 수 있습니다. rsyslog는 간단한 설정 변경으로 로그 ...
리눅스 / 그룹 / 그룹 조회, 그룹 추가, 그룹 삭제, 그룹 수정
그룹 조회 그룹 목록은 /et/group 파일에 있습니다. cat 명령어로 전체를 조회하거나... cat /etc/group tail 명령어로 마지막 부분을 조회할 수 있습니다. # tail -n 5 /etc/group avahi:x:70: slocate:x:21: rngd:x:974: tcpdump:x:72: vboxsf:x:973: X:Y:Z 형식으로 나오는데, X는 그룹 이름, Y는 그룹 비밀번호, Z는 그룹 ID입니다. 그룹 추가 groupadd 명령으로 그룹을 추가합니다. # groupadd group-1 # tail -n 5 /etc/group slocate:x:21: rngd:x:974: tcpdump:x:72: vboxsf:x:973: group-1:x:1000: 그룹 삭제 groupdel 명령으로 그룹을 삭제합니다. # ...