Ubuntu Server / Apache, PHP, MariaDB 설치하는 방법

Ubuntu Server에 웹서버 Apache, 웹프로그래밍 언어 PHP, 데이터베이스 MariaDB를 설치하는 방법입니다. 웹서버 운영을 위한 최소한의 설치로, 실제로 서비스할 때는 더 많은 패키지가 필요할 수 있습니다.

설치

  • Apache, PHP, MariaDB를 설치합니다. php-mysql은 PHP와 MariaDB 연동을 위한 패키지입니다.
apt install apache2 mariadb-server php php-mysql

MariaDB 설정

  • 다음과 같이 명령하여 몇 가지 설정을 합니다.
mysql_secure_installation
  • MariaDB의 root 계정 비밀번호를 입력하라고 나오는데, 비밀번호가 없으므로 그냥 엔터를 누릅니다.
Enter current password for root (enter for none):
  • root의 비밀번호를 설정합니다.
Set root password? [Y/n]
  • 네 가지 질문이 더 나옵니다. 적절히 설정합니다. 보통 전부 Y를 선택합니다.
Remove anonymous users? [Y/n]
Disallow root login remotely? [Y/n]
Remove test database and access to it? [Y/n]
Reload privilege tables now? [Y/n]

테스트

/var/www/html에 다음의 내용을 가진 phpinfo.php 파일을 만듭니다.

<?php phpinfo(); ?>

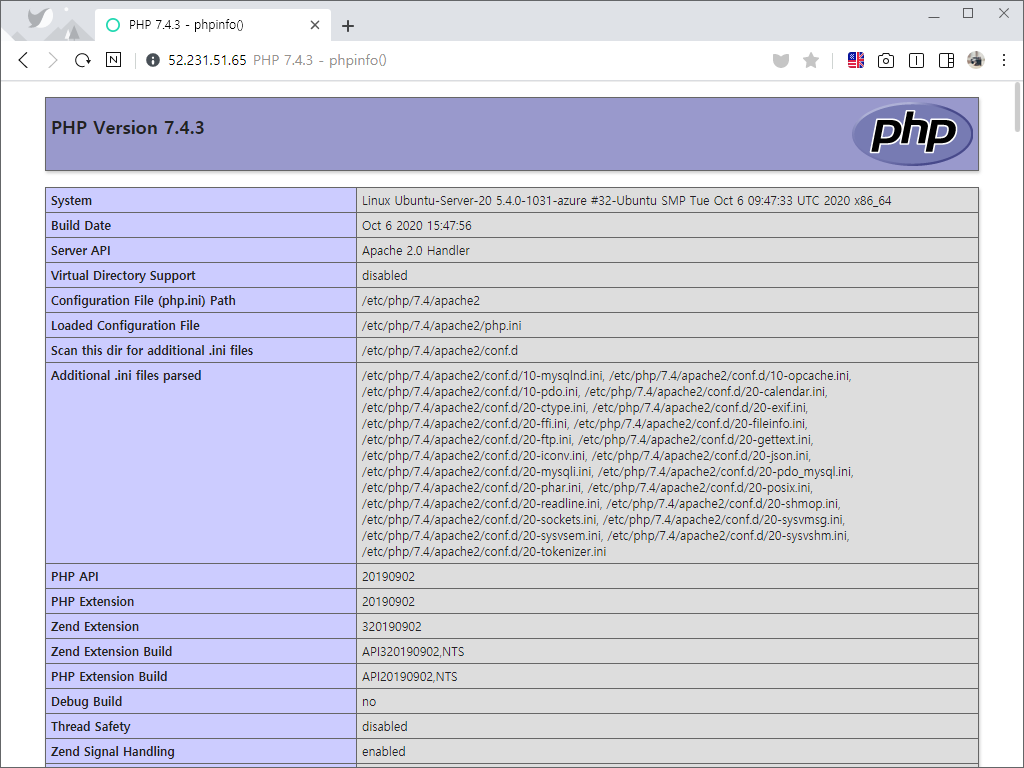
http://<Server-IP>/phpinfo.php로 접속하여 다음과 같은 화면이 나오는지 확인합니다.
Tip

MariaDB에 웹에서 root 계정으로 접속하고 싶다면

  • MariaDB에 접속
mysql -uroot -p
  • mysql 데이터베이스 수정
use mysql;
update user set plugin='' where user='root';
flush privileges;

외부에서 MariaDB에 접속하고 싶다면

  • 외부에서 MariaDB에 접속하고 싶다면 /etc/mysql/mariadb.conf.d/50-server.cnf에 있는 다음 코드를 주석처리하거나 삭제합니다.
bind-address = 127.0.0.1
  • MariaDB를 재시작합니다.
systemctl restart mariadb.service

같은 카테고리의 다른 글

Ubuntu Server / 고정 IP 설정하는 방법

Ubuntu Server / 고정 IP 설정하는 방법

Ubuntu Server 22.04 설정 파일 수정하기 네트워크 설정 파일은 /etc/netplan 디렉토리 안에 있는 yaml 파일이다. DHCP로 설치했다면, 설정 파일 내용은 다음과 비슷하게 되어 있다. # This is the network config written by 'subiquity' network: ethernets: eth0: dhcp4: true version: 2 다음과 같이 수정하고 저장한다. IP 등은 ...

Ubuntu Server / Nginx, PHP, MariaDB 설치하고 설정하기

Ubuntu Server / Nginx, PHP, MariaDB 설치하고 설정하기

Nginx 설치 Nginx를 설치합니다. apt install nginx 만약 방화벽을 사용하고 있다면 포트를 열어줍니다. ufw allow 'Nginx Full' 서버 주소로 접속했을 때 다음과 같이 나오면 제대로 된 것입니다. 시작, 정지 등 Nginx를 시작합니다. systemctl start nginx Nginx를 멈춥니다. systemctl stop nginx Nginx를 재시작합니다. systemctl restart nginx Nginx를 다시 로드합니다. systemctl reload nginx Nginx를 설치하면 부팅 시 자동으로 시작하게 설정됩니다. 만약 자동 시작을 해제하고 싶다면 다음과 같이 명령합니다. systemctl ...

Ubuntu / hostname 확인하는 방법, 변경하는 방법

Ubuntu / hostname 확인하는 방법, 변경하는 방법

hostname 확인하는 방법 방법 1 - 명령어로 확인하기 다음과 같이 명령하면 hostname을 출력한다. hostname 방법 2 - 설정 파일 열어서 확인하기 /etc/hostname 파일에 hostname이 있다. cat /etc/hostname hostname 변경하는 방법 방법 1 - 명령어로 변경하기 다음과 같이 명령하면 hostname이 abc로 바뀐다. hostnamectl set-hostname abc 방법 2 - 설정 파일 열어서 변경하기 텍스트 에디터로 /etc/hostname 파일을 열어서 내용을 abc로 바꾸면 hostname이 abc로 바뀐다. 재부팅 재부팅을 하면 변경사항이 ...

Ubuntu Server / Apache, PHP, MariaDB 설치하는 방법

Ubuntu Server / Apache, PHP, MariaDB 설치하는 방법

Ubuntu Server에 웹서버 Apache, 웹프로그래밍 언어 PHP, 데이터베이스 MariaDB를 설치하는 방법입니다. 웹서버 운영을 위한 최소한의 설치로, 실제로 서비스할 때는 더 많은 패키지가 필요할 수 있습니다. 설치 Apache, PHP, MariaDB를 설치합니다. php-mysql은 PHP와 MariaDB 연동을 위한 패키지입니다. apt install apache2 mariadb-server php php-mysql MariaDB 설정 다음과 같이 명령하여 몇 가지 설정을 합니다. mysql_secure_installation MariaDB의 root 계정 비밀번호를 입력하라고 ...

Ubuntu Server / Let’s Encrypt 무료 SSL 인증서 발급 받기

Ubuntu Server / Let’s Encrypt 무료 SSL 인증서 발급 받기

Ubuntu Server에서 Apache Web Server를 사용하는 경우 Let’s Encrypt 인증서 발급 받는 방법입니다. Apache용 Certbot 설치 Ubuntu Server 18.04, Ubuntu Server 20.04 apt install software-properties-common add-apt-repository universe add-apt-repository ppa:certbot/certbot apt update apt upgrade apt install certbot python3-certbot-apache Ubuntu Server 16.04 add-apt-repository ppa:certbot/certbot apt update apt upgrade apt install python-certbot-apache 인증서 발급 abc.com 인증서 발급하고 설정 파일 생성 certbot --apache -d abc.com abc.com과 www.abc.com 인증서 동시 발급하고 설정 ...

Ubuntu Server / Apache / 사용자 인증 만드는 방법

Ubuntu Server / Apache / 사용자 인증 만드는 방법

웹사이트의 콘텐츠를 특정 사용자만 볼 수 있게 하는 방법은 여러 가지가 있습니다. 만약 웹서버에 대한 충분한 권한이 있다면, Apache를 이용하여 구현할 수 있습니다. 비밀번호 파일 만들기 비밀번호 파일은 htpasswd 명령어로 만듭니다. /home/auth/ 디렉토리에 passwords라는 이름의 파일을 만들고, 사용자 user1의 비밀번호를 정하고 싶다면 다음과 같이 명령합니다. htpasswd -c /home/auth/passwords user1 .htaccess 파일 만들기 웹사이트의 루트 디렉토리에 ...

Ubuntu / Webmin / 설치하는 방법

Ubuntu / Webmin / 설치하는 방법

Webmin은 웹브라우저를 통해 시스템 관리를 하는 툴이다. Webmin is a web-based interface for system administration for Unix. Using any modern web browser, you can setup user accounts, Apache, DNS, file sharing and much more. Webmin removes the need to manually edit Unix configuration files like /etc/passwd, and lets you manage a ...

Ubuntu / 시간대(time zone) 설정하는 방법

Ubuntu / 시간대(time zone) 설정하는 방법

현재 서버의 시간대 확인 현재 서버에 설정된 시간대는 date 명령어로 확인할 수 있다. root@jb-dev-01:~# date Mon Dec 3 17:03:06 UTC 2018 시간대 설정 방법 1 - dpkg-reconfigure tzdata 시간대를 설정하고 싶다면 다음과 같이 명령한다. dpkg-reconfigure tzdata 한국이라면 Asia를 선택하고 Seoul을 선택합니다. 시간대 설정 방법 2 - tzselect tzselect 명령으로 설정할 수 있다. 번호를 입력하여 시간대를 정한다. root@ubuntu-1804-server:~# tzselect Please identify ...

Ubuntu Server / PHP 최신 버전으로 업그레이드하는 방법

Ubuntu Server / PHP 최신 버전으로 업그레이드하는 방법

Ubuntu 패키지로 설치한 PHP 버전보다 PHP 최신 버전이 더 높을 수 있습니다. 예를 들어 패키지로 설치한 PHP의 버전은 7.0, 최신 버전은 7.2일 수 있다는 것이죠. 만약 최신 버전의 PHP를 사용해야 한다면 다음의 방법으로 설치할 수 있습니다. PHP를 처음 설치하는 경우 저장소를 추가합니다. add-apt-repository ppa:ondrej/php 패키지 정보를 업데이트합니다. apt-get update PHP를 설치합니다. apt-get install php PHP가 설치되어 있는 경우 저장소를 ...

Ubuntu Server / root 계정으로 로그인하는 방법, root 계정으로 ssh 접속하는 방법

Ubuntu Server / root 계정으로 로그인하는 방법, root 계정으로 ssh 접속하는 방법

Ubuntu는 설치할 때 일반 사용자 계정만 만듭니다. 관리자 권한이 필요할 때는 sudo를 이용하죠. 그런데 공부를 위해 혼자만 사용하거나, 여러 가지 이유로 보안에 문제가 없는 경우 root 계정으로 로그인해서 작업하는 게 편합니다. root 계정으로 로그인 하는 방법 일반 사용자 계정으로 로그인합니다. 다음과 같이 명령하여 root 계정의 비밀번호를 만들면 root 계정으로 로그인할 수 있습니다. sudo passwd ...