Ubuntu Server / do-release-upgrade / 버전 업그레이드 명령어
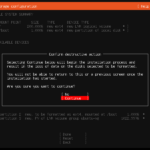
Ubuntu 새 버전이 나오면 어떻게 업그레이드를 할까? 새로 설치하고 다시 설정하는 게 제일 좋지만, 설정할 게 많다면 바로 업그레이드를 할 수도 있다.
업그레이드는 do-release-upgrade 명령어로 한다.
do-release-upgrade -h
Usage: do-release-upgrade [options]
Options:
  -h, --help            show this help message and exit
  -V, --version         Show version and exit
  -d, --devel-release   If using the latest supported release, upgrade to the
                        development release
  --data-dir=DATA_DIR   Directory that contains the data files
  -p, --proposed        Try upgrading to the latest release using the upgrader
                        from $distro-proposed
  -m MODE, --mode=MODE  Run in a special upgrade mode. Currently 'desktop' for
                        regular upgrades of a desktop system and 'server' for
                        server systems are supported.
  -f FRONTEND, --frontend=FRONTEND
                        Run the specified frontend
  -c, --check-dist-upgrade-only
                        Check only if a new distribution release is available
                        and report the result via the exit code
  --allow-third-party   Try the upgrade with third party mirrors and
                        repositories enabled instead of commenting them out.
  -q, --quiet
주의할 점은...
- 만일의 사태에 대비해서 중요한 자료와 설정은 백업한다.
- SSH로 원격 접속하여 업그레이드하는 것은 권장하지 않는다. 연결이 끊길 수 있으므로 컴퓨터에서 직접 한다.(하지만, SSH로도 잘 되기는 한다.)
- 업그레이드를 마치면 재부팅을 해야 한다.
- 클라우드 서비스에 있는 가상 머신의 경우 버전 업그레이드를 권장하지 않거나 금지하기도 한다. 서비스 제공자에게 미리 문의하는 게 좋다.
Ubuntu 22.04 Server / root 계정으로 로그인하는 방법, root 계정으로 ssh 접속하는 방법
Ubuntu는 설치할 때 일반 사용자 계정만 만듭니다. 관리자 권한이 필요할 때는 sudo를 이용하죠. 그런데 공부를 위해 혼자만 사용하거나, 여러 가지 이유로 보안에 문제가 없는 경우 root 계정으로 로그인해서 작업하는 게 편합니다. root 계정으로 로그인 하는 방법 일반 사용자 계정으로 로그인합니다. 다음과 같이 명령하여 root 계정의 비밀번호를 만들면 root 계정으로 로그인할 수 있습니다. # sudo ...
Ubuntu Server / Let’s Encrypt 무료 SSL 인증서 발급 받기
Ubuntu Server에서 Apache Web Server를 사용하는 경우 Let’s Encrypt 인증서 발급 받는 방법입니다. Apache용 Certbot 설치 Ubuntu Server 20.04, Ubuntu Server 22.04 # snap install core # snap refresh core # snap install --classic certbot # ln -s /snap/bin/certbot /usr/bin/certbot Ubuntu Server 18.04 # apt install software-properties-common # add-apt-repository universe # add-apt-repository ppa:certbot/certbot # apt update # apt upgrade # apt install certbot ...
Ubuntu 18.04 Server / Nginx, PHP, MariaDB 설치하고 설정하기
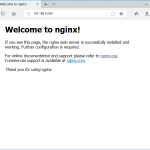
Nginx 설치 Nginx를 설치합니다. # apt install nginx 만약 방화벽을 사용하고 있다면 포트를 열어줍니다. # ufw allow 'Nginx Full' 서버 주소로 접속했을 때 다음과 같이 나오면 제대로 된 것입니다. 시작, 정지 등 Nginx를 시작합니다. # systemctl start nginx Nginx를 멈춥니다. # systemctl stop nginx Nginx를 재시작합니다. # systemctl restart nginx Nginx를 다시 로드합니다. # systemctl reload nginx Nginx를 설치하면 부팅 시 자동으로 시작하게 설정됩니다. 만약 자동 ...
Ubuntu 20.04 Server / GUI 설치하는 방법
Ubuntu Server는 CLI(Command Line Interface) 환경으로 설치된다. 그런데 어떤 작업은 GUI(Graphical Uer Interface) 환경에서 하는 것이 편하다. 만약 GUI 환경이 필요하다면 설치하여 사용할 수 있다. GUI 패키지에는 kubuntu-desktop lubuntu-desktop ubuntu-desktop ubuntu-desktop-minimal xubuntu-desktop 등이 있다. 주로 ubuntu-desktop 또는 ubuntu-desktop-minimal을 사용하는 듯 하다. 예를 들어 ubuntu-desktop-minimal을 설치한다면, 다음과 같이 명령하면 된다. # apt install ubuntu-desktop-minimal Minimal임에도 불구하고 꽤 많은 저장소 공간이 필요하다. After ...
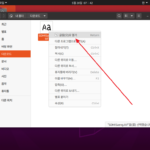
Ubuntu 20.04 Desktop 설치하려는 글꼴을 더블 클릭하거나, 글꼴 선택 후 엔터키를 누르거나, 마우스 우클릭 후 를 클릭합니다. 상단에 있는 를 클릭합니다. 설치가 완료되면 으로 바뀝니다. 글꼴이 잘 설치되었는지 확인합니다.
PHP intl 설치 apt install php-intl service apache2 reoad APCu 설치 apt install php-apcu service apache2 reload
Ubuntu 16.04 Server / PHP / 메모리 늘리는 방법
PHP 설정은 php.ini에서 한다. Ubuntu 16.04에서 php.ini의 위치는 /etc/php/7.0/apache2/php.ini 이다. PHP 버전에 따라 7.0은 다른 숫자일 수 있다. 메모리를 늘리기 위해 수정해야 할 것은 memory_limit이다. 기본값은 128M이다. 128을 적절히 변경한다. memory_limit = 128M 변경한 설정이 적용되도록 하려면 웹서버를 다시 시작하거나 다시 로드한다. Apache 웹서버라면 다음과 같이 명령하여 다시 시작할 수 있고, # service apache2 restart 다음과 같이 ...
우분투 다운로드 우분투 다운로드는 보통 우분투 홈페이지에서 합니다. 상단의 Downloads 메뉴를 클릭하고 안내를 따라가면 됩니다. 그런데, 우분투 홈페이지를 통해 다운로드를 받으면 전송 속도가 느릴 수 있습니다. 만약 너무 느리다면 가까운 미러 사이트에 직접 접속하여 다운로드해보세요. 빠르게 다운로드를 할 수 있습니다. 카카오 서버 한국이라면 카카오 서버가 빠릅니다. 우분투 페이지로 간 다음 원하는 버전을 선택합니다. 데스크톱 이미지와 ...
다운로드 Ubuntu Server 다운로드 페이지는 다음과 같다. https://ubuntu.com/download/server 최신 버전에 대한 안내가 주로 있으므로, 구버전을 다운로드하고 싶다면 아래 링크가 편하다. https://mirror.kakao.com/ubuntu-releases/ 가상 머신에 설치한다면 다운로드한 ISO 파일을 그대로 사용하면 되고, 물리 서버에 설치한다면 Rufus 같은 툴을 이용하여 부팅 USB를 만든다. 설치 설치 미디어로 부탕하고 잠시 기다리면 언어를 선택하는 화면이 나온다. 원하는 언어를 선택하고 엔터키를 누른다. 키보드 레이아웃을 정하고 ...
SSH 설정 설정 파일 /etc/ssh/sshd_config 포트 변경하기 다음 코드를 #Port 22 다음처럼 바꾼다. Port 1234 포트 번호는 자신이 원하는 것으로... root 계정 로그인 가능하게 만들기 다음 코드를 #PermitRootLogin prohibit-password 다음처럼 만든다. PermitRootLogin yes 설정 변경 적용하기 service ssh restart