리눅스 / 명령어 / which, whereis, locate / 명령어 위치 찾기
명령어의 위치를 찾을 때 사용할 수 있는 명령어에는 which, whereis, locate가 있다. 명령어의 위치만 찾을 때는 which를 사용하고, 관련된 파일들의 위치까지 찾을 때는 whereis나 locate를 사용한다.
- which 명령어로 find 명령어를 찾는다.
# which find
/usr/bin/find
- whereis 명령어로 find 명령어를 찾는다.
# whereis find
find: /usr/bin/find /usr/share/man/man1/find.1.gz
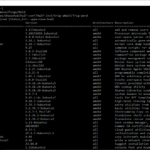
- locate 명령어로 find 명령어를 찾는다.
# locate find
/usr/bin/find
/usr/bin/find2perl
/usr/bin/findmnt
/usr/bin/nl-link-ifindex2name
/usr/bin/nl-link-name2ifindex
/usr/bin/oldfind
/usr/lib64/python2.7/modulefinder.py
/usr/lib64/python2.7/modulefinder.pyc
/usr/lib64/python2.7/modulefinder.pyo
/usr/sbin/btrfs-find-root
/usr/sbin/findfs
/usr/share/bash-completion/completions/findmnt
/usr/share/doc/findutils-4.5.11
/usr/share/doc/findutils-4.5.11/AUTHORS
/usr/share/doc/findutils-4.5.11/COPYING
/usr/share/doc/findutils-4.5.11/ChangeLog
/usr/share/doc/findutils-4.5.11/NEWS
/usr/share/doc/findutils-4.5.11/README
/usr/share/doc/findutils-4.5.11/THANKS
/usr/share/doc/findutils-4.5.11/TODO
/usr/share/doc/wpa_supplicant-2.6/examples/p2p/p2p_find.py
/usr/share/doc/wpa_supplicant-2.6/examples/p2p/p2p_stop_find.py
/usr/share/info/find-maint.info.gz
/usr/share/info/find.info.gz
/usr/share/locale/be/LC_MESSAGES/findutils.mo
/usr/share/locale/bg/LC_MESSAGES/findutils.mo
/usr/share/locale/ca/LC_MESSAGES/findutils.mo
/usr/share/locale/cs/LC_MESSAGES/findutils.mo
/usr/share/locale/da/LC_MESSAGES/findutils.mo
/usr/share/locale/de/LC_MESSAGES/findutils.mo
/usr/share/locale/el/LC_MESSAGES/findutils.mo
/usr/share/locale/eo/LC_MESSAGES/findutils.mo
/usr/share/locale/es/LC_MESSAGES/findutils.mo
/usr/share/locale/et/LC_MESSAGES/findutils.mo
/usr/share/locale/fi/LC_MESSAGES/findutils.mo
/usr/share/locale/fr/LC_MESSAGES/findutils.mo
/usr/share/locale/ga/LC_MESSAGES/findutils.mo
/usr/share/locale/gl/LC_MESSAGES/findutils.mo
/usr/share/locale/hr/LC_MESSAGES/findutils.mo
/usr/share/locale/hu/LC_MESSAGES/findutils.mo
/usr/share/locale/id/LC_MESSAGES/findutils.mo
/usr/share/locale/it/LC_MESSAGES/findutils.mo
/usr/share/locale/ja/LC_MESSAGES/findutils.mo
/usr/share/locale/ko/LC_MESSAGES/findutils.mo
/usr/share/locale/lg/LC_MESSAGES/findutils.mo
/usr/share/locale/lt/LC_MESSAGES/findutils.mo
/usr/share/locale/ms/LC_MESSAGES/findutils.mo
/usr/share/locale/nl/LC_MESSAGES/findutils.mo
/usr/share/locale/pl/LC_MESSAGES/findutils.mo
/usr/share/locale/pt/LC_MESSAGES/findutils.mo
/usr/share/locale/pt_BR/LC_MESSAGES/findutils.mo
/usr/share/locale/ro/LC_MESSAGES/findutils.mo
/usr/share/locale/ru/LC_MESSAGES/findutils.mo
/usr/share/locale/rw/LC_MESSAGES/findutils.mo
/usr/share/locale/sk/LC_MESSAGES/findutils.mo
/usr/share/locale/sl/LC_MESSAGES/findutils.mo
/usr/share/locale/sr/LC_MESSAGES/findutils.mo
/usr/share/locale/sv/LC_MESSAGES/findutils.mo
/usr/share/locale/tr/LC_MESSAGES/findutils.mo
/usr/share/locale/uk/LC_MESSAGES/findutils.mo
/usr/share/locale/vi/LC_MESSAGES/findutils.mo
/usr/share/locale/zh_CN/LC_MESSAGES/findutils.mo
/usr/share/locale/zh_TW/LC_MESSAGES/findutils.mo
/usr/share/man/man1/find.1.gz
/usr/share/man/man1/find2perl.1.gz
/usr/share/man/man1/oldfind.1.gz
/usr/share/man/man8/btrfs-find-root.8.gz
/usr/share/man/man8/findfs.8.gz
/usr/share/man/man8/findmnt.8.gz
- locate 명령어는 -n 옵션으로 출력 개수를 정할 수 있다.
[root@localhost ~]# locate find -n 10
/usr/bin/find
/usr/bin/find2perl
/usr/bin/findmnt
/usr/bin/nl-link-ifindex2name
/usr/bin/nl-link-name2ifindex
/usr/bin/oldfind
/usr/lib64/python2.7/modulefinder.py
/usr/lib64/python2.7/modulefinder.pyc
/usr/lib64/python2.7/modulefinder.pyo
/usr/sbin/btrfs-find-root
locate 명령어의 경우 설치가 필요할 수도 있다. CentOS라면 다음과 같이 명령하여 설치한다.
yum install mlocate
사용 전에 DB를 업데이트해야 한다.
updatedb
DB에서 검색하므로 검색 결과가 빠르게 나온다.
리눅스 / chown, chmod / 파일 또는 디렉토리 소유자, 소유그룹, 권한 설정
chown과 chmod는 파일 및 디렉토리의 권한과 소유자를 관리하는 데 사용되는 Linux 명령어입니다. 정보 확인 ls 명령어에 -l 옵션을 붙여서 파일 또는 디렉토리의 권한과 소유자(그룹)을 확인할 수 있습니다. 제일 앞에 있는 문자는 디렉토리인지 파일인지는 나타냅니다. d는 디렉토리라는 뜻이고, -는 파일이라는 뜻입니다. 그 다음 3개의 문자열은 소유자의 권한을, 그 다음 3개의 문자열은 소유그룹의 권한을, 그 다음 ...
Ubuntu Server 22.04 / vsftpd로 FTP 서버 구축하기
vsftpd vsftpd(Very Secure FTP Daemon)는 유닉스와 리눅스에서 사용할 수 있는 가벼운 FTP 서버입니다. 주요 특징은 다음과 같습니다. Virtual IP configurations Virtual users Standalone or inetd operation Powerful per-user configurability Bandwidth throttling Per-source-IP configurability Per-source-IP limits IPv6 Encryption support through SSL integration 설치 vsftpd는 우분투 패키지에 포함되어 있으므로 다음과 같이 명령하여 설치할 수 있습니다. # apt install vsftpd 방화벽을 사용 중이라면 다음과 같이 명령하여 포트를 ...
Ubuntu 22.04 Server / 백신 프로그램 ClamAV 설치 및 사용법
ClamAV ClamAV는 리눅스에서 사용할 수 있는 백신 프로그램이다. 우분투 패키지에 포함되어 있으므로 apt 명령으로 쉽게 설치하고 사용할 수 있다. 설치 # apt install clamav 사용법 데이터베이스 업데이트 clamav-freshclam 서비스를 중지한다. # systemctl stop clamav-freshclam freshclam 명령으로 업데이트한다. # freshclam clamav-freshclam 서비스를 시작한다. # systemctl start clamav-freshclam 검사 home 디렉토리와 그 하위 디렉토리를 검사한다. # clamscan -r /home 검사 결과는 다음처럼 나온다. ----------- SCAN SUMMARY ----------- Known viruses: ...

CentOS 7 / rsyslog / 로그 서버 구축하는 방법
CentOS을 설치하면 로그 기록을 위한 rsyslog 패키지가 설치되고 실행됩니다. 로그는 로컬 컴퓨터에 저장되는데, 관리하는 컴퓨터가 여러 대인 경우 각각의 로그를 따로 모니터링하는 것이 불편할 수 있습니다. 그런 경우 하나의 컴퓨터를 로그를 수집하는 서버로 만들어서 그 서버에 로그가 쌓이게 하면, 좀 더 수월하게 로그를 관리할 수 있습니다. rsyslog는 간단한 설정 변경으로 로그 ...
Ubuntu 16.04 Server / 고정 IP 설정하는 방법
네트워크 설정 파일은 /etc/network/interfaces이다. 우분투를 DHCP로 설치했다면 설정 파일의 내용은 다음과 비슷하게 되어 있다. # The primary network interface auto enp0s3 iface enp0s3 inet dhcp 이를 다음처럼 변경하고 저장한다. xxx.xxx.xxx.xxx는 네트워크 환경에 맞게 수정한다. # The primary network interface auto enp0s3 iface enp0s3 inet static address xxx.xxx.xxx.xxx netmask xxx.xxx.xxx.xxx gateway xxx.xxx.xxx.xxx dns-nameservers xxx.xxx.xxx.xxx 다음과 같이 명령하여 네트워크를 재시작한다. systemctl restart networking.service 만약 위와 같이 해도 ...
Ubuntu 24.04 Server / 설치된 패키지 확인하는 방법
우분투에서 설치된 패키지 확인은 apt 또는 dpkg 명령어로 할 수 있다. 출력하는 내용에 차이가 있다. apt 명령어로 설치된 패키지 확인 설치된 모든 패키지를 출력한다. # apt list --installed 설치된 패키지 중 이름에 mariadb가 있는 것을 출력한다. # apt list --installed | grep mariadb dpkg 명령어로 설치된 패키지 확인 설치된 모든 패키지를 출력한다. # dpkg -l 설치된 패키지 중 이름에 ...
Ubuntu 18.04 Server / Nginx, PHP, MariaDB 설치하고 설정하기
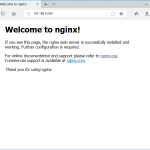
Nginx 설치 Nginx를 설치합니다. # apt install nginx 만약 방화벽을 사용하고 있다면 포트를 열어줍니다. # ufw allow 'Nginx Full' 서버 주소로 접속했을 때 다음과 같이 나오면 제대로 된 것입니다. 시작, 정지 등 Nginx를 시작합니다. # systemctl start nginx Nginx를 멈춥니다. # systemctl stop nginx Nginx를 재시작합니다. # systemctl restart nginx Nginx를 다시 로드합니다. # systemctl reload nginx Nginx를 설치하면 부팅 시 자동으로 시작하게 설정됩니다. 만약 자동 ...
우분투 다운로드 우분투 다운로드는 보통 우분투 홈페이지에서 합니다. 상단의 Downloads 메뉴를 클릭하고 안내를 따라가면 됩니다. 그런데, 우분투 홈페이지를 통해 다운로드를 받으면 전송 속도가 느릴 수 있습니다. 만약 너무 느리다면 가까운 미러 사이트에 직접 접속하여 다운로드해보세요. 빠르게 다운로드를 할 수 있습니다. 카카오 서버 한국이라면 카카오 서버가 빠릅니다. 우분투 페이지로 간 다음 원하는 버전을 선택합니다. 데스크톱 이미지와 ...
Ubuntu / 특정 패키지만 업그레이드 하기, 보안 업데이트만 업그레이드 하기
우분투 서버에 접속하면 업데이트가 필요한 패키지가 있는지 알려줍니다. 두 가지 분류로 알려주는데, 하나는 패키지 업데이트, 또 하나는 보안 업데이트입니다. 소프트웨어는 보통 최신 버전을 유지하는 것이 좋지만, 업그레이드했을 때 문제가 없는지 충분히 확인을 해야 합니다. 따라서 특정 패키지만 업그레이드를 하거나, 보안 업데이트만 해야 하는 경우가 발생하는데, 어떻게 그런 작업을 하는지 알아보겠습니다. 특정 ...
Ubuntu 18.04 Server / 시간대(time zone) 설정하는 방법
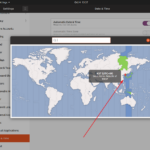
현재 서버의 시간대 확인 현재 서버에 설정된 시간대는 date 명령어로 확인할 수 있다. # date 시간대 설정 방법 1 - dpkg-reconfigure tzdata 시간대를 설정하고 싶다면 다음과 같이 명령한다. # dpkg-reconfigure tzdata 한국이라면 Asia를 선택하고 Seoul을 선택합니다. 시간대 설정 방법 2 - tzselect tzselect 명령으로 설정할 수 있다. 번호를 입력하여 시간대를 정한다. # tzselect Please identify a location so that time ...