OBS Studio / 디스플레이 캡쳐 / 검은 화면 나오는 문제 해결하는 방법

OBS Studio는 컴퓨터 화면 녹화, 웹캠 녹화, 게임 녹화 등을 할 수 있는 오픈소스 프로그램입니다. 녹화뿐만 아니라 실시간 방송도 가능하고, 여러 소스를 동시에 화면에 띄워 녹화 및 방송을 할 수도 있는 유용한 프로그램입니다. 이런 프로그램이 오픈소스라는 것이 고마울 뿐입니다.

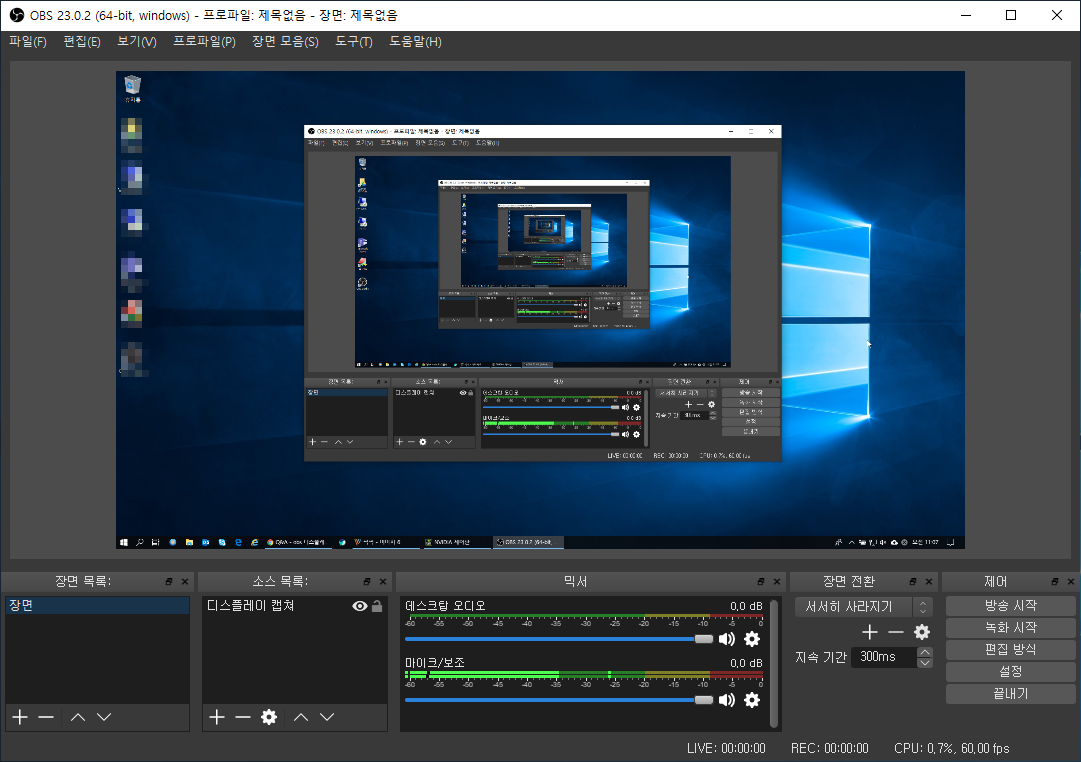
컴퓨터 화면 녹화를 하기 위해 OBS Studio를 설치했는데, 문제가 발생했습니다. 디스플레이 캡쳐를 추가하면 컴퓨터 화면이 나와야 하는데 다음처럼 검정 화면이 나옵니다.
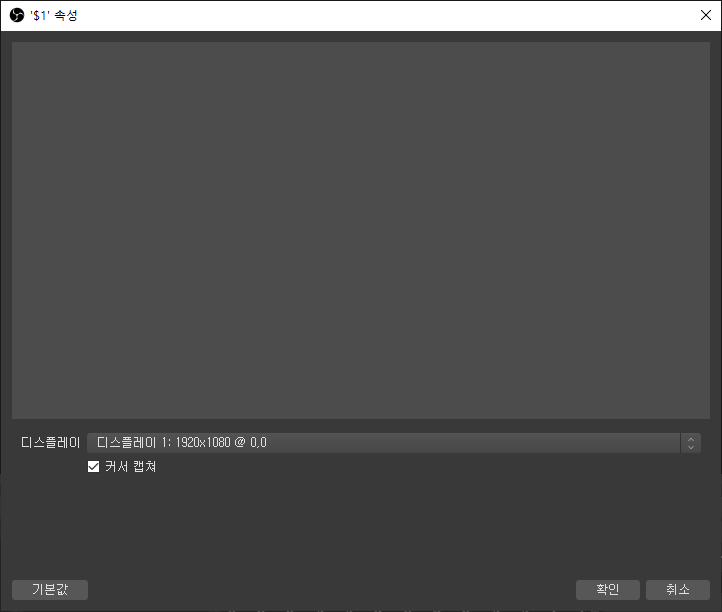
NVIDIA 그래픽 카드를 사용한다면 다음 두 가지 방법으로 이 문제를 해결할 수 있습니다. 방법 1을 해보시고, 안되면 방법 2를 해보세요.

방법 1

  • NVIDIA 그래픽 카드를 최신 버전으로 업그레이드합니다. 윈도우에서 기본 제공하는 드라이버 말고, NVIDIA 홈페이지에서 드라이버를 다운로드하여 설치하는 것이 좋습니다.
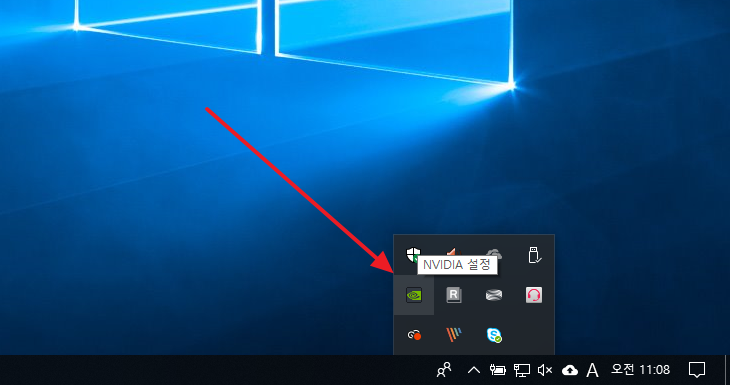
  • NVIDIA 제어판을 엽니다.

  • [3D 설정 관리]에서 [프로그램 설정] 탭으로 이동 후, [사용자 정의할 프로그램 선택]에서 [추가]를 클릭합니다.
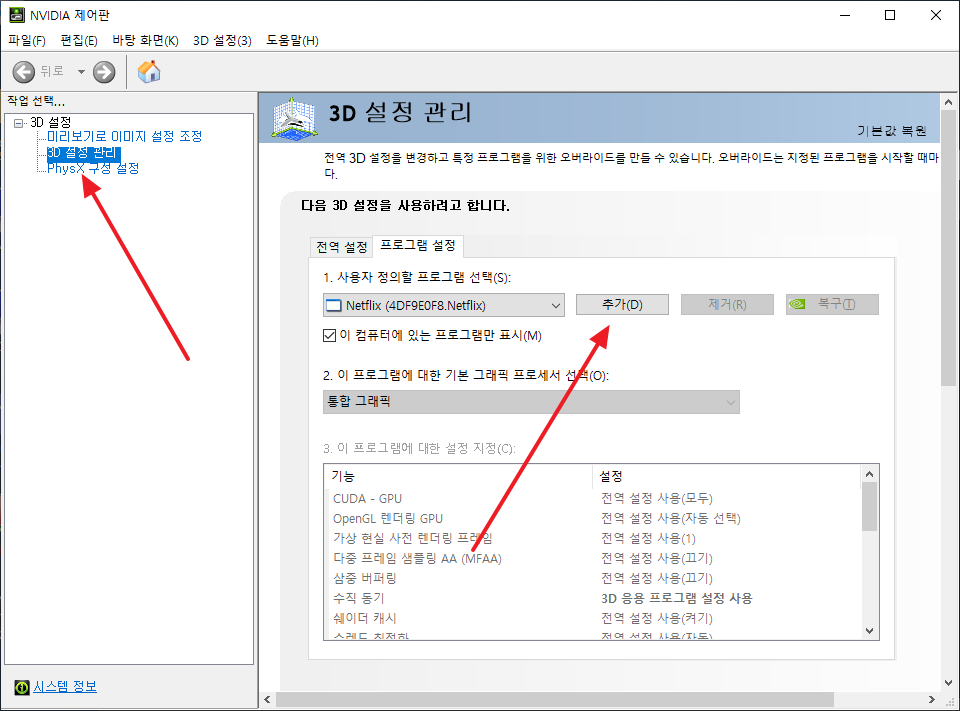
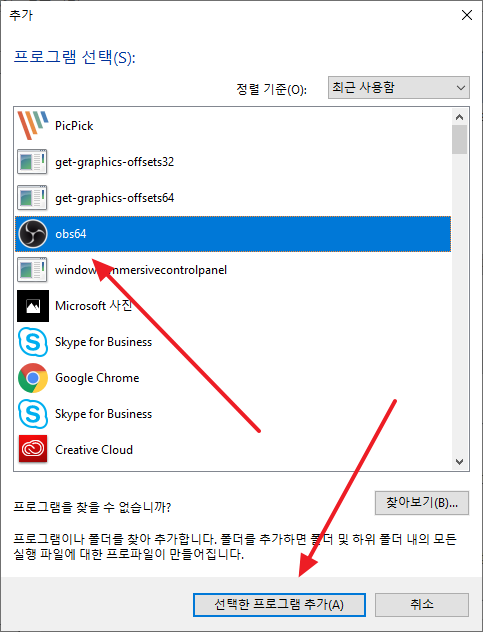
  • obs64를 선택하고 [선택한 프로그램 추가]를 클릭합니다.

  • [이 프로그램에 대한 기본 그래픽 프로세서 선택]을 [통합 그래픽]으로 설정한 후 [적용]을 클릭합니다.
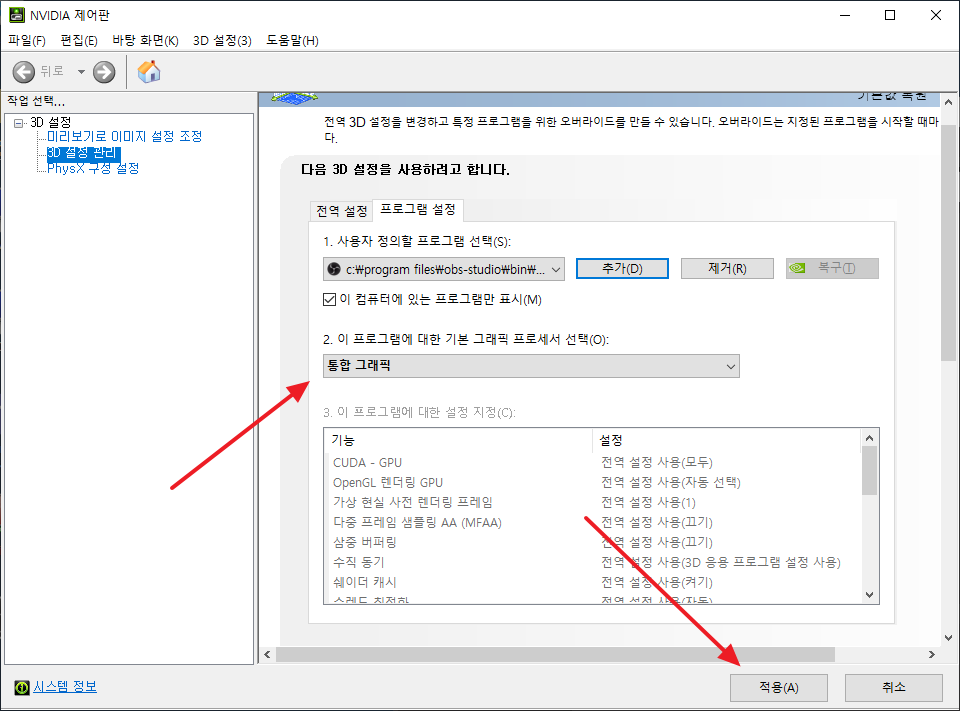
  • 이제 컴퓨터 화면을 제대로 인식합니다.

만약 잘 되지 않는다면 OBS Studio를 재실행 하거나, 컴퓨터를 재부팅해보세요.

방법 2

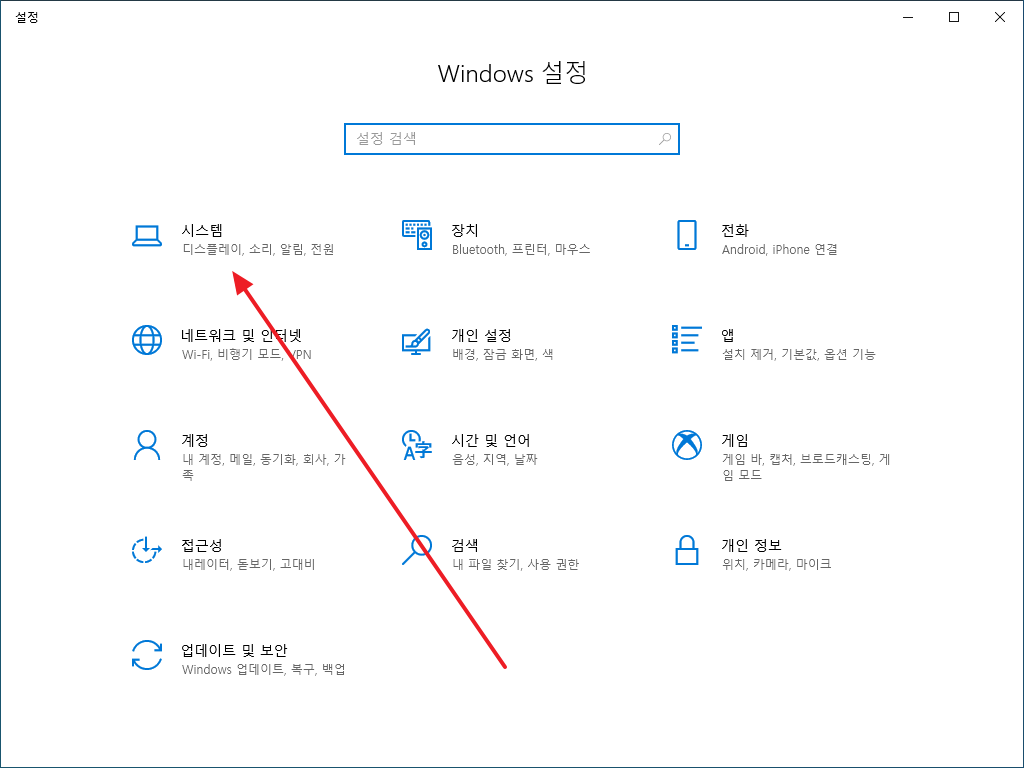
  • Windows 설정을 엽니다. 단축키는 [WIN+I]입니다.
  • 시스템을 클릭합니다.

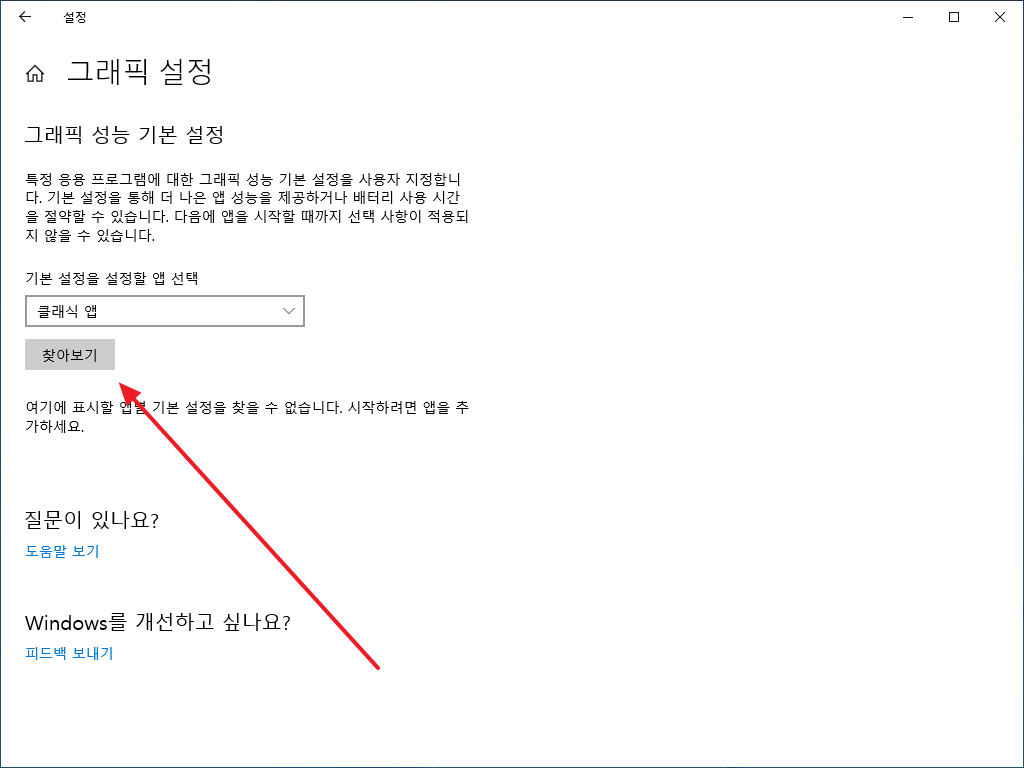
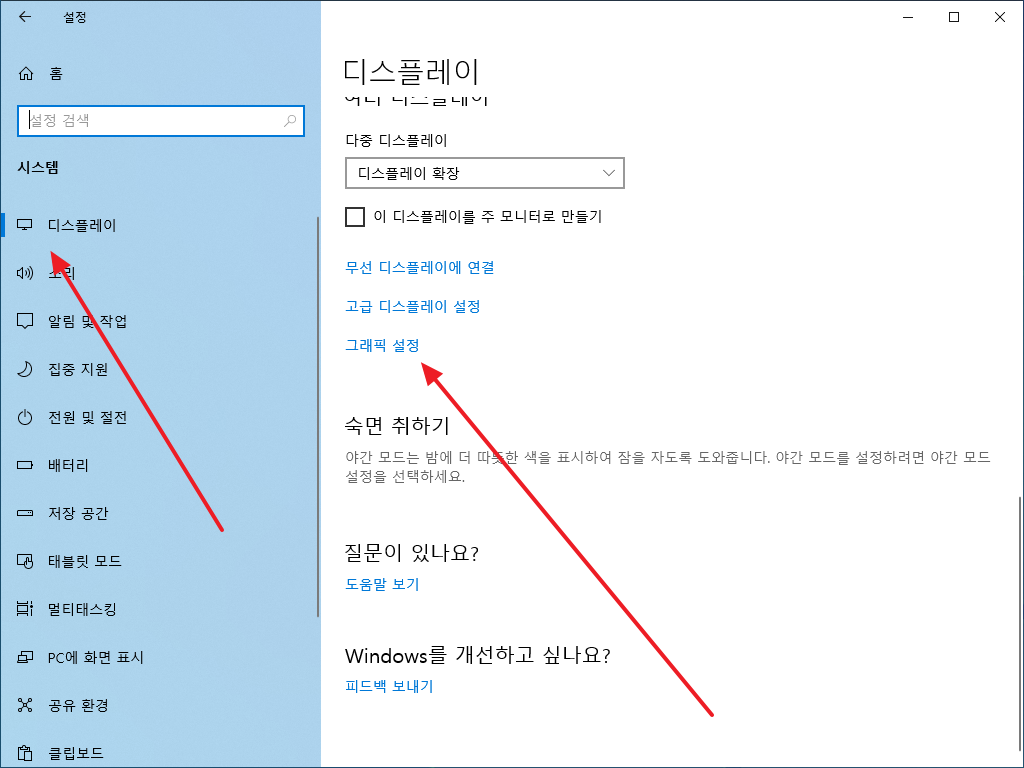
  • [디스플레이]를 클릭한 후, 밑으로 주욱 내려와서 [그래픽 설정]을 클릭합니다.
  • [찾아보기]를 클릭합니다.

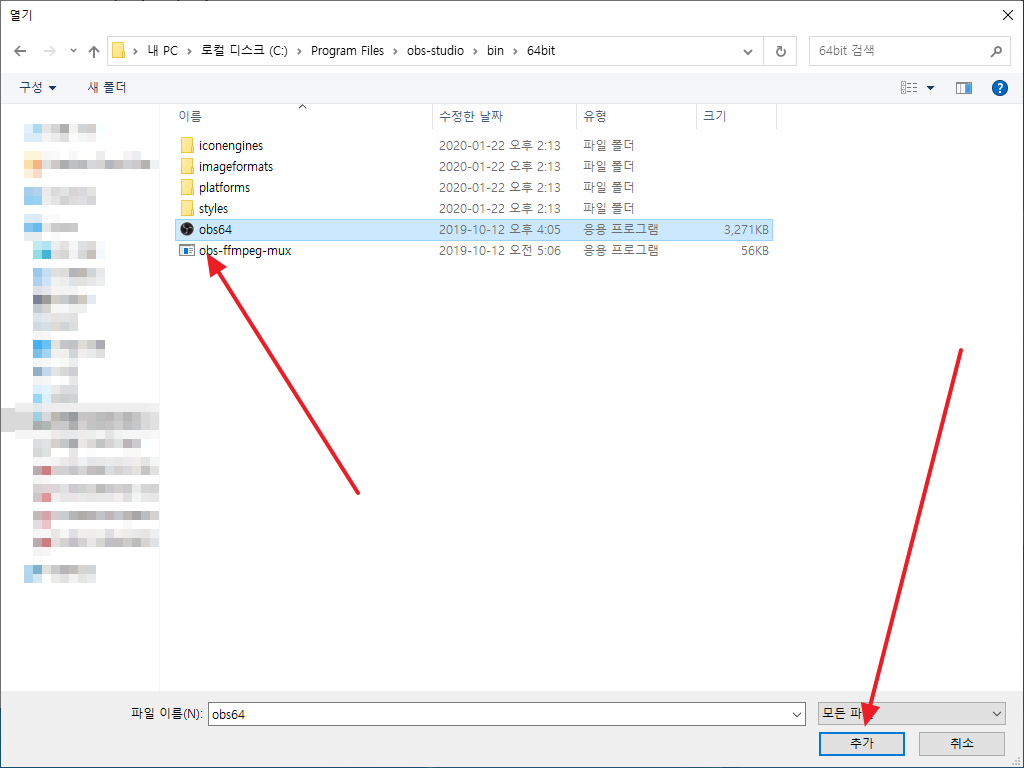
  • OBS Studio 실행 파일을 선택하고 [추가]를 클릭합니다.

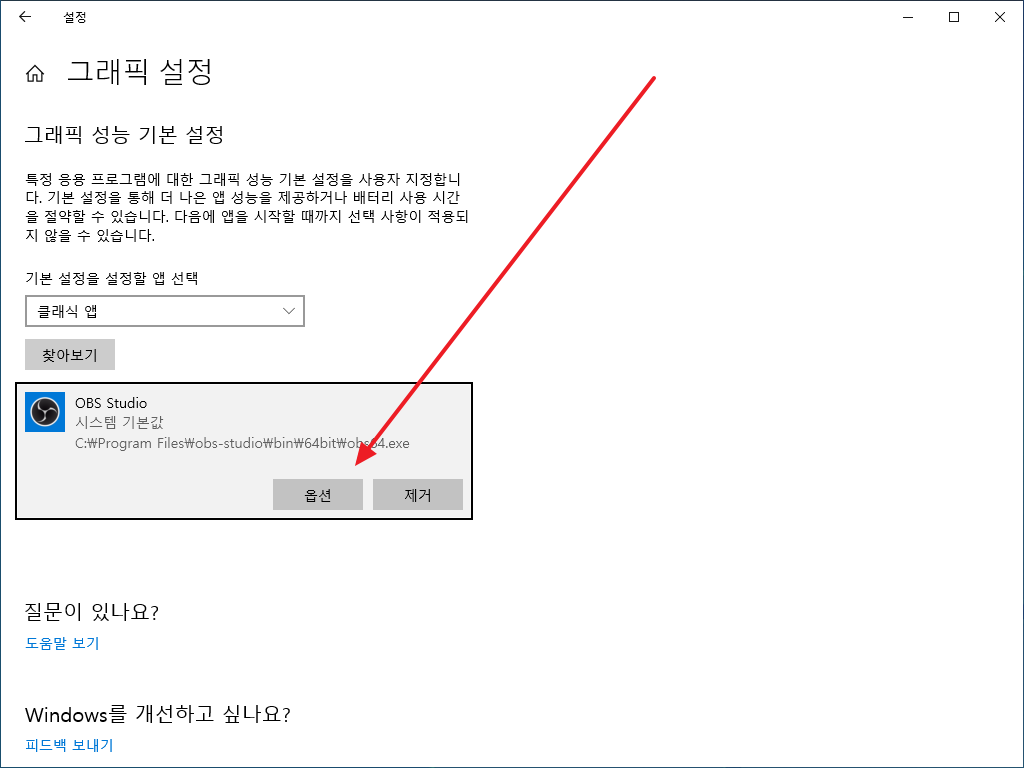
  • [옵션]을 클릭합니다.

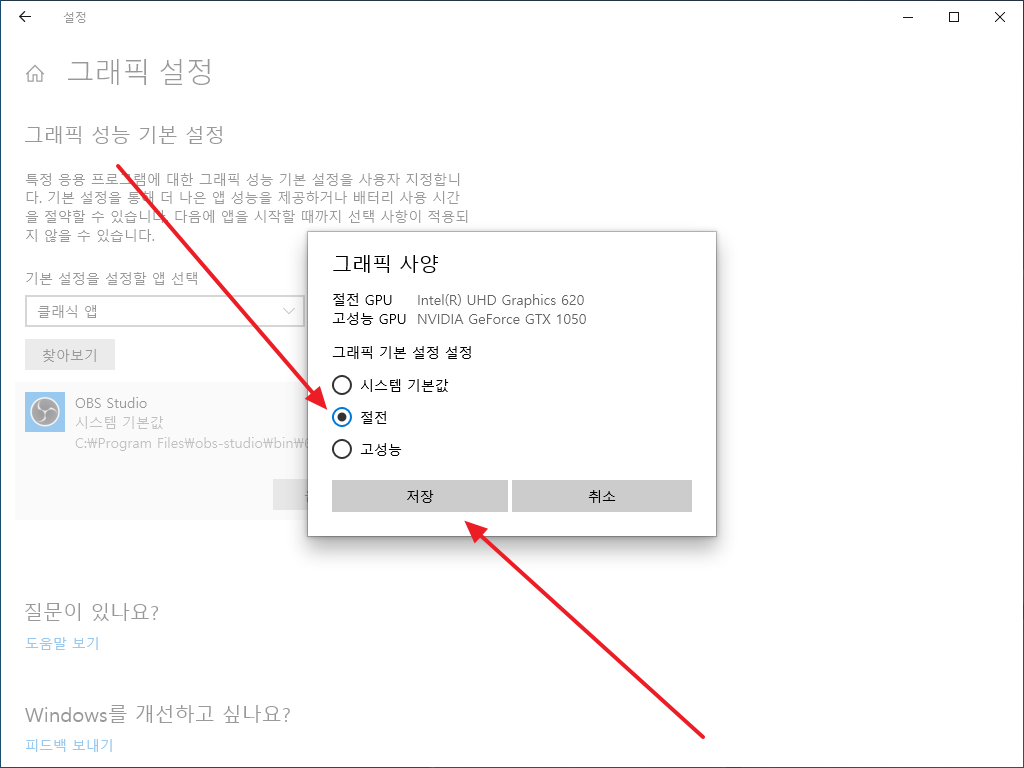
  • [절전]을 선택하고 [저장]을 클릭합니다.

  • OBS Studio를 실행해서 잘 되는지 확인합니다.
같은 카테고리의 다른 글
OBS Studio / 컴퓨터 화면 녹화하는 방법

OBS Studio / 컴퓨터 화면 녹화하는 방법

OBS Studio로 컴퓨터 화면을 녹화해보겠습니다. 이를 OBS Studio에서는 디스플레이 캡쳐라고 합니다. + 버튼을 클릭하고 를 클릭합니다. 이름을 적당히 정한 후 을 클릭합니다. 미리보기가 나옵니다. 만약 NVIDIA 그래픽카드를 사용하면서 화면이 검정색으로 나온다면 여기의 안내를 따라 해결하세요. 을 클릭합니다. 이제 을 누르면 해당 화면이 녹화됩니다. 을 클릭하면 녹화를 마칩니다. 기본 저장 폴더는 동영상(Videos)입니다. 녹화 관련 설정을 변경하고 ...

모니터 / 색 영역 / sRGB(standard Red Green Blue)

모니터 sRGB는 모니터가 sRGB 색 공간을 얼마나 잘 재현하는지를 나타내는 지표입니다. sRGB는 컴퓨터 모니터, 프린터, 디지털 카메라 등의 표준 색 공간으로, 대부분의 웹 콘텐츠와 디지털 이미지가 sRGB 색 공간을 기반으로 제작됩니다. 모니터의 sRGB 퍼센트 값은 해당 모니터가 sRGB 색 공간의 몇 퍼센트를 재현할 수 있는지를 나타냅니다. sRGB 색 공간 정의 sRGB(standard Red Green ...

리눅스 / 명령어 / cp - 복사하는 명령어, mv - 이동하는 명령어

cp는 copy의 약자로 복사하는 명령어, mv는 move의 약자로 이동하는 명령어이다. 복사하기 abc.txt 파일을 def.txt로 이름을 바꾸어 복사한다. cp abc.txt def.txt xyz라는 디렉토리가 없다면 abc.txt 파일을 xyz 파일로 복사한다. xyz라는 디렉토리가 있다면 xyz 디렉토리 안에 abc.txt 파일을 복사한다. cp abc.txt xyz abc.txt 파일을 xyz 디렉토리 안에 def.txt라는 이름으로 복사한다. cp abc.txt xyz/def.txt abc가 디렉토리이고 xyz라는 디렉토리가 없다면, abc 디렉토리를 xyz로 ...

Ubuntu Server / 22.04 / 네트워크 세팅에 이더넷(Wired) 보이지 않을 때 해결 방법

Ubuntu Server / 22.04 / 네트워크 세팅에 이더넷(Wired) 보이지 않을 때 해결 방법

우분투 설정의 네트워크에 Wired가 보이지 않는다. 그것이 보여야 GUI로 IP 설정이 가능한데 말이다. 이를 보이게 하는 방법이 여러 가지가 있는 거 같은데, 내가 성공한 방법은... /etc/netplan/00-installer-config.yaml의 내용은 다음처럼 생겼을 것이다. # This is the network config written by 'subiquity' network: ethernets: eth0: dhcp4: true ...

리눅스 / 명령어 / which, whereis, locate / 명령어 위치 찾기

명령어의 위치를 찾을 때 사용할 수 있는 명령어에는 which, whereis, locate가 있다. 명령어의 위치만 찾을 때는 which를 사용하고, 관련된 파일들의 위치까지 찾을 때는 whereis나 locate를 사용한다. which 명령어로 find 명령어를 찾는다. # which find /usr/bin/find whereis 명령어로 find 명령어를 찾는다. # whereis find find: /usr/bin/find /usr/share/man/man1/find.1.gz locate 명령어로 find 명령어를 찾는다. # locate find /usr/bin/find /usr/bin/find2perl /usr/bin/findmnt /usr/bin/nl-link-ifindex2name /usr/bin/nl-link-name2ifindex /usr/bin/oldfind /usr/lib64/python2.7/modulefinder.py /usr/lib64/python2.7/modulefinder.pyc /usr/lib64/python2.7/modulefinder.pyo /usr/sbin/btrfs-find-root /usr/sbin/findfs /usr/share/bash-completion/completions/findmnt /usr/share/doc/findutils-4.5.11 /usr/share/doc/findutils-4.5.11/AUTHORS /usr/share/doc/findutils-4.5.11/COPYING /usr/share/doc/findutils-4.5.11/ChangeLog /usr/share/doc/findutils-4.5.11/NEWS /usr/share/doc/findutils-4.5.11/README /usr/share/doc/findutils-4.5.11/THANKS /usr/share/doc/findutils-4.5.11/TODO /usr/share/doc/wpa_supplicant-2.6/examples/p2p/p2p_find.py /usr/share/doc/wpa_supplicant-2.6/examples/p2p/p2p_stop_find.py /usr/share/info/find-maint.info.gz /usr/share/info/find.info.gz /usr/share/locale/be/LC_MESSAGES/findutils.mo /usr/share/locale/bg/LC_MESSAGES/findutils.mo /usr/share/locale/ca/LC_MESSAGES/findutils.mo /usr/share/locale/cs/LC_MESSAGES/findutils.mo /usr/share/locale/da/LC_MESSAGES/findutils.mo /usr/share/locale/de/LC_MESSAGES/findutils.mo /usr/share/locale/el/LC_MESSAGES/findutils.mo /usr/share/locale/eo/LC_MESSAGES/findutils.mo /usr/share/locale/es/LC_MESSAGES/findutils.mo /usr/share/locale/et/LC_MESSAGES/findutils.mo /usr/share/locale/fi/LC_MESSAGES/findutils.mo /usr/share/locale/fr/LC_MESSAGES/findutils.mo /usr/share/locale/ga/LC_MESSAGES/findutils.mo /usr/share/locale/gl/LC_MESSAGES/findutils.mo /usr/share/locale/hr/LC_MESSAGES/findutils.mo /usr/share/locale/hu/LC_MESSAGES/findutils.mo /usr/share/locale/id/LC_MESSAGES/findutils.mo /usr/share/locale/it/LC_MESSAGES/findutils.mo /usr/share/locale/ja/LC_MESSAGES/findutils.mo /usr/share/locale/ko/LC_MESSAGES/findutils.mo /usr/share/locale/lg/LC_MESSAGES/findutils.mo /usr/share/locale/lt/LC_MESSAGES/findutils.mo /usr/share/locale/ms/LC_MESSAGES/findutils.mo /usr/share/locale/nl/LC_MESSAGES/findutils.mo /usr/share/locale/pl/LC_MESSAGES/findutils.mo /usr/share/locale/pt/LC_MESSAGES/findutils.mo /usr/share/locale/pt_BR/LC_MESSAGES/findutils.mo /usr/share/locale/ro/LC_MESSAGES/findutils.mo /usr/share/locale/ru/LC_MESSAGES/findutils.mo /usr/share/locale/rw/LC_MESSAGES/findutils.mo /usr/share/locale/sk/LC_MESSAGES/findutils.mo /usr/share/locale/sl/LC_MESSAGES/findutils.mo /usr/share/locale/sr/LC_MESSAGES/findutils.mo /usr/share/locale/sv/LC_MESSAGES/findutils.mo /usr/share/locale/tr/LC_MESSAGES/findutils.mo /usr/share/locale/uk/LC_MESSAGES/findutils.mo /usr/share/locale/vi/LC_MESSAGES/findutils.mo /usr/share/locale/zh_CN/LC_MESSAGES/findutils.mo /usr/share/locale/zh_TW/LC_MESSAGES/findutils.mo /usr/share/man/man1/find.1.gz /usr/share/man/man1/find2perl.1.gz /usr/share/man/man1/oldfind.1.gz /usr/share/man/man8/btrfs-find-root.8.gz /usr/share/man/man8/findfs.8.gz /usr/share/man/man8/findmnt.8.gz locate 명령어는 -n 옵션으로 출력 ...

엣지 / 주소 표시줄 검색 엔진 변경하는 방법

엣지 / 주소 표시줄 검색 엔진 변경하는 방법

엣지의 주소 표시줄에서 바로 검색할 수 있다. 검색 엔진은 Bing을 사용한다. 이 검색 엔진은 변경할 수 있다. 오른쪽 위의 점 세 개 아이콘을 클릭한다. 을 클릭한다. 왼쪽에서 를 클릭한다. 을 클릭한다. 을 원하는 것으로 선택하면, 설정이 완료된다.

리눅스 / 명령어 / rdate / 타임서버의 시간과 동기화해주는 명령어

rdate는 서버의 시간과 타임서버의 시간을 동기화해주는 명령어이다. rdate는 설치되어있지 않는 경우가 많으므로, 필요하다면 설치를 해야 한다. CentOS라면 # yum install rdate Ubuntu라면 # apt install rdate 와 같이 명령하여 설치할 수 있습니다. 타임서버의 시간을 확인할 때는 -p 옵션을 사용합니다. 현재 서버의 시간을 변경하지 않는다. # rdate -p time.bora.net 현재 서버의 시간을 타임서버의 시간으로 맞출 때에는 -s 옵션을 ...

네이버 웹마스터 도구 / 사이트 등록하는 방법

네이버 웹마스터 도구 / 사이트 등록하는 방법

홈페이지나 블로그가 네이버에서 검색되도록 하기 위해서는 네이버 웹마스터 도구에 등록을 해야 한다. 네이버 웹마스터 도구 : https://searchadvisor.naver.com/console/board 네이버 계정으로 로그인해야 하고, HTML 파일을 업로드하거나 메타 태그를 추가해야 사이트 등록을 할 수 있다. 또한 RSS와 Sitemap을 등록해야 원활한 수집이 가능하다. 네이버 계정 하나에 100개의 사이트를 등록할 수 있다. 사이트 등록 사이트 URL을 입력하고 오른쪽 끝에 있는 ...

Ubuntu Server 22.04 / vsftpd로 FTP 서버 구축하기

vsftpd vsftpd(Very Secure FTP Daemon)는 유닉스와 리눅스에서 사용할 수 있는 가벼운 FTP 서버입니다. 주요 특징은 다음과 같습니다. Virtual IP configurations Virtual users Standalone or inetd operation Powerful per-user configurability Bandwidth throttling Per-source-IP configurability Per-source-IP limits IPv6 Encryption support through SSL integration 설치 vsftpd는 우분투 패키지에 포함되어 있으므로 다음과 같이 명령하여 설치할 수 있습니다. # apt install vsftpd 방화벽을 사용 중이라면 다음과 같이 명령하여 포트를 ...

당구 / 시스템 / 코너각

당구 / 시스템 / 코너각

여러 가지 상황에 대한 코너각을 정리한다. 코너각을 알면 약간의 변형으로 코너 근처에 있는 적구를 맞출 수 있다. 파이브 앤 하프 시스템 코너각 파이브 앤 하프 시스템에서 50에서 30을 향해 치면 3 쿠션 20을 거쳐 코너로 들어가기 때문에, 코너를 20으로 센다. 하지만 출발 지점에 따라 3 쿠션 20에 들어가는 각도가 다르므로 보정이 필요하다. 개인차가 있겠으나 ...