리눅스 / rsync / 동기화 프로그램
rsync는 동기화 프로그램이다. 백업할 때 유용하게 사용할 수 있다.
사용법
기본
- abc 디렉토리 안의 def 디렉토리를 xyz 디렉토리 안에 동기화시킨다.
- 처음 실행하는 것이라면 xyz 디렉토리 안에 def 디렉토리가 복사된다.
- 다시 실행시키면 /abc/def 디렉토리의 내용 중 수정되거나 추가된 것만 /xyz/def 디렉토리로 복사된다.
- /abc/def에서 삭제된 내용은 /xyz/def에 반영되지 않는다.
# rsync -avz /abc/def /xyz
- def 뒤에 /를 붙이면 def 디렉토리 안에 있는 폴더와 파일들만 동기화된다. 즉, xyz 디렉토리 안에 def 디렉토리가 생기지 않는다.
# rsync -avz /abc/def/ /xyz
삭제 파일도 동기화하기
- --delete 옵션을 추가하면, /abc/def에서 삭제된 것은 /xyz/def에서도 삭제된다.
# rsync -avz --delete /abc/def /xyz
특정 디렉토리 제외하기
- abc 디렉토리 안에 있는 abc-2 디렉토리를 제외하고 동기화한다.
# rsync -avz --exclude 'abc-2' abc xyz
다른 서버와 동기화
- ssh로 다른 서버에 접속하여 동기화할 수 있다.
- 도메인 대신 IP를 적어도 되고, 같은 네트워크에 있다면 호스트네임을 적어도 된다.
# rsync -avz --delete -e ssh root@abc.com:/abc/def /xyz
- ssh 포트를 다른 것으로 사용할 수 있다.
# rsync -avz --delete -e "ssh -p 2345" root@abc.com:/abc/def /xyz
sshpass
- sshpass를 이용하면 비밀번호 입력을 따로 할 필요가 없다.
# rsync -avz --delete /abc/def --rsh="sshpass -p password ssh -p 2345" root@abc.com:/xyz
Ubuntu 16.04 Server / PHP / 메모리 늘리는 방법
PHP 설정은 php.ini에서 한다. Ubuntu 16.04에서 php.ini의 위치는 /etc/php/7.0/apache2/php.ini 이다. PHP 버전에 따라 7.0은 다른 숫자일 수 있다. 메모리를 늘리기 위해 수정해야 할 것은 memory_limit이다. 기본값은 128M이다. 128을 적절히 변경한다. memory_limit = 128M 변경한 설정이 적용되도록 하려면 웹서버를 다시 시작하거나 다시 로드한다. Apache 웹서버라면 다음과 같이 명령하여 다시 시작할 수 있고, # service apache2 restart 다음과 같이 ...
Ubuntu 18.04 Server / phpMyAdmin 설치하는 방법
phpMyAdmin은 MySQL, MariaDB를 웹브라우저에서 관리할 수 있게 해주는 소프트웨어입니다. Ubuntu 18.04에 phpMyAdmin을 설치하고 설정하는 방법을 알아보겠습니다. 설치 apt install phpmyadmin 설치하는 과정에서 몇 가지 질문을 합니다. 사용하는 웹서버를 선택합니다. 비밀번호를 정하고... 다시 한 번 입력합니다. Yes를 선택하고 진행하면 설치가 끝납니다. 접속 웹브라우저로 서버 주소에 phpmyadmin을 붙여서 접속합니다. MySQL 또는 MariaDB의 사용자명과 암호를 입력해서 로그인하는데... root 계정으로 접속이 불가능할 수도 있습니다. 만약 root으로 ...
Ubuntu 16.04 Server / logrotate 설치하고 설정하기
우분투(Ubuntu)는 여러 작업의 내용을 로그(Log) 파일로 남깁니다. 예를 들어 웹서버 운영과 관련된 로그는 /var/log/apache2에 있습니다. 로그는 기본적으로 하나의 파일에 계속 추가하는 것이어서, 시간이 지날수록 파일의 크기가 커집니다. 로그 파일의 크기가 너무 커지면, 시스템이 느려지거나 다운되기도 합니다. 이러한 문제를 해결해주는 패키지가 logrotate입니다. 로그 파일이 일정 기준을 충족하면 기존 로그 파일을 다른 이름으로 변경하여 저장하고 ...

리눅스 서버에 SSH 접속을 하는 공격이 있습니다. SSH Brute Force라고 하는데, 여러 아이디와 비밀번호로 로그인을 시도하는 공격입니다. 이 공격을 방어하는 방법은 여러가지가 있습니다. root 계정으로 로그인 못하게 하기 암호를 복잡하게 만들기 접속 가능 IP를 정하기 SSH 포트 번호 바꾸기 이 중에서 SSH 포트 번호 바꾸는 방법을 정리해보겠습니다. CentOS 7 기준이며, 포트 번호를 1980으로 바꾼다고 가정하겠습니다. SSH 설정 파일 ...
systemctl은 서비스를 관리하는 명령어이다. 서비스 상태 확인 systemctl status service_name.service 서비스 시작 systemctl start service_name.service 서비스 재시작 systemctl restart service_name.service 서비스 중지 systemctl stop service_name.service 부팅 시 서비스 자동 시작 systemctl enable service_name.service 부팅 시 서비스 자동 시작 해제 systemctl disable service_name.service 서비스 목록 보기 systemctl list-units --type=service
현재 언어 확인하기 locale 명령어로 현재 언어를 확인할 수 있다. # locale LANG=en_US.UTF-8 LANGUAGE= LC_CTYPE="en_US.UTF-8" LC_NUMERIC="en_US.UTF-8" LC_TIME="en_US.UTF-8" LC_COLLATE="en_US.UTF-8" LC_MONETARY="en_US.UTF-8" LC_MESSAGES="en_US.UTF-8" LC_PAPER="en_US.UTF-8" LC_NAME="en_US.UTF-8" LC_ADDRESS="en_US.UTF-8" LC_TELEPHONE="en_US.UTF-8" LC_MEASUREMENT="en_US.UTF-8" LC_IDENTIFICATION="en_US.UTF-8" LC_ALL= 언어 추가하기 사용 가능한 언어는 locale -a로 확인할 수 있다. # locale -a C C.utf8 en_US.utf8 POSIX 예를 들어 한국어를 추가하고 싶다면 아래와 같이 명령한다. # apt install language-pack-ko locale -a로 설치 확인을 한다. # locale -a C C.utf8 en_US.utf8 ko_KR.utf8 POSIX 언어 변경하기 다음과 같이 명령하면 사용하는 언어가 한국어로 바뀐다. update-locale LANG=ko_KR.utf8 로그아웃 후 다시 로그인하거나, 컴퓨터를 다시 시작하면 ...
Ubuntu 18.04 Server / Nginx, PHP, MariaDB 설치하고 설정하기
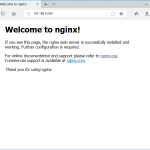
Nginx 설치 Nginx를 설치합니다. # apt install nginx 만약 방화벽을 사용하고 있다면 포트를 열어줍니다. # ufw allow 'Nginx Full' 서버 주소로 접속했을 때 다음과 같이 나오면 제대로 된 것입니다. 시작, 정지 등 Nginx를 시작합니다. # systemctl start nginx Nginx를 멈춥니다. # systemctl stop nginx Nginx를 재시작합니다. # systemctl restart nginx Nginx를 다시 로드합니다. # systemctl reload nginx Nginx를 설치하면 부팅 시 자동으로 시작하게 설정됩니다. 만약 자동 ...
MariaDB / 포트 변경 MariaDB의 기본 접속 포트는 3306입니다. 이를 다른 포트로 변경하고 싶다면 /etc/mysql/mariadb.conf.d/50-server.cnf를 수정합니다. port = 3306 을 찾아서 원하는 포트로 변경한 후 저장합니다. 그리고 MariaDB를 재시작합니다. service mysql restart MariaDB / Can't connect to MySQL server on ... (10061) 다음과 같은 에러를 만났다면... Can't connect to MySQL server on ... (10061) /etc/mysql/mariadb.conf.d/50-server.cnf에 있는 bind-address = 127.0.0.1 를 ...
dnf는 패키지를 관리하는 명령어이다. 도움말 도움말 보기 # dnf -h 목록 보기 패키지 목록 보기 # dnf list 그룹 목록 보기 # dnf grouplist 검색 zip을 키워드로 패키지 검색 # dnf search zip 정보 출력 zip 패키지 정보 출력 # dnf info zip Server with GUI 그룹 정보 출력 # dnf groupinfo 'Server with GUI' 설치 zip 패키지 설치 # dnf install zip httpd와 php 설치 # dnf install httpd php Server ...
파일 이름 바꾸기 mv는 파일을 이동시키는 명령어이다. 이 명령어를 이용해서 파일 이름을 바꿀 수 있다. 예를 들어 다음은 abc.txt를 xyz.txt로 바꾼다. # mv abc.txt xyz.txt 디렉토리 이름 바꾸기 디렉토리 이름을 바꾸는 것도 파일 이름 변경과 같다. 다음은 abc 디렉토리의 이름을 xyz로 바꾼다. # mv abc xyz