리눅스 / 명령어 / passwd / 사용자 암호 설정 명령어
사용자의 비밀번호 설정은 passwd 명령어로 한다.
비밀번호 만들기, 변경하기
- 사용자 jb의 비밀번호를 만들거나 변경한다.
passwd jb
사용자을 적지 않으면 현재 로그인한 사용자의 비밀번호를 만들거나 변경한다.
비밀번호 삭제하기
- 사용자 jb의 비밀번호를 삭제한다. 사용자는 비밀번호 입력 없이 로그인 가능하다.
passwd -d jb
비밀번호 잠그기, 잠금 풀기
- 사용자 jb를 잠근다. 즉, 사용자는 로그인하지 못한다.
passwd -l jb
- 사용자 jb의 잠금을 푼다.
passwd -u jb
비밀번호 만료시키기
- 사용자 jb의 비밀번호를 만료시킨다. 로그인하면 비밀번호를 변경하라고 한다.
passwd -e jb
사용법 출력하기
- 사용법과 옵션을 출력한다.
passwd -h
- 결과는 다음과 같다.
Usage: passwd [options] [LOGIN]

Options:
  -a, --all                     report password status on all accounts
  -d, --delete                  delete the password for the named account
  -e, --expire                  force expire the password for the named account
  -h, --help                    display this help message and exit
  -k, --keep-tokens             change password only if expired
  -i, --inactive INACTIVE       set password inactive after expiration
                                to INACTIVE
  -l, --lock                    lock the password of the named account
  -n, --mindays MIN_DAYS        set minimum number of days before password
                                change to MIN_DAYS
  -q, --quiet                   quiet mode
  -r, --repository REPOSITORY   change password in REPOSITORY repository
  -R, --root CHROOT_DIR         directory to chroot into
  -S, --status                  report password status on the named account
  -u, --unlock                  unlock the password of the named account
  -w, --warndays WARN_DAYS      set expiration warning days to WARN_DAYS
  -x, --maxdays MAX_DAYS        set maximum number of days before password
                                change to MAX_DAYS
현재 언어 확인하기 locale 명령어로 현재 언어를 확인할 수 있다. # locale LANG=en_US.UTF-8 LANGUAGE= LC_CTYPE="en_US.UTF-8" LC_NUMERIC="en_US.UTF-8" LC_TIME="en_US.UTF-8" LC_COLLATE="en_US.UTF-8" LC_MONETARY="en_US.UTF-8" LC_MESSAGES="en_US.UTF-8" LC_PAPER="en_US.UTF-8" LC_NAME="en_US.UTF-8" LC_ADDRESS="en_US.UTF-8" LC_TELEPHONE="en_US.UTF-8" LC_MEASUREMENT="en_US.UTF-8" LC_IDENTIFICATION="en_US.UTF-8" LC_ALL= 언어 추가하기 사용 가능한 언어는 locale -a로 확인할 수 있다. # locale -a C C.utf8 en_US.utf8 POSIX 예를 들어 한국어를 추가하고 싶다면 아래와 같이 명령한다. # apt install language-pack-ko locale -a로 설치 확인을 한다. # locale -a C C.utf8 en_US.utf8 ko_KR.utf8 POSIX 언어 변경하기 다음과 같이 명령하면 사용하는 언어가 한국어로 바뀐다. update-locale LANG=ko_KR.utf8 로그아웃 후 다시 로그인하거나, 컴퓨터를 다시 시작하면 ...

cat /etc/redhat-release # cat /etc/redhat-release CentOS Linux release 7.4.1708 (Core) cat /etc/*release* # cat /etc/*release* CentOS Linux release 7.4.1708 (Core) Derived from Red Hat Enterprise Linux 7.4 (Source) NAME="CentOS Linux" VERSION="7 (Core)" ID="centos" ID_LIKE="rhel fedora" VERSION_ID="7" PRETTY_NAME="CentOS Linux 7 (Core)" ANSI_COLOR="0;31" CPE_NAME="cpe:/o:centos:centos:7" HOME_URL="https://www.centos.org/" BUG_REPORT_URL="https://bugs.centos.org/" CENTOS_MANTISBT_PROJECT="CentOS-7" CENTOS_MANTISBT_PROJECT_VERSION="7" REDHAT_SUPPORT_PRODUCT="centos" REDHAT_SUPPORT_PRODUCT_VERSION="7" CentOS Linux release 7.4.1708 (Core) CentOS Linux release 7.4.1708 (Core) cpe:/o:centos:centos:7

Rocky Linux 9 / SSH / 포트 변경하는 방법
SSH는 22 포트를 사용한다. 알려진 포트이므로 다른 포트로 변경하는 것이 보안상 좋다. Rocky Linux 9에서 SSH 포트 변경하는 방법은 다음과 같다. 포트를 1980으로 바꾼다고 가정한다. /etc/ssh/sshd_config에서 다음의 코드를... #Port 22 다음으로 변경한다. Port 1980 SELINUX가 활성화되어 있다면 다음과 같이 명령하여 1980 포트를 사용할 수 있게 만든다. semanage port -a -t ssh_port_t -p tcp 1980 만약 다음과 같은 ...
Ubuntu 16.04 Server / 고정 IP 설정하는 방법
네트워크 설정 파일은 /etc/network/interfaces이다. 우분투를 DHCP로 설치했다면 설정 파일의 내용은 다음과 비슷하게 되어 있다. # The primary network interface auto enp0s3 iface enp0s3 inet dhcp 이를 다음처럼 변경하고 저장한다. xxx.xxx.xxx.xxx는 네트워크 환경에 맞게 수정한다. # The primary network interface auto enp0s3 iface enp0s3 inet static address xxx.xxx.xxx.xxx netmask xxx.xxx.xxx.xxx gateway xxx.xxx.xxx.xxx dns-nameservers xxx.xxx.xxx.xxx 다음과 같이 명령하여 네트워크를 재시작한다. systemctl restart networking.service 만약 위와 같이 해도 ...
Ubuntu / 특정 패키지만 업그레이드 하기, 보안 업데이트만 업그레이드 하기
우분투 서버에 접속하면 업데이트가 필요한 패키지가 있는지 알려줍니다. 두 가지 분류로 알려주는데, 하나는 패키지 업데이트, 또 하나는 보안 업데이트입니다. 소프트웨어는 보통 최신 버전을 유지하는 것이 좋지만, 업그레이드했을 때 문제가 없는지 충분히 확인을 해야 합니다. 따라서 특정 패키지만 업그레이드를 하거나, 보안 업데이트만 해야 하는 경우가 발생하는데, 어떻게 그런 작업을 하는지 알아보겠습니다. 특정 ...
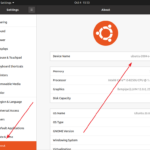
Ubuntu 20.04 Server / hostname 확인하는 방법, 변경하는 방법
hostname 확인하는 방법 방법 1 - 명령어로 확인하기 다음과 같이 명령하면 hostname을 출력한다. hostname 방법 2 - 설정 파일 열어서 확인하기 /etc/hostname 파일에 hostname이 있다. cat /etc/hostname hostname 변경하는 방법 방법 1 - 명령어로 변경하기 다음과 같이 명령하면 hostname이 abc로 바뀐다. hostnamectl set-hostname abc 방법 2 - 설정 파일 열어서 변경하기 텍스트 에디터로 /etc/hostname 파일을 열어서 내용을 abc로 바꾸면 hostname이 abc로 바뀐다. 재부팅 재부팅을 하면 변경사항이 ...
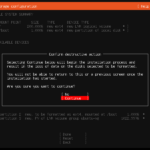
다운로드 Ubuntu Server 다운로드 페이지는 다음과 같다. https://ubuntu.com/download/server 최신 버전에 대한 안내가 주로 있으므로, 구버전을 다운로드하고 싶다면 아래 링크가 편하다. https://mirror.kakao.com/ubuntu-releases/ 가상 머신에 설치한다면 다운로드한 ISO 파일을 그대로 사용하면 되고, 물리 서버에 설치한다면 Rufus 같은 툴을 이용하여 부팅 USB를 만든다. 설치 설치 미디어로 부탕하고 잠시 기다리면 언어를 선택하는 화면이 나온다. 원하는 언어를 선택하고 엔터키를 누른다. 키보드 레이아웃을 정하고 ...
리눅스 / 명령어 / alias / 명령어 별칭 만들기
긴 명령어 또는 복잡한 명령어를 자주 사용한다면 alias를 사용하자. 시간을 많이 절약할 수 있다. alias 목록 보기 alias를 실행하면 현재 등록된 alias를 출력한다. alias 예를 들어 ll을 실행한다는 것은 ls -alF를 실행하는 것과 같다. alias egrep='egrep --color=auto' alias fgrep='fgrep --color=auto' alias grep='grep --color=auto' alias l='ls -CF' alias la='ls -A' alias ll='ls -alF' alias ls='ls --color=auto' alias 만들기 alias는 다음과 같이 만든다. abc를 실행하는 ...
리눅스가 OS인 서버의 시간과 실제 시간을 동기화하는 방법 중의 하나는 ntp를 이용하는 것입니다. CentOS 7에 ntp를 설치하고 설정하는 방법을 요약합니다. ntp 설치 yum install ntp 동기화할 서버 주소 가까운 곳에 있는 시간 서버를 사용하는 게 좋습니다. (하지만, 설정을 변경하지 않아도 큰 문제는 없습니다.) 서버 주소는 http://www.pool.ntp.org/에서 구할 수 있습니다. 지역을 아시아로 했을 때의 서버 주소는 다음과 같습니다. server 0.asia.pool.ntp.org server ...
Rocky Linux 8 / root 계정으로 ssh 접속 가능하게 설정하는 방법
Rocky Linux를 설치할 때 가능하게 설정하지 않았다면, root 계정으로 ssh 접속을 할 수 없다. 보안 상 권장되는 설정이나, 테스트나 공부 목적 등으로 root 계정으로 ssh 접속하는 게 더 좋은 상황이라면, 다음과 같이 하여 접속을 허용할 수 있다. vi나 nano 같은 텍스트 에디터로 /etc/ssh/sshd_config 파일을 연다. 제일 밑에 다음 코드를 추가하고, 저장한다. PermitRootLogin yes 다음과 같이 ...