Car Tires / How to Read Tire Sizes and Specifications
You can read a tire’s size from a sidewall marking such as P215/65R15 95H. In this example, 215 is the nominal section width in millimeters, 65 is the aspect ratio in percent, R means radial construction, 15 is the rim diameter in inches, and 95H gives the load index and speed rating. Before buying replacements, check the vehicle’s tire information placard and owner’s manual rather than relying only on the tires currently fitted.
How to break down P215/65R15 95H
This is an example of a passenger-car tire marking, not a fitment recommendation for your vehicle. The first part describes type, dimensions, and construction; the final part describes load and speed classifications.
| Marking | Meaning | How to read the example |
|---|---|---|
| P | P-metric passenger-car sizing | Indicates the passenger category. Euro-metric sizes may have no initial letter; that does not indicate a defective or unusual product. |
| 215 | Nominal section width | 215mm from one sidewall to the other. This is not necessarily the width of the tread touching the road. |
| 65 | Aspect ratio | The section height is 65% of the section width. It does not mean a height of 65mm. |
| R | Radial construction | Describes the arrangement of the internal cords. In this position, R does not mean radius or a speed rating. |
| 15 | Nominal rim diameter | For a 15-inch rim, not a tire with an overall diameter of 15 inches. |
| 95 | Load index | Corresponds to a maximum of 690kg per tire under specified conditions, not 95kg. |
| H | Speed rating | A 210km/h rating under specified test conditions. It is not permission or a recommendation to drive at that speed on the road. |
Other prefixes include LT for light-truck tires and T for temporary spares. P-metric and sizes without a prefix can have different load applications even when their numbers match, so check the letters too. See Bridgestone’s guide to reading tire sizes for the marking systems and locations.
Calculate section height and overall diameter
The aspect ratio is section height divided by section width. The example’s nominal section height is 215 × 0.65 = 139.75mm. Tires with the same aspect ratio can have different heights: a 225mm-wide tire with a 65 aspect ratio has a nominal section height of 146.25mm. The aspect ratio alone does not establish equal height.
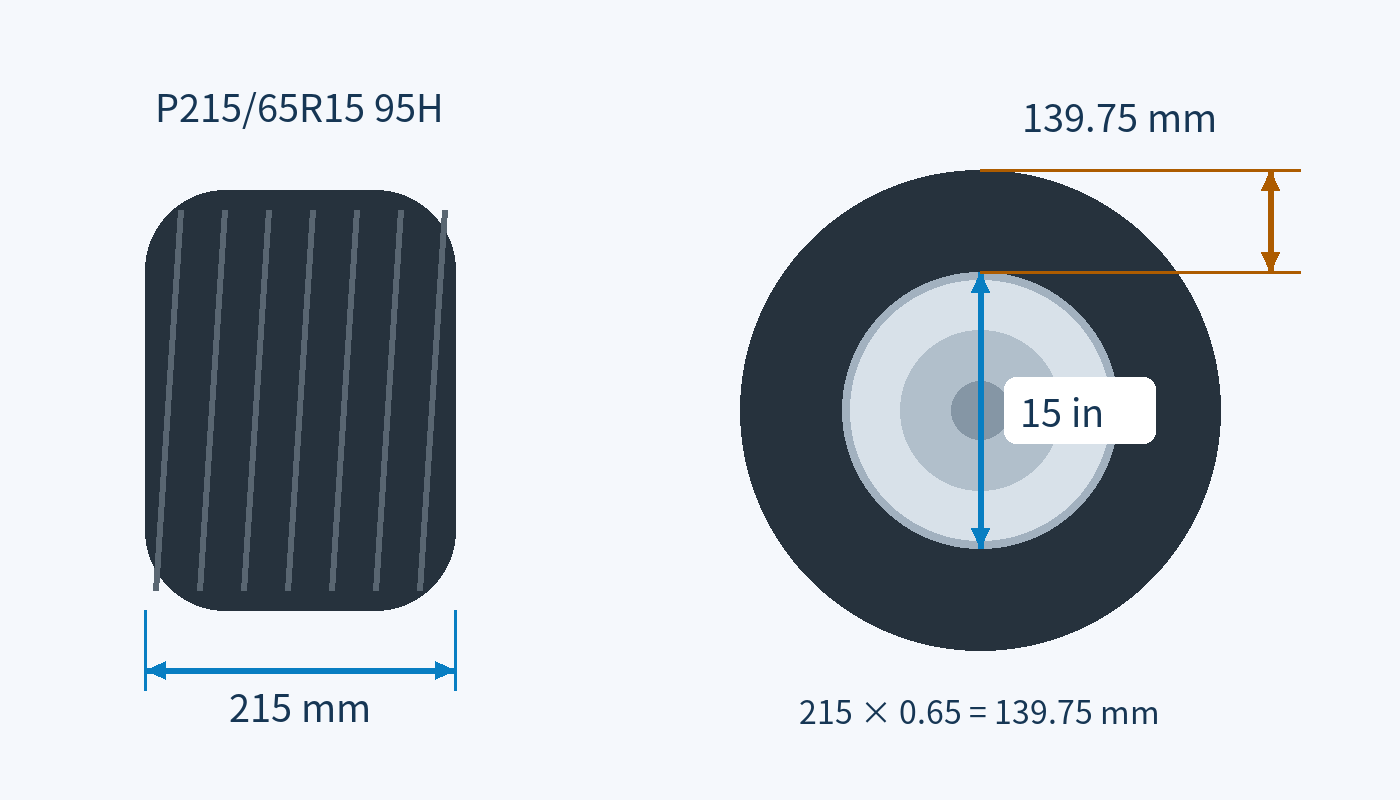
In the diagram, 215mm is section width, 139.75mm is one sidewall’s section height, and 15in is rim diameter. This is a schematic explaining the dimensions, not a scale engineering drawing. Rim diameter refers to the bead-seat diameter; do not confuse it with a measurement across the wheel’s outer lip.
The theoretical overall diameter is 15 × 25.4 + 2 × 139.75 = 660.5mm. These are nominal dimensions, however, and do not directly establish the actual dimensions or loaded rolling circumference. This calculation explains the marking; it does not approve a change to another tire size.
Understand load index and speed rating limits
The 690kg associated with load index 95 is the maximum capacity of one tire under specified conditions. Multiplying by four gives 2,760kg, but that is not your vehicle’s permissible gross weight or extra payload. Vehicle and axle limits, actual load distribution, and inflation requirements also matter. See Michelin’s load and speed specification guide for the corresponding values.
| Speed symbol | Corresponding speed |
|---|---|
| S | 180km/h |
| T | 190km/h |
| H | 210km/h |
| V | 240km/h |
The symbols do not follow a simple alphabetical order: H falls between U and V. Test conditions differ from real driving, so wear, damage, and underinflation cannot be ignored. Bridgestone’s explanation of speed ratings also cautions against treating the rating as a recommended driving speed. Check that replacements meet the vehicle manufacturer’s specified load index and speed rating.
Read the date code and pressure markings
On tires using U.S. DOT markings, the last four digits of the Tire Identification Number (TIN) give the production week and year. For example, 2525 means week 25 of 2025, not a month or day. The date portion may appear on only one sidewall. Check the other side if necessary, but do not crawl unsafely under the vehicle; ask a tire shop to check if access is difficult.
The sidewall maximum pressure, such as MAX PRESS, is different from the vehicle’s recommended pressure. Follow the recommended cold pressures on the vehicle’s tire placard, often near the driver’s door, or in the owner’s manual. Values may differ front to rear or with load conditions. Cold means the tires have not been heated by driving; the U.S. National Highway Traffic Safety Administration (NHTSA) describes this as not having driven for at least three hours.
The date code identifies age; it does not by itself guarantee remaining service life or safety. Check wear, cracks, bulges, damage, and the manufacturer’s usage and replacement guidance as well. See NHTSA’s tire safety guidance for date codes and cold-pressure principles.
M+S, 3PMSF, XL, and mounting-direction markings
- M+S: Stands for Mud and Snow. This marking alone does not establish that the tire passed a certified snow-performance test.
- 3PMSF: Stands for Three-Peak Mountain Snowflake and appears as a mountain with three peaks and a snowflake. It indicates that the tire meets a specified snow-performance test standard. Some all-season/all-weather products also carry it; it does not guarantee every aspect of ice grip, braking, or winter performance. Michelin’s winter tire marking guide distinguishes M+S from tested 3PMSF performance.
- XL, Extra Load, or Reinforced: Indicates a reinforced specification for higher loads. Check the required load index and inflation conditions together. Fitting these tires does not increase the vehicle’s permitted payload.
- ROTATION arrow: Shows the required direction of rotation for a directional tire.
- OUTSIDE and INSIDE: Identify the outward- and inward-facing sides of an asymmetric tire. These are different from a rotation arrow; follow the actual product’s mounting instructions.
A checklist before replacing tires
- Find the vehicle’s requirements first. Check the placard and manual for specified sizes, approved alternatives, and front/rear differences. Do not assume the currently fitted tires are correct.
- Compare the complete marking. Check width, aspect ratio, construction, and rim diameter, plus load index, speed rating, and any required XL or other specification.
- Verify wheel and vehicle compatibility. Matching rim diameter alone does not establish suitable rim width, clearance, or load capacity. Before changing sizes, have a qualified tire professional confirm manufacturer approval and tire/wheel suitability.
- Check usage and mounting requirements. Choose a product appropriate to the season and climate and check directional or asymmetric markings. Follow the manufacturer’s mixing and rotation guidance for vehicles with different front/rear sizes or all-wheel drive.
- Check pressure and condition after installation. Verify recommended cold pressures. If the vehicle has a Tire Pressure Monitoring System (TPMS), follow the manual’s required reset or relearn procedure. Have vibration, interference, or warning lights investigated.